We collect data to keep information neat and easy to understand. Data can be shown in tables, pictographs, or bar graphs. These help us compare, count, and read information quickly in real life.
Collecting Data
Collecting data means gathering information about people, things, or activities.
We usually ask questions and record answers neatly in a table.
Tables show data in rows and columns, which makes it easy to read.
Reading and Understanding Tables
A table helps us organise numbers.
Each row and column tells us something different.
We can count, add, or compare numbers quickly.
What is a Pictograph?
A pictograph is a way of showing information using pictures or symbols instead of numbers.
Each picture stands for some items, like one book picture can mean 5 books.
Pictographs make data fun to read and much easier than long tables.
What Does Each Picture Mean?
In a pictograph, every picture has a value.
This value is called the scale.
Example:
1 picture = 5 items
1 picture = 10 people
The scale helps us know the real number behind the pictures.
Can We Use Different Scales?
Yes, we can use different scales depending on the data.
For small numbers, use 1 picture = 1 item.
For large numbers, use 1 picture = 10 or 20 items.
The right scale makes the pictograph neat and easy to read.
Why Are Pictographs Useful?
They make big numbers easy to understand.
We can compare groups quickly just by looking at the pictures.
They are interesting and fun to see.
They are useful in real life when we want to share information clearly.
What to Look for in a Pictograph
Title – tells us what the pictograph is about (e.g., fruits, pets).
Labels – show what is being counted (e.g., names, days).
Symbols/Pictures – show what picture is used and how many there are.
Scale – tells us how many items one picture stands for.
Key – a small note that explains the value of each picture.
Child TV Reporter
Samaira and Kabir decided to act like reporters and collect information from their friends. To do this, they asked 35 of their friends, “How many hours a day do you spend watching TV?” and carefully recorded their responses in a notebook. The collected data was organised in a table, which shows how much time each child spends watching TV. Based on this information, we will answer a few questions related to their TV viewing habits. Look at the table and answer the following questions.
1. How many children watch TV for more than half an hour?
→ Children who watch for 1 hour, 1½ hours, 2 hours, and more than 2 hours: 10 + 9 + 5 + 3 = 27 children 2. How many children watch TV for less than two hours? → Children who watch for ½ hour, 1 hour, and 1½ hours: 8 + 10 + 9 = 27 children 3. The number of children who watch TV for more than two hours is → 3 4. More children watch TV for two hours than for half an hour. (True/False) → 2 hours: 5 children → ½ hour: 8 children → False
Stock-Taking in a Shop
Joseph Uncle wanted to check how many play items he had in his store before the summer break. These items included toys, board games, and sports items. To record this information easily, he decided to use a pictograph.
Since there were too many items to draw individually, Dipesh, his helper, suggested using one picture to represent 5 items. This made the pictograph neat and easy to understand.
Now, let’s read the pictograph and answer the questions based on it.
(1) How many toys does Joseph Uncle have? → There are 7 toy icons. → Each icon = 5 toys → 7×5=35 toys
(2) How many board games does Joseph Uncle have? → There are 10 board game icons. → Each icon = 5 board games → 10×5=50 board games
(3) How many total play items does Joseph Uncle have? → Toys = 35 → Board Games = 50 → Sports Items = 12 icons × 5 = 60 → 35 +50+60=145 total play items
Is there any other scale that you can use to make the pictograph? Choose your scale and show the same data using a pictograph in your notebook. Ans: Yes, we can use a different scale, such as 1 icon = 10 items, to make the pictograph simpler and easier to read. Using this new scale, the number of icons required would be fewer. For example, for toys (35 items), we would use 3 full icons and 1 half icon; for board games (30 items), we would need 3 full icons; and for sports items (40 items), we would use 4 full icons. This new scale helps in representing the data more compactly while still maintaining accuracy.
Two-wheelers on the road
Deepti observed the number of two-wheelers passing by her house during one hour on three different days. To show her findings clearly, she created a pictograph.
In the pictograph, each icon represents 3 two-wheelers. This helps her show large numbers quickly using fewer pictures.
Observe the pictograph and answer the following questions.
1. Which day had the most two-wheelers passing her house? → Friday (There are 12 icons, meaning 12×3=36 two-wheelers) 2. How many total two-wheelers did she record over three days? → Monday: 8 icons → 8×3=24 two-wheelers → Wednesday: 4icons → 4×3=12 two-wheelers → Friday: 12 icons → 12×3=36 two-wheelers → 24 +12+36=72 two-wheelers
3. How many fewer two-wheelers were seen on Wednesday than on Monday? → 24−12=12 fewer two-wheelers
4. How many more two-wheelers were seen on Friday than on Wednesday? → 36 −12=24 more two-wheelers
5. Choose any other scale and represent the same data using a pictograph → We can choose a new scale: 1 icon = 6 two-wheelers → Using this scale: Monday (24 two-wheelers): 4 full icons Wednesday (12 two-wheelers): 2 full icons Friday (36 two-wheelers): 6 full icons
What is a Bar Graph?
A bar graph shows information using bars (rectangles).
The length or height of the bar shows the number or amount.
The taller or longer the bar, the greater the number.
Bar graphs help us see and compare information quickly.
Why Are Bar Graphs Useful?
They make it easy to compare different things.
We can quickly see which item has the highest or lowest value.
By just looking at the bars, we can understand the data quickly.
They help us spot patterns, like what is increasing or decreasing over time.
What Does a Bar Graph Look Like?
Title – tells what the bar graph is about.
Bars – rectangles that show the value for each item.
Labels – written on the X-axis (side to side) and Y-axis (up and down) to tell what the bars represent.
Scale – shows how much each line or mark on the axis stands for.
Equal spacing and width – all bars must have the same width and be spaced evenly apart.
What is a Scale?
The scale in a bar graph is like a measuring ruler.
It tells us how much each step or line is worth.
A small scale (like 1 line = 1 item) is used for small numbers.
A bigger scale (like 1 line = 10 items) is used for large numbers.
Choosing the right scale makes the bar graph clear and easy to read.
Vertical and Horizontal Bar Graphs
Vertical bar graph – bars go upwards (most common).
Horizontal bar graph – bars go sideways (used when labels are long or for easier reading).
A bar graph is a simple and smart way to show information using bars. It helps us compare, count, and understand data quickly. Once we know how to read the labels, bars, and scale, we can use bar graphs to solve real-life problems, do schoolwork, or even share surveys and reports. Let us understand the difference between a bar graph and a pictograph using the following example:
Pictograph vs Bar Graph
Pictographs use pictures; bar graphs use bars.
Pictographs are fun but less exact.
Bar graphs are neat and show exact numbers.
Both are useful for different situations.
Example: Raman’s daily routine (pictograph) vs. Sheela’s routine (bar graph).
Recording a Day
One day, Raman and Sheela decided to record how they spent their day. Raman recorded his daily routine in the table below:
Sheela recorded her routine in the following manner:How is Sheela’s recording different from Raman’s recording?
Sheela showed her daily routine using a bar graph Raman, on the other hand, used a pictograph.
Observe Raman’s and Sheela’s routines and answer the following questions. 1. Whose daily routine shows more time spent on sleeping? → Raman
Raman sleeps for 9 hours (9 boxes).
Sheela sleeps for 8 hours (bar reaches 8).
2. Who spends more hours in school? → Sheela
Raman: 6 hours
Sheela: 7 hours
3. How many more hours does Sheela spend studying compared to Raman? → 2 more hours
Raman: 2 hours
Sheela: 4 hours
Difference: 4−2=2 hours
4. Is there any activity on which they spend the same amount of time? If yes, name the activity → No
5. Based on their data, whose routine do you think is more balanced? Why? → Sheela’s routine seems more balanced because she divides her time more evenly between sleeping, school, studying, playing, and other activities. Raman spends a lot more time sleeping and less time studying, which makes his routine less balanced for a student.
Food Wastage in the School Canteen
Rani stays in a residential school. Her school’s dining hall displays the amount of food wasted and the number of children the food could have fed. Given below is the data collected over the weekdays for different food items.
Rani was shocked to see the data. What do you think about food wastage? How can we reduce the wastage of food? What can we do with the leftover food?
Observe the above graph and answer the following questions.
Observations from the graph:
Sandwich (Monday): 5 kg
Paratha (Tuesday): 6 kg
Khichdi (Wednesday): 8 kg
Puri-Sabzi (Thursday): 7 kg
Idli-Sambar (Friday): 4 kg
Which food item had the highest amount of wastage? → Khichdi (Wednesday) – 8 kg
Which food item had the least amount of wastage? → Idli-Sambar (Friday) – 4 kg
How much total food wastage was recorded in these days?→ 5+6+8+7+4=30 kg
If 1 kg of food waste can feed 3 children, how many children could have been fed with the total food wasted? → 30 × 3 = 90 children
_______ day had less food wastage than _______ day. → Friday had less food wastage than Monday (Or any correct pair like Monday < Tuesday, Tuesday < Wednesday, etc.)
If the same food items are to be repeated next week, can you predict which food item is likely to be wasted the most? → Khichdi is likely to be wasted the most, based on the current data.
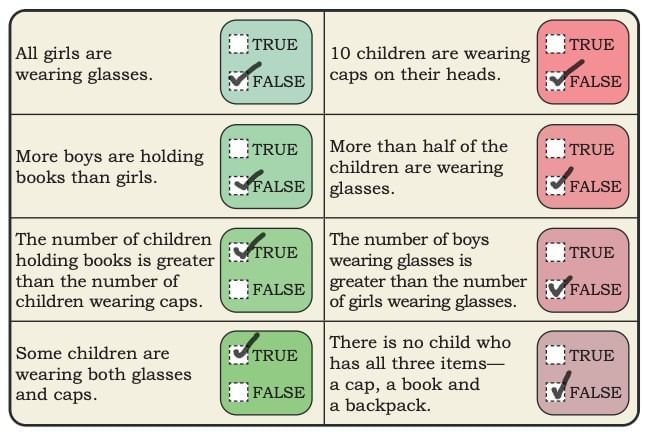
True or False
Observe the above picture. Based on your observation, find out which of the following statements are true or false.
Have you ever wondered how birds like the Siberian Crane travel so far and still return to the same place? Or how do we find our way in a new place like a zoo or bird sanctuary? Just like road signs guide us, maps and directions help us reach our destination. In this chapter, you will learn how to find directions using the sun or a compass, read and draw maps, follow routes, guide an ant through a maze, and use coordinates to locate animals in a zoo. With fun puzzles and activities, you’ll become a map master and explore anywhere with ease!
Finding Directions: Face the Rising Sun!
Do you know one simple way to find directions without using a compass? Let’s try this fun activity together!
Steps to be followed: 1. Go outside early in the morning or imagine you are standing in a field. 2. Now, face the rising sun. The direction you are facing is called East. The sun always rises in the East! 3. Stretch out your arms to your sides.
Your left hand is now pointing towards the North.
Your right hand is pointing towards the South.
And the direction behind you is West – that’s where the sun sets.
You’ve just found all four cardinal directions — East, West, North, and South — just by facing the sun! Isn’t that cool?
Remember:
Let us perform some activities to understand directions better:
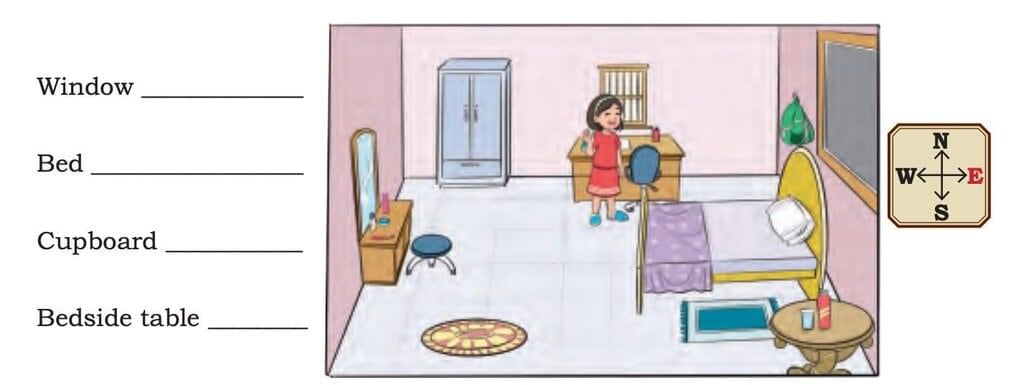
1. Observe the picture above and answer the following:
Manu is facing the rising Sun. That direction is East. His left hand is pointing in the North direction. His right hand is pointing in the South direction. West is behind him. 2. Write the directions of the following with the girl.
Ans:
Window — North Bed — East Cupboard — West Bedside table — South
Let’s Learn About Maps!
Have you ever used a map while going on a trip or playing a treasure hunt game?
A map is a special drawing that shows the layout of places – like streets, parks, schools, or even a zoo! Maps help us find places, plan routes, and know which direction to go.
What Does a Map Show?
Places – Like houses, roads, parks, shops, or famous monuments
Symbols – Small pictures or signs that stand for things
Directions – Maps usually have a direction arrow showing North (N), so we can figure out East, West, and South too
Routes – Lines or paths that show how to go from one place to another
Key or Legend – A box that explains what the symbols on the map mean
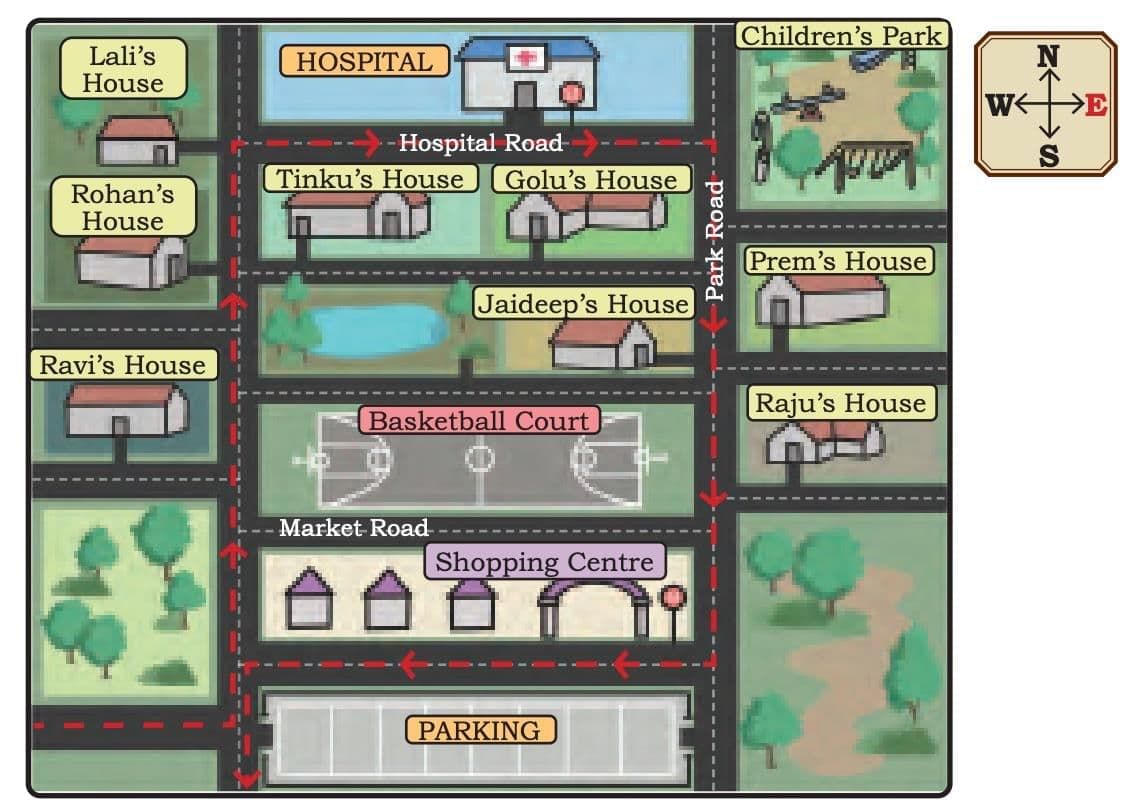
Now, Let’s Use a Map!
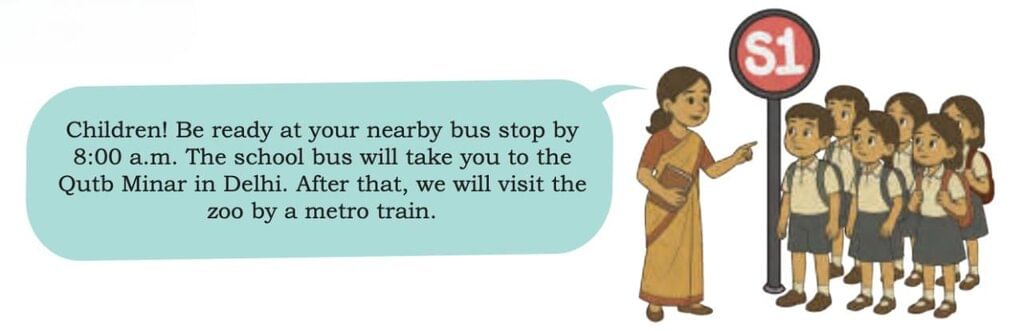
1. The street map shows the bus route with dotted lines. The bus will pick up children from Stop 1 and Stop 2 marked on the map.
Observe the map and help the children board the bus.
The bus will start from the parking area. It will go north and then it will take a right turn onto ___________ Road driving in the ___________ direction to reach Stop 1(S1). To reach Stop 2(S2), it will turn _______ (right/left) onto ___________ Road driving in the ___________ direction.
Ans: The bus will start from the parking area. It will go north and then it will take a right turn onto Market Road driving in the east direction to reach Stop 1 (S1). To reach Stop 2 (S2), it will turn left onto Temple Road driving in the north direction.
Bus Route
(a) Whose houses are situated to the east of Jaideep’s house?____________ (b) Mark the route from Ravi’s house to the children’s park. (c) Which stop is closer to Lali’s house? __________________ (d) Golu is running late. Trace the route to help him reach the nearest bus stop. (e) In which direction would Prem have to move to reach Stop 2?
Ans:
(a) Raju’s house and Prem’s house (b) From Ravi’s house → go north on Hospital Road → turn east to reach Children’s Park (c) Stop 1 (S1) (d) From Golu’s house → go north on Market Road → turn east to reach Stop 1 (S1) (e) North
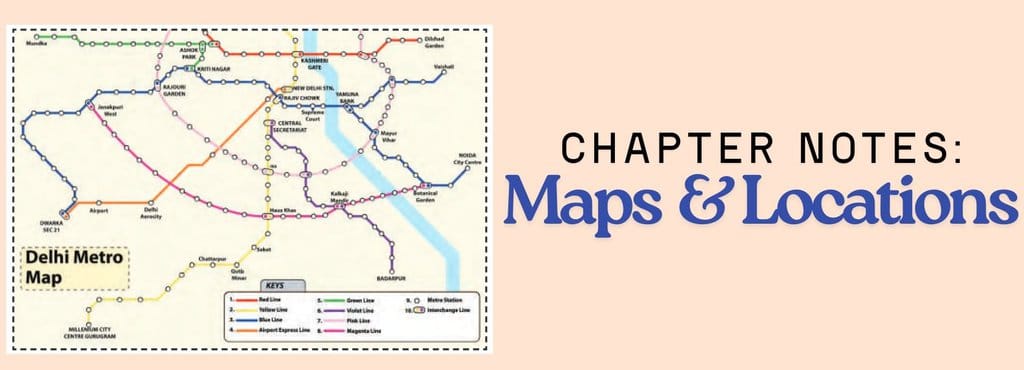
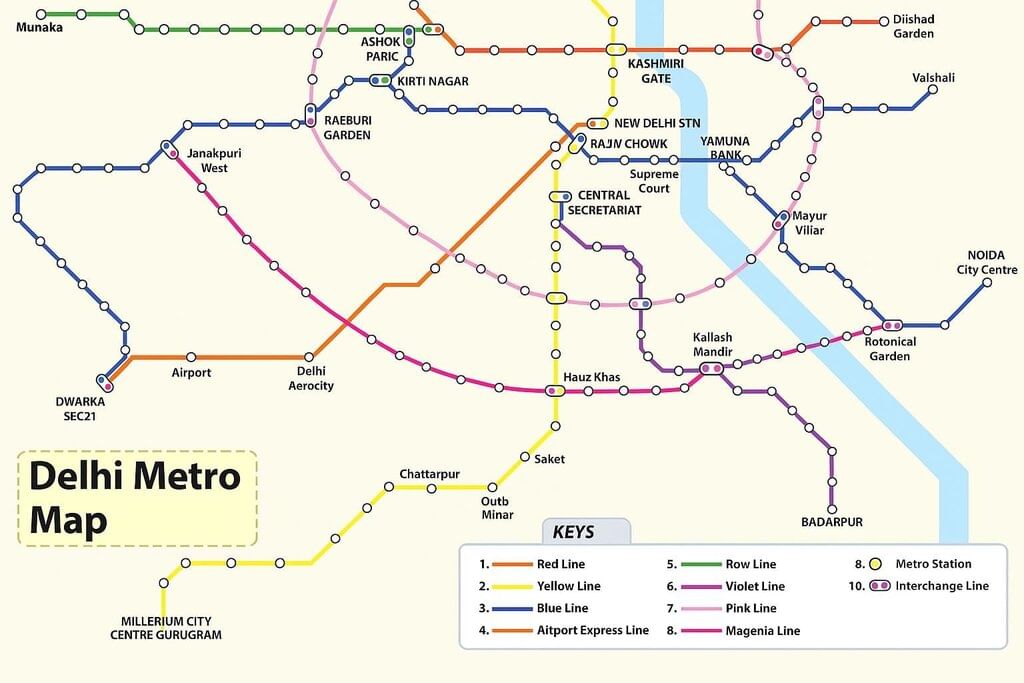
2. Children will get off the bus at the Qutub Minar metro station. To reach the zoo, they need to get off the metro at the Supreme Court metro station. Here is the metro map for your reference. Read the key to the symbols and identify them on the map. What do the different coloured lines represent? Mark the Qutub Minar station on the Yellow Line and the Supreme Court station on the Blue Line.
Study the map carefully and answer the questions that follow.
(a) Look at the metro map and trace different routes from the Qutub Minar metro station to the Supreme Court metro station. (b) Lali says, “We can take the Yellow Line and change the metro at Hauz Khas to take the Magenta Line.” If the children follow Lali’s suggestion, at which station(s) do they need to change the metro line again to reach the Supreme Court metro station? (c) Which route has the least number of stations between Qutub Minar and the Supreme Court? (d) Which metro route(s) do you think, is/are the best way to reach the zoo from Qutub Minar? __________________________
Ans:
(a) Possible routes from Qutub Minar (Yellow Line) to Supreme Court (Blue Line):
Qutub Minar (Yellow) → Central Secretariat (Change to Blue) → Supreme Court
Reason: This is the shortest, simplest route with only one interchange and minimal travel time.
Now that we have understood the concept of maps and directions, let us solve some questions:
1. To collect food, the ant can only crawl along the dotted lines on the grid. The arrows show the direction in which the ant can move.
Fill in the blanks below with the distances and the directions in which the ant must move from its starting position.
(a) To get to the laddoos, the ant has to crawl 2 cm towards the east. (b) To get to the sugar, the ant has to crawl ____cm in the _______direction. (c) To get to the bread, the ant has to crawl ____cm in the _______ direction; then ____cm in the _______direction. (d) To get to the apple, the ant needs to crawl ______ cm towards _________, and then ____cm towards _________, and finally ___cm towards______. Identify other routes to reach the point where Apple is located. Which one is the shortest?
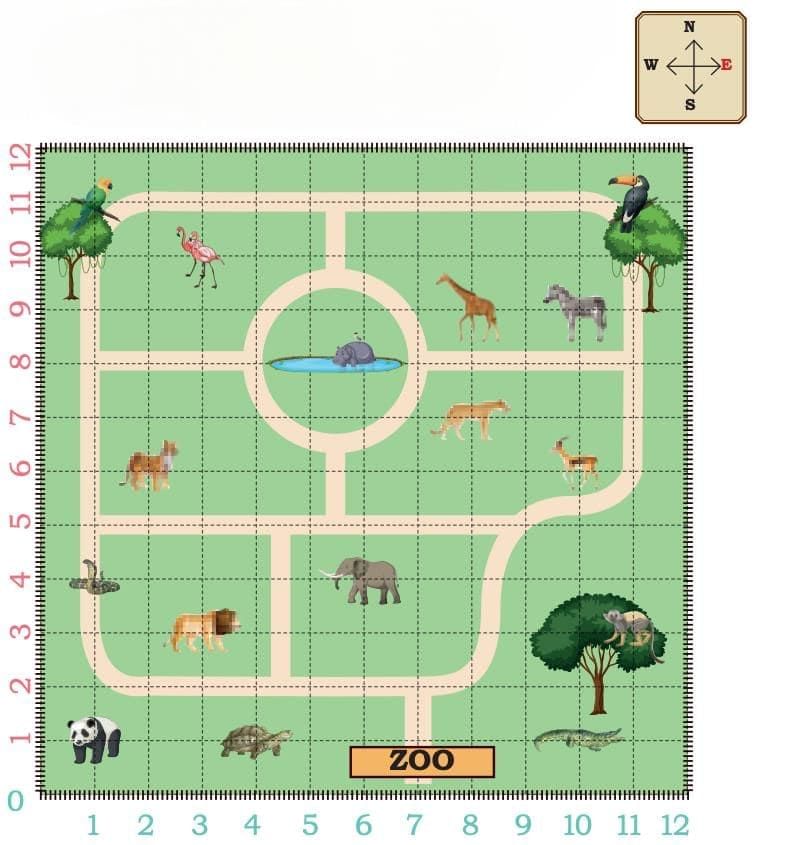
2. Locating the Animals in the Zoological Park (Zoo)
Children observe a map of the zoo drawn on a grid. Each vertical line (column) and horizontal line(row) is marked with a number. To reach the Panda, we will start from zero. Move one step horizontally east and reach the first column. Move up (vertically) one step north and reach the first row. The panda is where the first row and the first column meet.
We write the meeting point of the first row and the first column as (1,1).
To reach the tortoise, move ________ steps towards east and reach the_________ column.
Then move _______ step(s) _______ and reach the first _______.
The location of the tortoise is (4,1). What is at (1,4)?
Answer the following questions now:
1. Locate the animal at the following positions on the map.
Now you know how to find your way using directions, read maps, follow routes, and even use grids to locate places or animals. Maps are like secret guides that help us travel and explore without getting lost. So, whether you are going to a park, a zoo, or even a new friend’s house, you can be a smart explorer and find your way easily!
In this chapter, we will learn about factors and multiples and how they are related. A factor divides a number exactly, like 2 is a factor of 8 because 8 ÷ 2 = 4 with no remainder. A multiple is what you get when you multiply a number by a whole number, like the multiples of 3 are 3, 6, 9, 12, and so on. We will also explore common factors (factors shared by two or more numbers), common multiples (multiples shared by two or more numbers), and prime numbers (numbers that have only two factors: 1 and itself).What is a Factor?
A factor of a number is a number that can divide it completely without leaving any remainder.
Example: Factors of 8 are numbers that divide 8 exactly:
1 divides 8 exactly (8 ÷ 1 = 8)
2 divides 8 exactly (8 ÷ 2 = 4)
4 divides 8 exactly (8 ÷ 4 = 2)
8 divides 8 exactly (8 ÷ 8 = 1)
So, the factors of 8 are 1, 2, 4, and 8.
How to find factors?
Start with the number 1 and go up to the number itself.
Divide the number by each one.
If the division has no remainder, then that number is a factor.
Common Factors
When two or more numbers share the same factor, that factor is called a common factor.
Example: Find common factors of 12 and 18.
Factors of 12: 1, 2, 3, 4, 6, 12
Factors of 18: 1, 2, 3, 6, 9, 18
Common factors are the numbers that appear in both lists: 1, 2, 3, and 6.
How to find Common Factors?
Find all factors of the first number.
Find all factors of the second number.
See which factors appear in both lists.
Example 1:
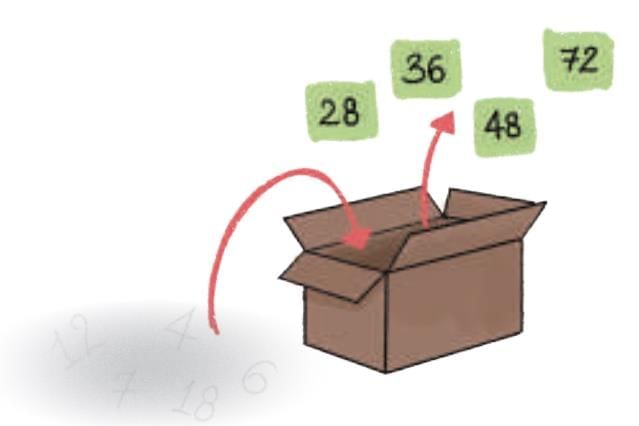
Sometimes, numbers are created by multiplying another number by the same value each time. If we know the final numbers, we can work backwards to find the multiplier. This also teaches us about common factors— numbers that can divide all given numbers exactly. Imagine a magic box. You put a number inside, the box multiplies it by a fixed number, and the result appears. In this activity, the numbers coming out of the box are 28, 36, 48, and 72.
We ask: (a) What could the multiplier be? (b) Could there be more than one multiplier? (c) What numbers might have been inside the box?
To solve this, we find numbers that divide all four outputs exactly. These are common factors.
(a) The multiplier could be 1, 2, or 4 because all the numbers 28, 36, 48, and 72 can be divided evenly by these numbers. (b) Yes, there could be more than one multiplier. For example, if the multiplier were 2, the inside numbers would be half of the given numbers. If it were 4, the inside numbers would be one-fourth of them. (c) The numbers that might have been inside the box depend on the multiplier:
If multiplier is 2 → inside numbers: 14, 18, 24, 36
If multiplier is 4 → inside numbers: 7, 9, 12, 18
If multiplier is 1 → inside numbers: 28, 36, 48, 72 This shows that the same output can come from different possible multipliers.
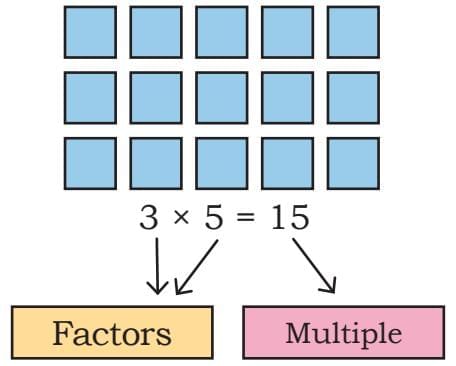
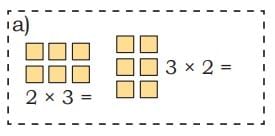
This activity shows that there can be more than one possible multiplier. It also helps us see that factors divide numbers exactly, while multiples are numbers made by multiplying. The same set of numbers can be made in different ways by choosing different multipliers.How to Identify Factors Using Arrays (Pairs)
A factor pair of a number is two numbers that multiply together to give that number.
For example, for 12:
1 × 12 = 12
2 × 6 = 12
3 × 4 = 12
So, the factors are 1, 2, 3, 4, 6, and 12.
If you try to arrange objects (like dots or blocks) in rows and columns, the number of rows and columns form factor pairs.Example 2:
One way to find the factors of a number is by arranging objects into arrays – rows and columns. Each arrangement shows a pair of factors that multiply to make the number.
Here, we see the number 15 can be arranged as 3 rows of 5. This tells us 3 × 5 = 15, so 3 and 5 are factors of 15. This can be seen in the following figure:
Similarly, the number 12 can be arranged as 3 × 4, 2 × 6, and 1 × 12. This tells us its factors are 1, 2, 3, 4, 6, and 12. This can be seen in the following figure:
Students, now try making arrays for numbers like 10, 14, 20, 25, and 32.
Try yourself:What are the factors of 24?
A.1, 2, 3, 6, 12, 24
B.1, 2, 3, 4, 6, 8, 12, 24
C.2, 3, 4, 6, 8, 12
D.1, 2, 4, 6, 8, 24
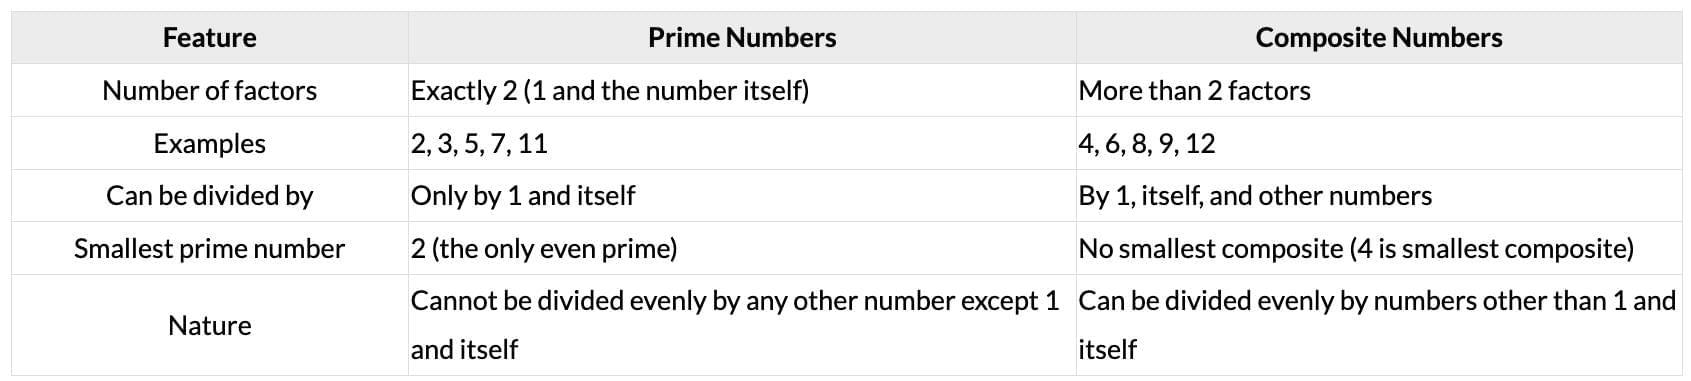
View SolutionPrime and Composite Numbers
Some numbers are called prime numbers because they have only two factors: 1 and the number itself. For example, 5 is prime because only 1 and 5 divide it exactly.
Other numbers have more than two factors; these are called composite numbers. For example, 12 is a composite number because it has many factors like 1, 2, 3, 4, 6, and 12.
Understanding the difference between prime and composite numbers helps us learn more about how numbers work:
Arrays make it easy to see all the factor pairs of a number. They also help us quickly identify prime numbers, which have only two factors – 1 and the number itself.What is a Multiple?
A multiple of a number is what you get when you multiply that number by any whole number.
Example: Multiples of 3 are:
3 × 1 = 3
3 × 2 = 6
3 × 3 = 9
3 × 4 = 12
and so on…
So, the multiples of 3 are 3, 6, 9, 12, 15, 18, …
How to find multiples?
Multiply the number by 1, 2, 3, 4, etc., and list the answers.Common Multiples
When two or more numbers share the same multiple, that multiple is called a common multiple.
Example: Find common multiples of 3 and 4.
Multiples of 3: 3, 6, 9, 12, 15, 18, 21, 24, …
Multiples of 4: 4, 8, 12, 16, 20, 24, 28, 32, …
Common multiples are: 12, 24, 36, …
How to find common multiples?
Write down multiples of the first number.
Write down multiples of the second number.
See which multiples appear in both lists.
Least Common Multiple (LCM)
The Least Common Multiple or LCM is the smallest number that is a multiple of two or more numbers.
In the example above, the smallest common multiple of 3 and 4 is 12.
How to find an LCM:
List the multiples of each number.
Identify the common multiples from the lists.
Choose the smallest common multiple.
That smallest common multiple is the LCM.
Example 3:
One sunny morning in the forest, Rabbit and Frog decided to have a jumping race. They both started from the same tree stump at position 0 on a long number line painted on the forest floor. Rabbit was fast but liked to take big leaps — 4 steps at a time. The frog was smaller but very quick, jumping 3 steps at a time.
As they hopped along, something interesting happened — they both landed on 12 at the same time! That was their first meeting point. After that, they met again at 24, then 36, and then 48.
The forest owl explained, “These meeting points are called common multiples — numbers that are in both the Rabbit’s list of multiples and the Frog’s list. The first one, where you meet, is called the Least Common Multiple, or LCM.”
Common multiples are numbers that appear in the multiplication tables of both numbers. The smallest one is the LCM, and all other common multiples are multiples of the LCM. When two jump patterns meet, the numbers they land on together are common multiples. Here, Rabbit and Frog’s LCM is 12, so all their common multiples are multiples of 12.
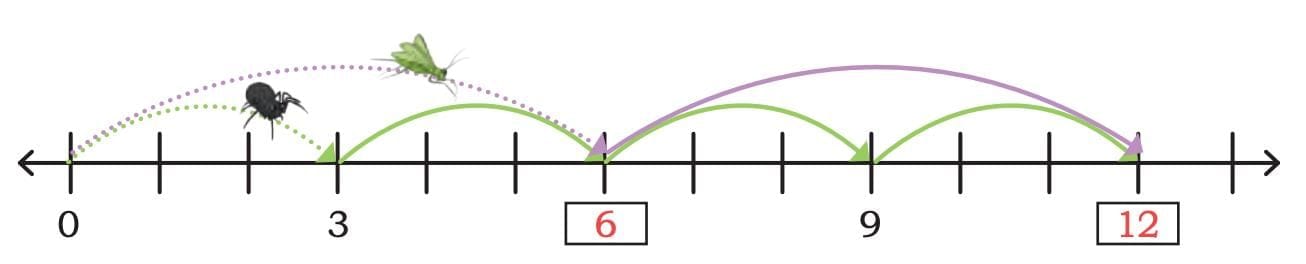
Example 4:
One bright morning, a spider and a grasshopper decided to practise jumping together on the number line. The spider was small but quick, hopping 3 steps each time: 0,3,6,9,12…… The grasshopper was stronger and leapt 6 steps each time: 0,6,12,24……
As they hopped along, they noticed something interesting — they both landed on 6 at the same time. That was their first meeting point. After that, they met again at 12, then 18, then 24, and so on.
The forest parrot explained, “The numbers where you both land together are called common multiples — numbers that appear in both your jumping lists. The first number where you meet is called the Least Common Multiple (LCM).”
In this case, because 6 is already a multiple of 3, every time the grasshopper lands, the spider lands there too. So all the grasshopper’s numbers are also common multiples. The smallest of these, 6, is the LCM of 3 and 6.
Common multiples are numbers that appear in the multiplication tables of both numbers. If one number is a multiple of the other, the larger one becomes the LCM. For jumps of 3 and 6, the common multiples are 6, 12, 18, 24, …, and the LCM is 6. When one number is a multiple of the other, the common multiples are just the multiples of the bigger number.Example 5:
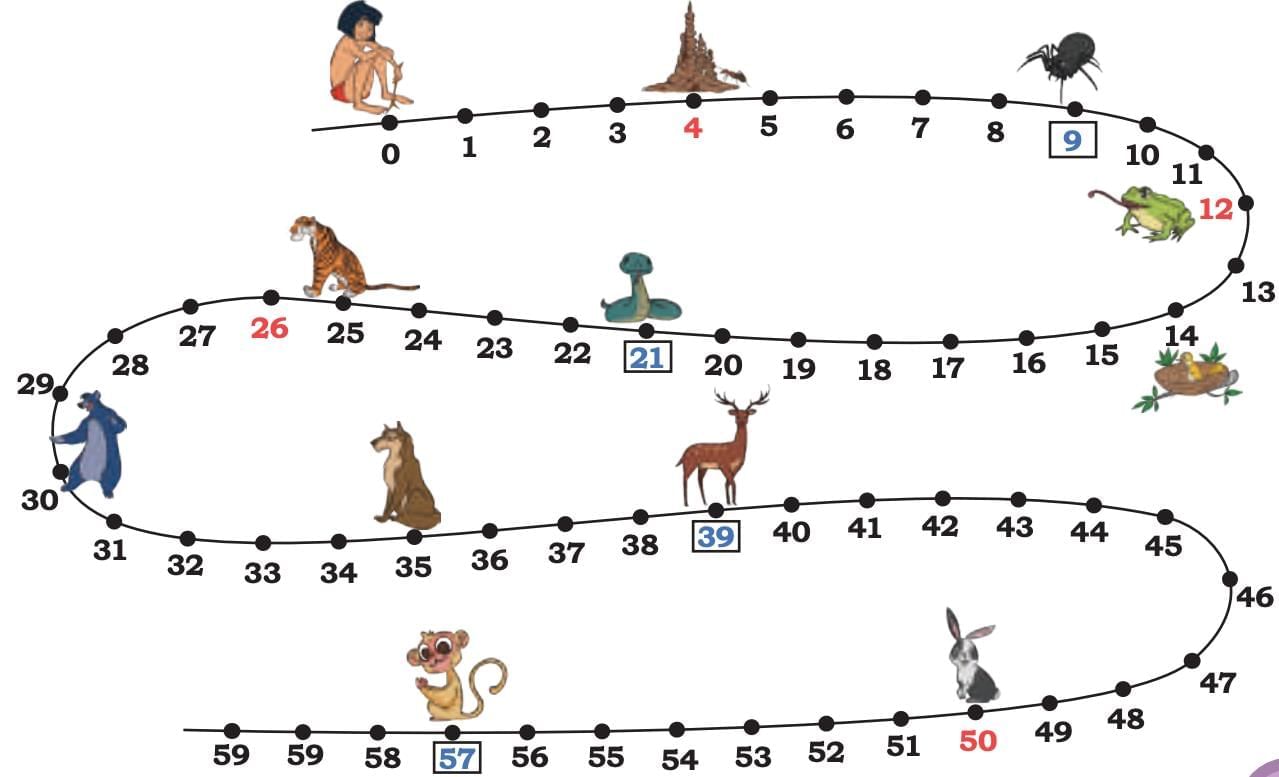
Mowgli was walking along a forest trail where his friends lived at different numbered spots. Starting from 0, he decided to visit his friends by jumping 2 steps at a time.
His jumps went like this: 0,2,4,6,8,10,12,14,16,18……
Looking at the positions on the trail, Mowgli realised he could meet:
The ant at position 4
The frog at position 12
The bird at position 14
The rabbit at position 50
All of these numbers can be divided exactly by 2. This means 2 is a common factor for all these positions — they are all multiples of 2.
When you take jumps of the same size and land on certain numbers, that jump size is a factor of all those numbers. If the same jump works for multiple positions, that number is their common factor. Jumping by 2 steps lets Mowgli meet all friends whose house numbers are multiples of 2. This shows that 2 is a common factor of those numbers.
Try yourself:Which of the following lists shows the first five multiples of 15?
A.15, 25, 35, 45, 55
B.10, 20, 30, 40, 50
C.15, 30, 45, 60, 75
D.1, 3, 5, 15, 30
View SolutionHow to Use Factors and Multiples?
Factors help us divide or break numbers apart.
Multiples help us build numbers up by repeated addition or multiplication.
Common factors and multiples help us solve problems like sharing things equally, finding common timings for events, or arranging objects neatly.
Conclusion
In this chapter, we learned about factors and multiples, two important ideas in numbers. A factor is a number that divides another number exactly without leaving any remainder. Multiples are numbers we get when we multiply a number by whole numbers like 1, 2, 3, and so on. Some numbers share factors, which we call common factors, and some share multiples, called common multiples. The smallest common multiple of two numbers is called the Least Common Multiple or LCM. We also learned about prime numbers, which are special numbers that have only two factors: 1 and themselves. Understanding factors and multiples helps us solve many math problems and real-life situations like sharing things equally and finding common timings.
Time helps us know when things happen and how long they last. Everyday activities—like waking up, going to school, playing, or sleeping—happen at certain times. We measure time in hours, minutes, and seconds. In this chapter, you will learn how hours and minutes are used for most daily activities, while seconds are used for very quick actions like a race, a blink, or turning a page.
What Are Seconds, Minutes, and Hours?
Time is like an invisible ruler that measures how long things take. But instead of using centimetres or metres, we use seconds, minutes, and hours. The smallest unit we often use is a second.
A second is very quick — it’s about the time it takes to blink your eyes, snap your fingers, or say the word “go!” Sixty of these tiny moments make 1 minute.
A minute is a little longer — enough time to take a sip of water, tie your shoelaces, or read a short paragraph in a book. One minute = 60 seconds.
An hour is made of 60 minutes, which means it has 3,600 seconds in total! That’s a lot of seconds. An hour is long enough to watch a cartoon, do a short homework assignment, or play outside with friends before coming back in.
Here’s a quick way to remember:
Seconds are for quick actions.
Minutes are for short tasks.
Hours are for long activities.
Next time you do something, think about it — should you measure it in seconds, minutes, or hours? You’ll start to see time in a whole new way!
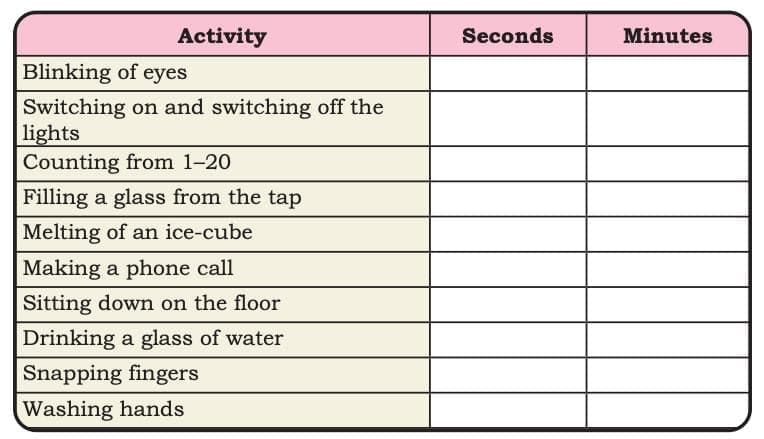
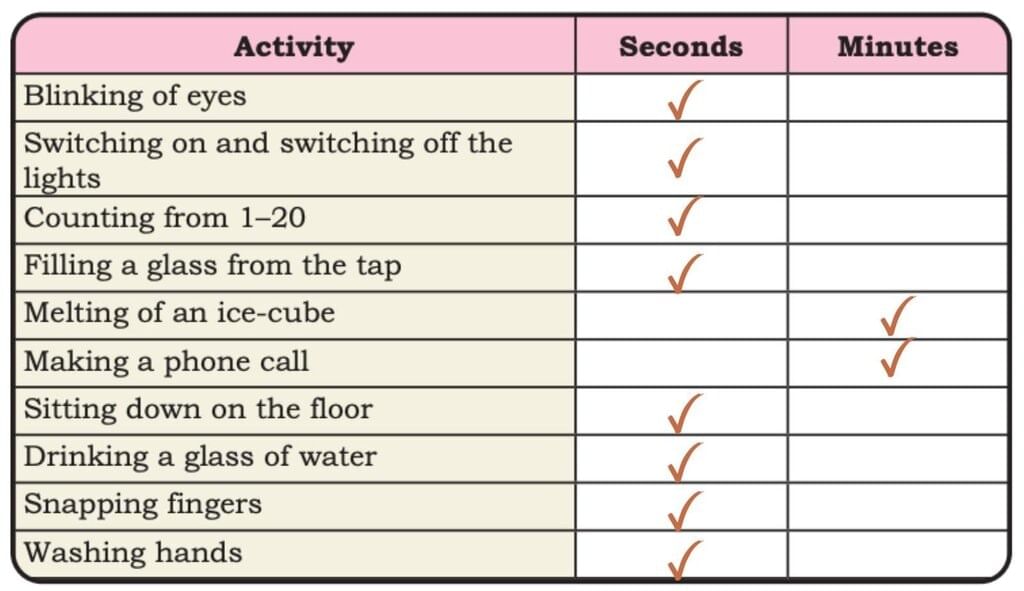
Example: Estimate whether you would take seconds or minutes to complete the following activities. Tick the appropriate cell.
Ans:
Try yourself:
What is a second often compared to?
A.A minute
B.A blink
C.A task
D.An hour
View SolutionTime Duration (Elapsed Time)
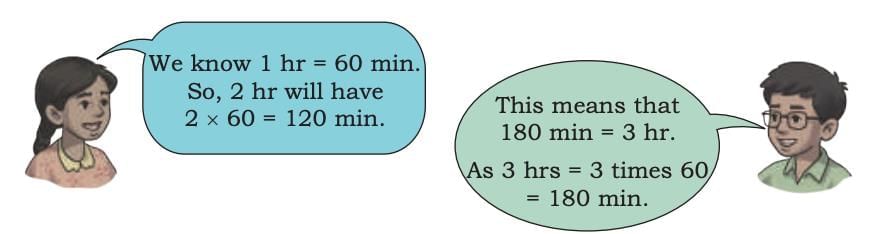
Did you know… 1 minute has 60 seconds and 1 hour has 60 minutes? That means in 1 hour, there are 3,600 seconds! Imagine counting every second for a whole hour – it would take forever!
Time duration tells us how long something lasts — from the moment it starts to the moment it ends.
Let’s say a football match starts at 01:15 p.m. and ends at 01:42 p.m.. From 1:15 to 1:42 is 27 minutes. That’s the time duration of the match. For quick activities, we use seconds instead of minutes. If something takes 90 seconds, we can change it into minutes and seconds:
60 seconds = 1 minute
30 seconds left over So, 90 seconds = 1 minute 30 seconds.
Sometimes, the end minutes are smaller than the start minutes. In that case, we borrow 1 hour (which is 60 minutes) before subtracting. This trick helps us find the answer easily.
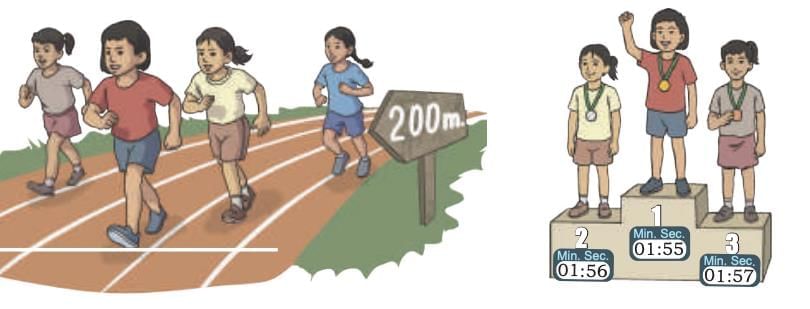
Example: Akira, Sunita, and Mary are participating in a 200 m walking race
Do you notice the use of a new unit, ‘seconds’, in the picture?
In situations like a race, ‘seconds’ help us observe small differences in the time taken by participants.
Each participant took 1 minute, but how much more? Identify the child who won the race. How much time did the child take? Ans: The child who won the race is the one standing in the first place podium — she took 1 minute 55 seconds to complete the 200 m walking race. In races, even a difference of 1 second can change the winner, which is why seconds are used along with minutes to measure time precisely.
Try yourself:
What is time duration?
A.How long something lasts
B.The speed of an object
C.A way to measure weight
D.The distance traveled
View Solution
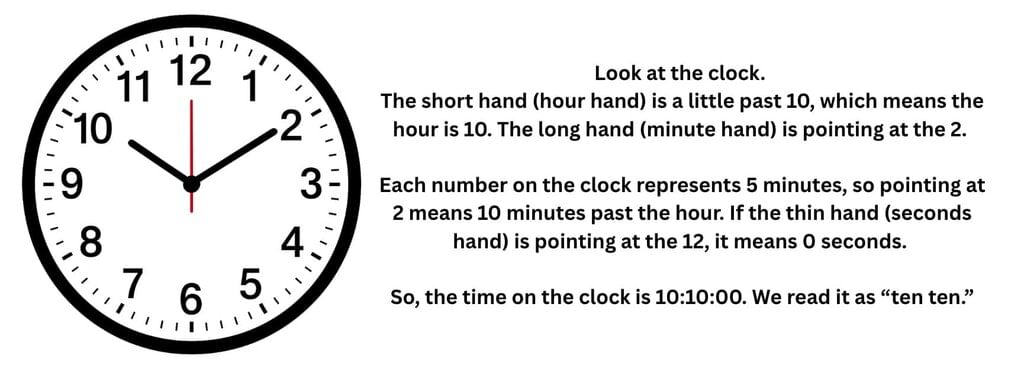
Mastering the Clock
A clock usually has three hands – the hour hand, the minute hand, and the second hand. The hour hand is short and shows the hour, the minute hand is long and shows the minutes, and the seconds hand is thin and moves quickly to show the seconds.
How to read time using a clock:
Look at the hour hand first and see which number it is pointing to or between.
Check the minute hand next. Each big number on the clock represents 5 minutes. For example, if the minute hand is on “3,” it means 15 minutes past the hour.
Check the seconds hand if needed. Like the minute hand, each number represents 5 seconds, and one full round of the seconds hand is 60 seconds or 1 minute.
Example:
Let us perform an activity:
Raghav practices yoga in the morning.
Let us find out
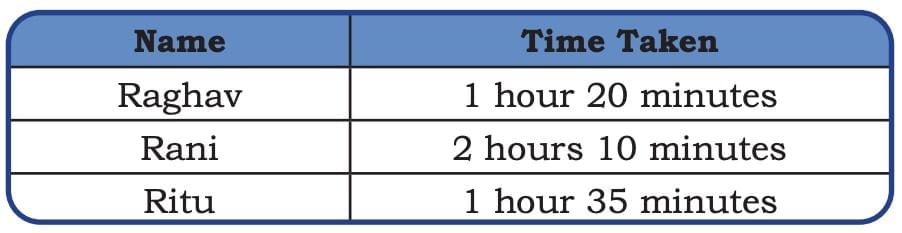
1. At what time did Raghav start practising Yoga? ………………. Ans: The clock shows the short hand (hour hand) between 6 and 7, and the long hand (minute hand) on 6. That means the time is 6:30 a.m. 2. At what time did he finish? ……………. Ans: The second clock shows the short hand near 6 and the long hand on 12. That means the time is 6:55 a.m. 3. How much time did he spend practising Yoga? ……………….. Ans: Start time = 6:30 a.m. End time = 6:55 a.m. Time taken = 25 minutes. 4. Find the time elapsed between the given time periods. Share your strategies. (a) 01:15 p.m. to 01:42 p.m.? → 42 minutes − 15 minutes = 27 minutes. (b) 03:18 p.m. to 08:18 p.m.? → 8 hours 18 minutes − 3 hours 18 minutes = 5 hours. (c) 09:15 a.m. to 11:30 a.m.? → Hours: 11 − 9 = 2 hours. Minutes: 30 − 15 = 15 minutes. Total = 2 hours 15 minutes. 5. The table below shows the time taken by 3 children to paint a picture.
(a) Who took the longest time? Ans: Rani (2 hours 10 minutes) (b) Who took the least time? Ans: Raghav (1 hour 20 minutes)
Try yourself:
What is the main focus of ‘Mastering the Clock’?
A.Understanding schedules
B.Creating clocks
C.Learning to tell time
D.Improving time management
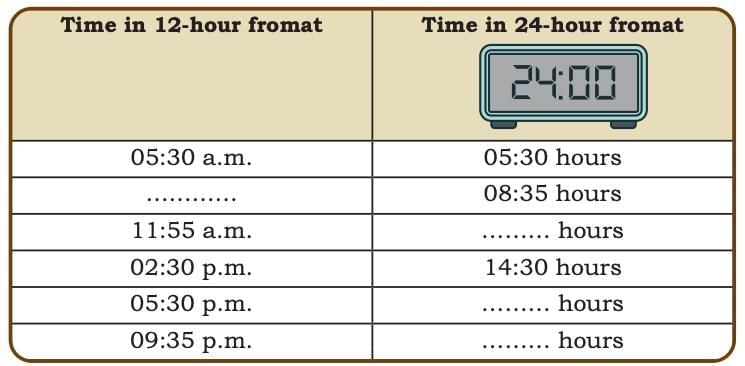
View SolutionConverting Time Formats
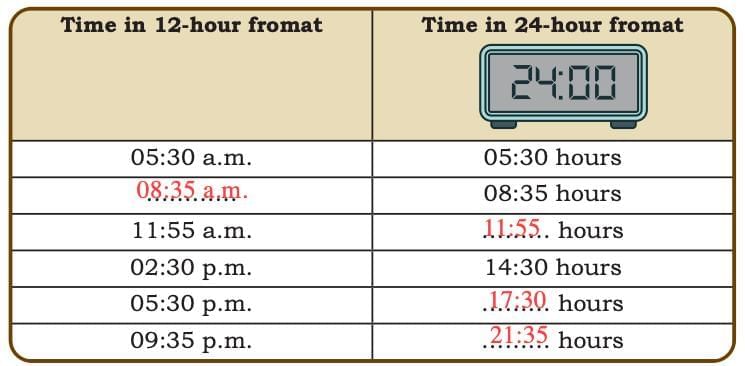
Time can be written in two different ways — the 12-hour format and the 24-hour format. Both show the same time of day but in a different style. Learning to read and change between these formats is important because clocks, watches, and timetables often use different systems.
1. 12-hour format
In the 12-hour format, the numbers on the clock go from 1 to 12 and then repeat. To show whether the time is in the morning or in the afternoon/evening, we use a.m. and p.m.
a.m. stands for “ante meridiem,” which means “before midday.” It is used for times from midnight (12:00 a.m.) to just before noon (11:59 a.m.).
p.m. stands for “post meridiem,” meaning “after midday.” It is used for times from noon (12:00 p.m.) to just before midnight (11:59 p.m.).
For example, if the clock shows 05:30 a.m., it means half past five in the morning. If the clock shows 02:30 p.m., it means half past two in the afternoon.
2. 24-hour format
The 24-hour format counts the hours of the day continuously from midnight (00:00 hours) to just before the next midnight (23:59 hours). There is no need for a.m. or p.m., because the hour number itself tells you if it is morning or evening.
Morning times (midnight to 11:59 a.m.) are written the same as in the 12-hour format, but with hours written as two digits. For example, 5:30 a.m. becomes 05:30 hours.
Afternoon and evening times (12:00 noon to 11:59 p.m.) are written by adding 12 to the hour number. For example, 2:30 p.m. becomes 14:30 hours, and 11:45 p.m. becomes 23:45 hours.
Let us perform an activity:
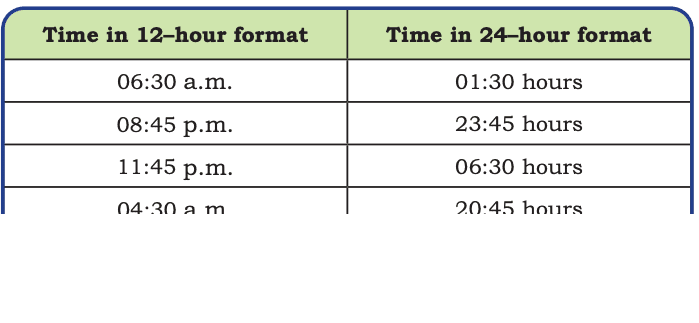
1. Fill in the blanks by writing the time in the appropriate format.
Ans:
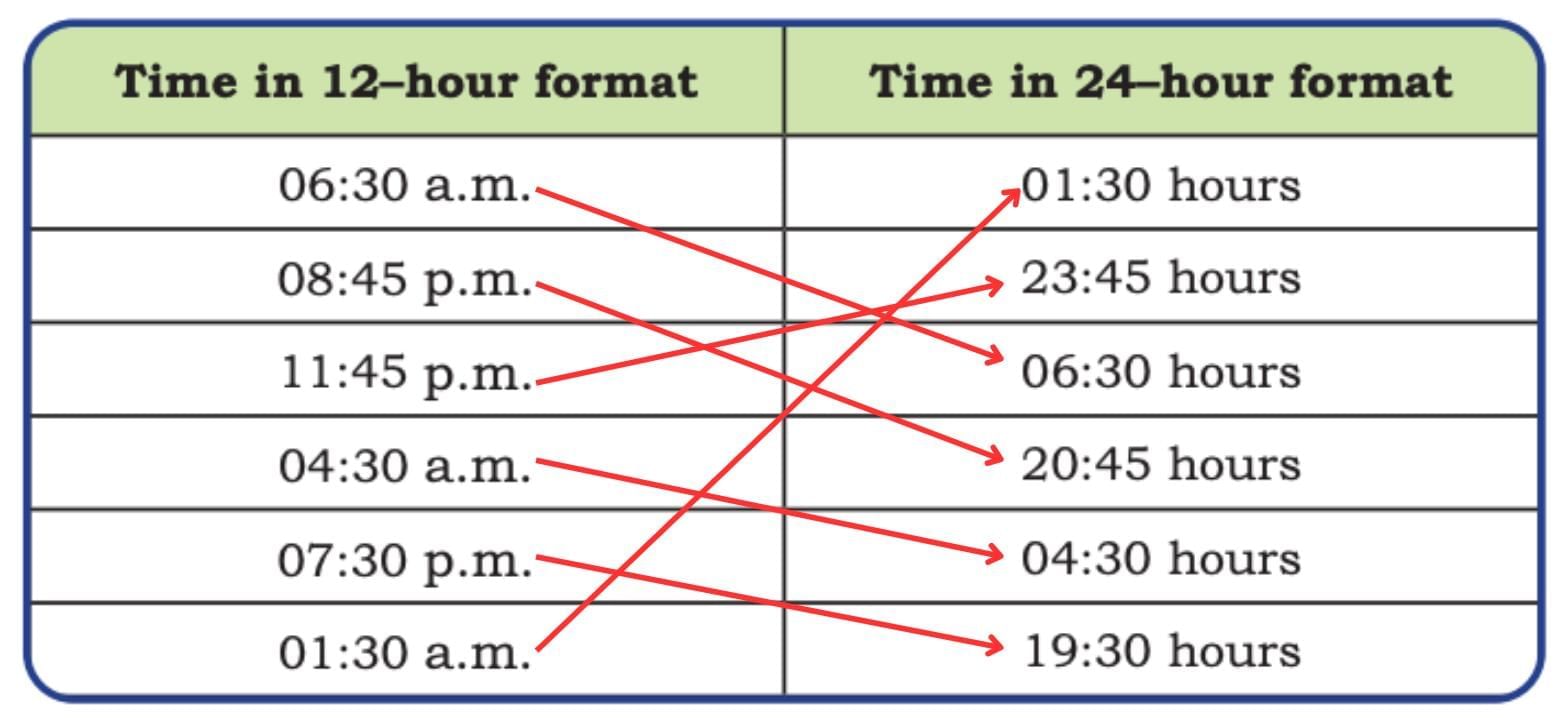
2. Match the following.
Ans:
Try yourself:
What does a.m. stand for?
A.After morning
B.Around midday
C.Before midday
D.After midday
View Solution
Conclusion
Time helps us know when things happen and how long they last. Seconds are for very quick actions, minutes are for short tasks, and hours are for long activities. By learning to read the clock, we can tell the exact time, work out how long something took, and change between the 12-hour and 24-hour formats. Understanding time makes it easier to follow schedules, be on time, and use every moment wisely.
A quilt is made by joining pieces of cloth together, often in different shapes and sizes. To decorate or cover it, we need to know the length around it and the space it covers. In this chapter, we learn to find the perimeter and area of shapes and use them in real-life situations like measuring quilts, floors, and gardens.
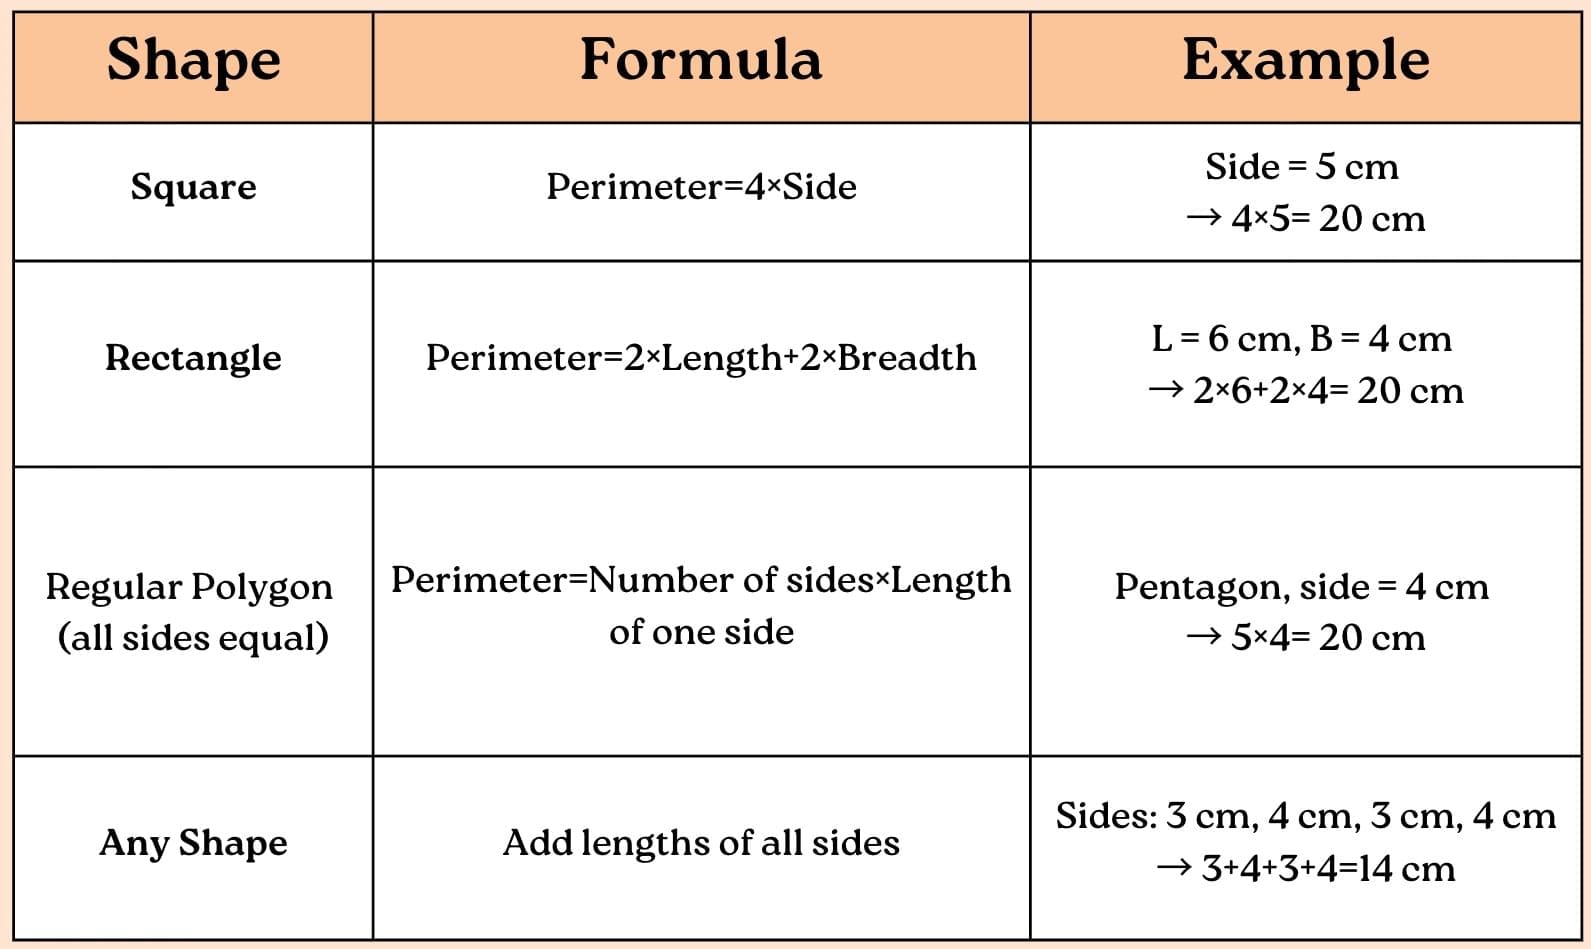
Perimeter
Preetha and Adrit’s grandmother made a beautiful quilt cover from old clothes and now wants to decorate it with lace along its border, using two different colours. To know how much lace of each colour she needs, we must remember that the length around a shape is called its perimeter. Here, we learn how to find the perimeter of different shapes and use it in real-life situations like decorating and designing.
Meaning: The perimeter is the total distance around a shape. Imagine you are walking along the edge of a garden, a playground, or a quilt — the total distance you walk is its perimeter.
How to Find Perimeter:
Remember:
Write units for perimeter (cm, m, km).
The perimeter tells us the length around and not about the inside.
Try yourself:
What is the perimeter?
A.The total distance around a shape
B.The weight of a shape
C.The area inside a shape
D.The height of a shape
View Solution
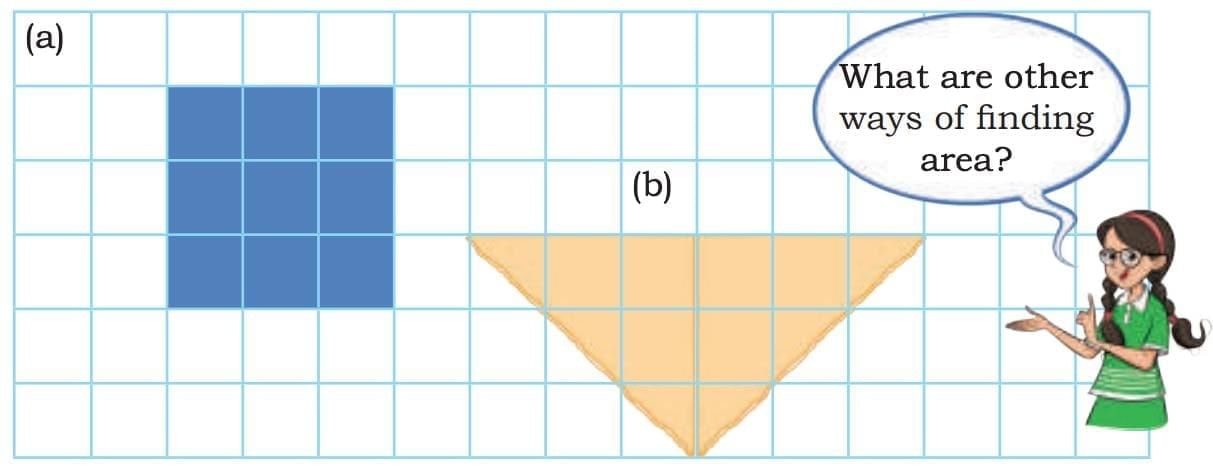
Now that we know how to measure the length around a shape, let’s think about how much space a shape covers inside.
Preetha and Adrit’s grandmother is making a rug with square patches. Look at the picture of the rug – can you count how many patches she has used? Each patch takes up some space, and all the patches together cover the whole rug.
Preetha and Adrit also tried covering their table using different shapes:
Preetha used triangles and circles.
Adrit used squares and rectangles.
They found that triangle, square and rectangle shapes cover the top of the table without gaps and overlaps. Circle shape leaves gaps.
TWENTY triangles cover Table 1.
EIGHT squares cover Table 3.
SIX rectangles cover Table 4
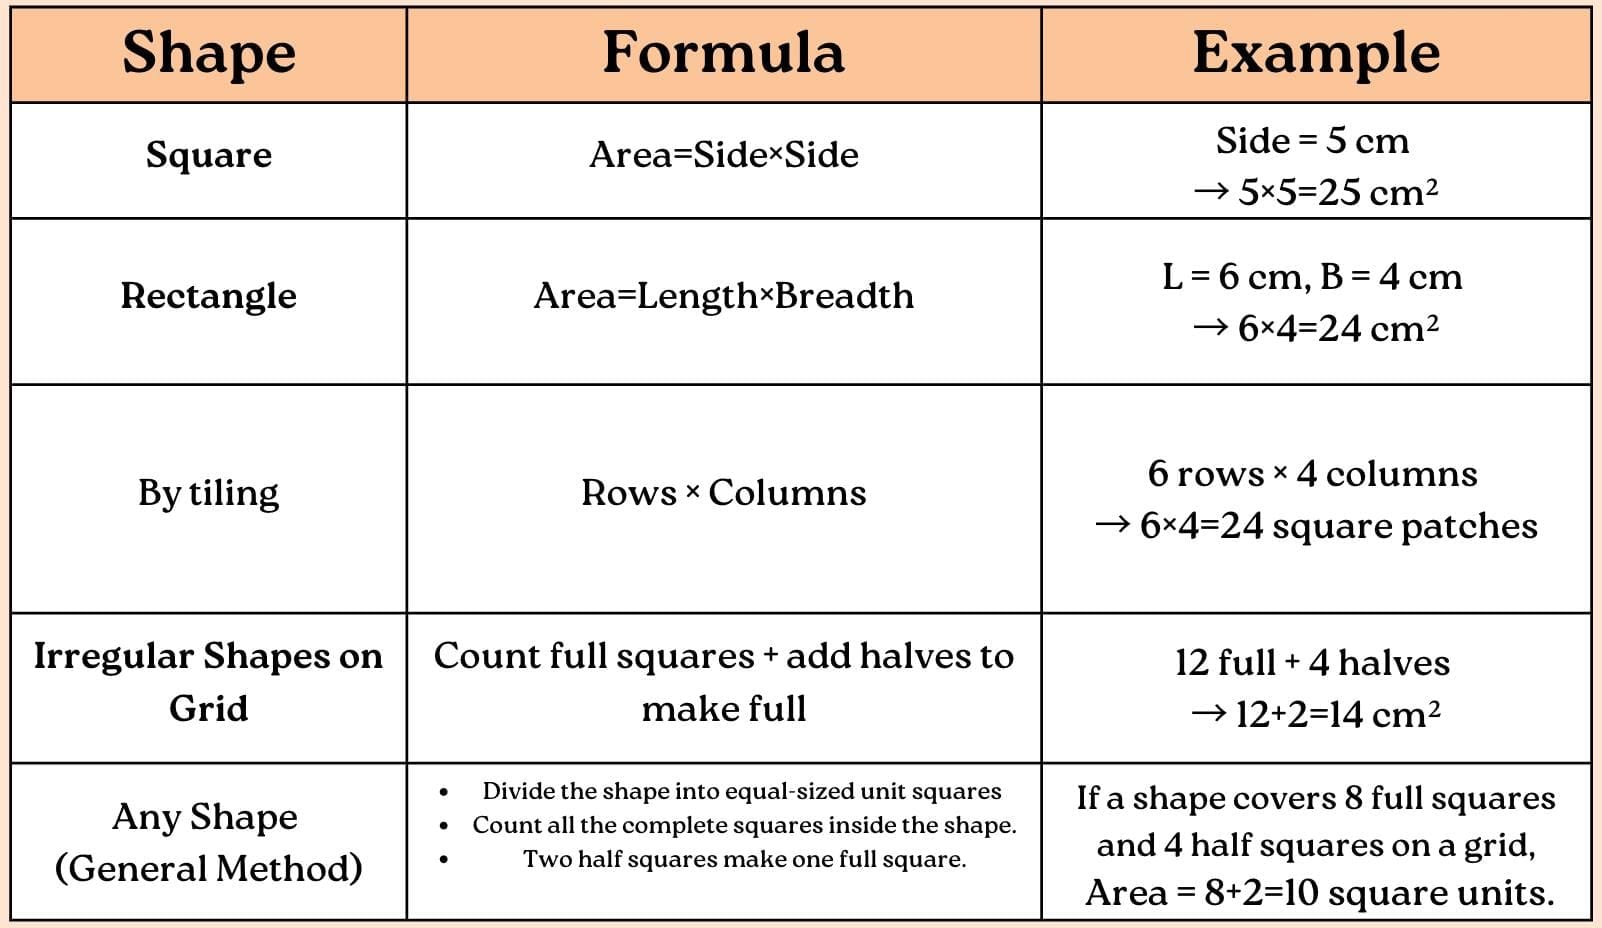
The region covered by the triangles, squares or rectangles is called the area of the table. To find the area of a region, we usually fill it with shapes that tile well — like squares, rectangles, and triangles. Circles do not tile perfectly because they leave spaces in between. Let us learn about area in detail:
Area
Meaning:
The area of a shape is the amount of surface it covers inside its boundary. If you spread tiles, patches, or paper inside a shape until it’s filled, the space covered is the area.
How to Find Area:
Remember:
Write units for area (cm², m², km²).
The area tells us the space inside a shape, not the length around it.
Let us look at the following examples:
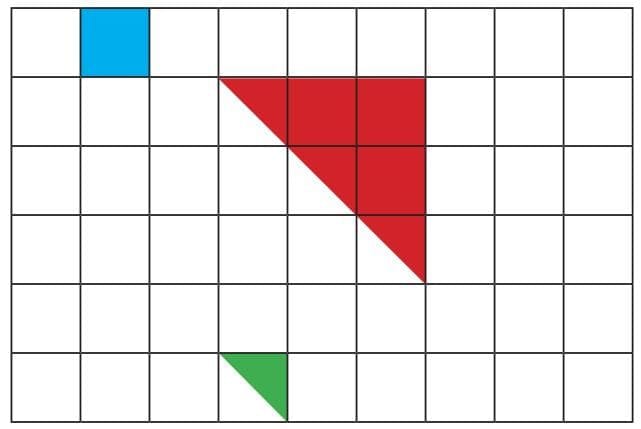
1. Preetha is playing with tiles. She covers her desk with different shapes, as shown below. Look at the different tiles on her desk and answer how many of the following shapes will cover the desk. (a) Green triangles __________ (b) Red triangles __________ (c) Blue squares __________
Ans: (a) Green triangles = 1 (b) Red triangles = 4 (c) Blue squares = 1
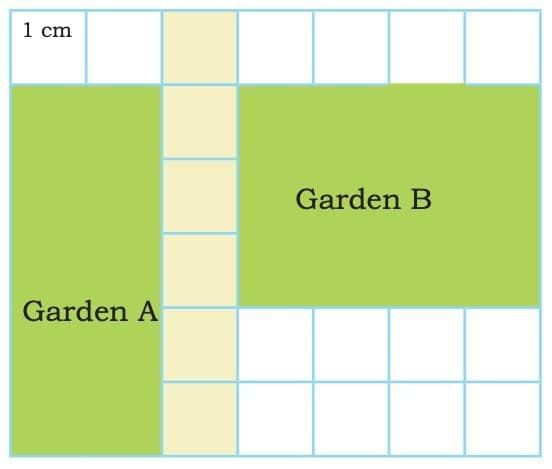
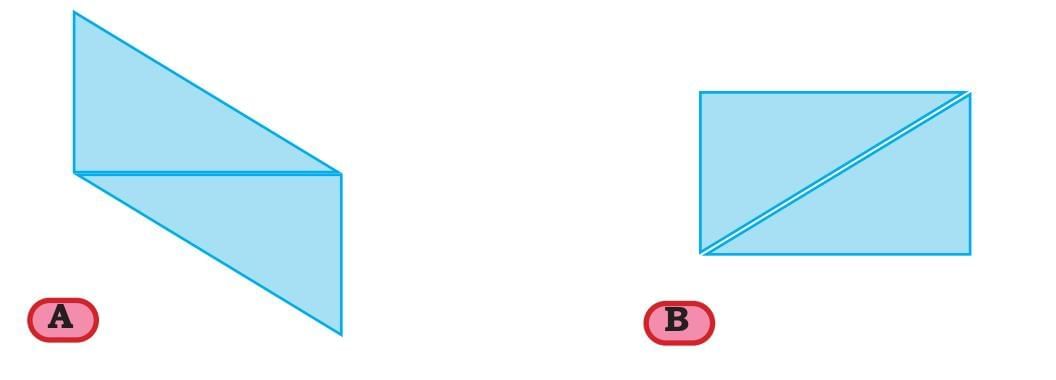
2. Compare the areas of the two gardens given below on the square grid. Share your observations.
Area of Garden A = _____ cm square Area of Garden B = _____ cm square
Ans: Area of Garden A = 12 cm² Area of Garden B = 12 cm²
3. Is the area of shape (a) less than the area of shape (b) given below? Discuss.
Preetha and Adrit’s grandmother is making another square patchwork. She arranges the patches as shown below. Can you guess how many patches she will need? How did you find it?
Did you notice that 6 is the length of one side and 4 is the length of the non-equal side of the rectangle?
Ans: Yes, the area of shape (a) is less than the area of shape (b) because shape (b) covers more square units on the grid.
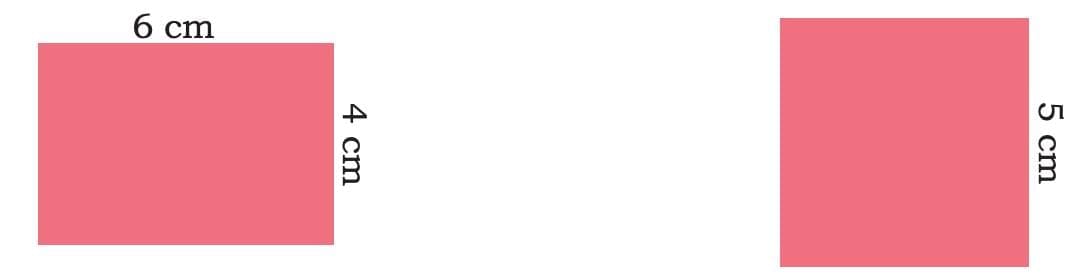
For the square patchwork, there are 6 rows with 4 patches in each row. Total patches = (6×4) square cm=24 square cm Here, 6 is the length and 4 is the breadth of the rectangle, showing that:
Area of a Rectangle = Length × Breadth
Similarly, we can also find the perimeter of the rectangular shape.
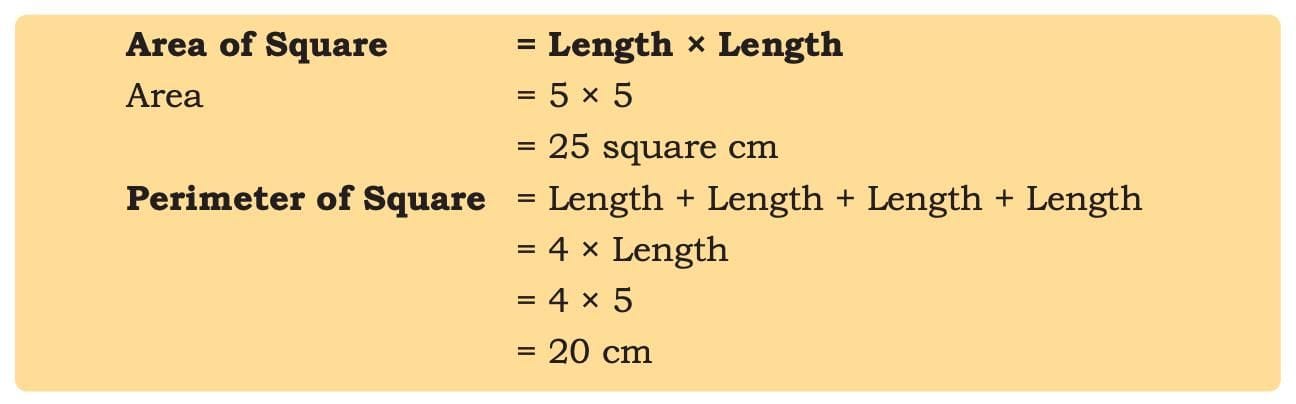
Have you ever wondered what would happen if all the sides of a rectangle were equal, that is, the case of a square?
Let us think about a square whose sides are 5 units long.
Conclusion:
In this chapter, we learned how to find the perimeter (the length around a shape) and the area (the space inside a shape). We saw how to measure them for squares, rectangles, and other shapes using unit squares, counting patches, and formulas. We also learned that some shapes can cover a surface without leaving gaps, and that two shapes can have the same area but look different. Knowing how to find perimeter and area helps us in real life, like decorating quilts, measuring gardens, or tiling floors.
Symmetry is all around us — in nature, in the objects we use, and even in the letters we write. It makes things look balanced and beautiful. From the wings of a butterfly to the patterns in rangoli, symmetry helps create harmony in shapes and designs. In this chapter, we will learn what symmetry is, explore different types of lines of symmetry, and discover how to create symmetrical shapes and patterns through fun activities.
Symmetry
Meaning: Symmetry means that when we divide a shape into two halves, one half is the mirror image of the other.
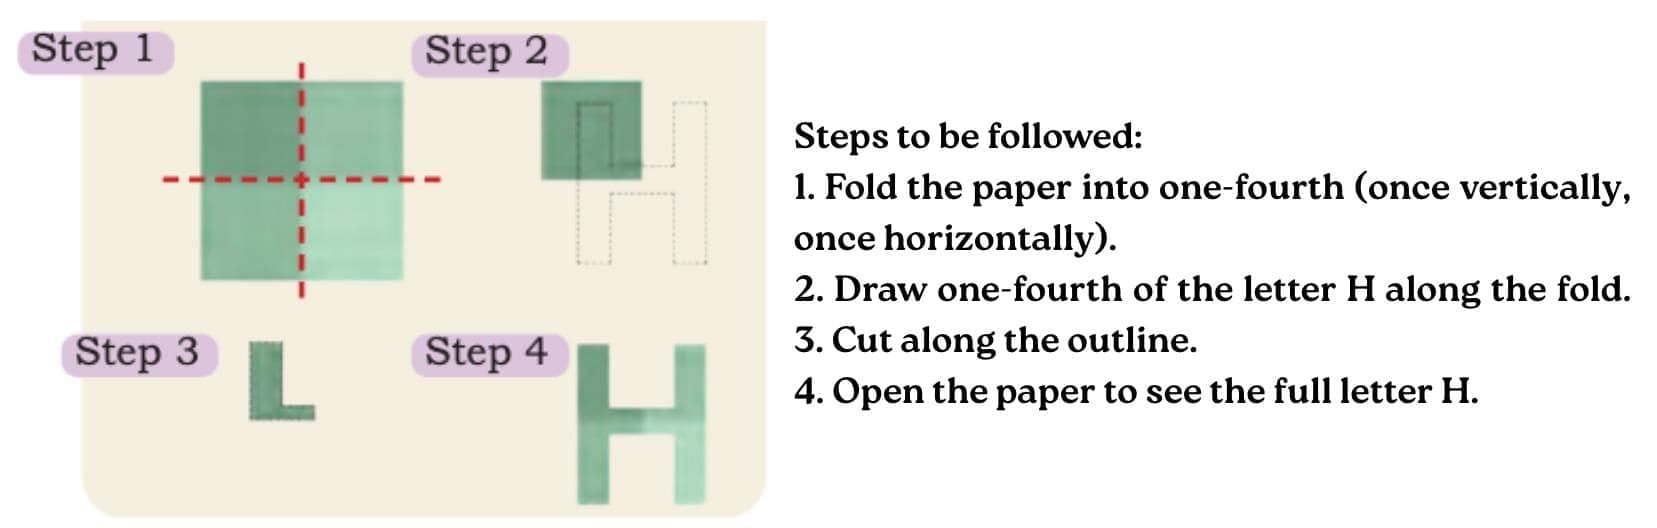
Let us look at the types of Lines of Symmetry using the Alphabet Symmetry Example:
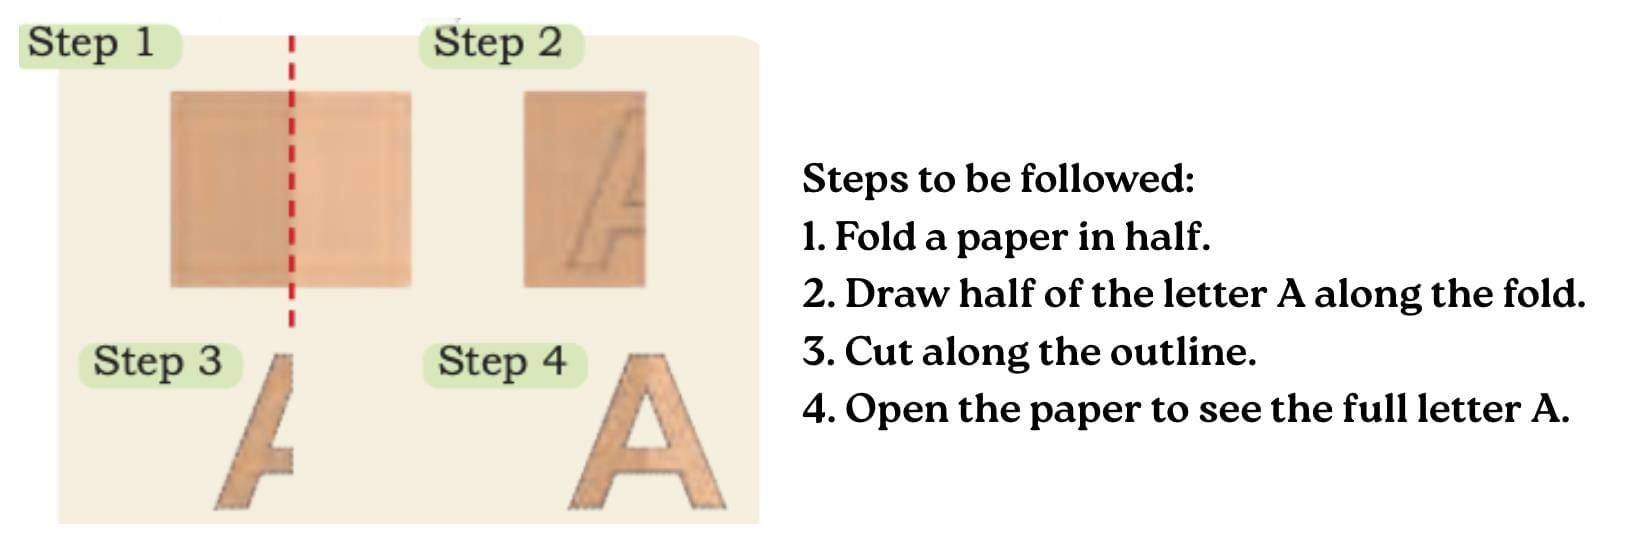
Prem and Manu want to paste ‘Happy Birthday’ cutouts on a wall for Lali’s birthday. While preparing cutouts of letters, they observe that some letters can be cut out in an easy way. They remember that they learnt about reflection symmetry and lines of symmetry in Grade 4.
Let us recall:
Reflection Symmetry: A shape has reflection symmetry if one half is the mirror image of the other half. Imagine folding it along a line — both sides match exactly.
Line of Symmetry: The line that divides a shape into two equal, mirror-image halves is called the line of symmetry.
Vertical Line of Symmetry – The line goes up and down.
Horizontal Line of Symmetry – The line goes left to right.
Some shapes have more than one line of symmetry.
They used their knowledge of lines of symmetry to make the cutouts. The letter A has a vertical line of symmetry. So, to cut out the letter ‘A’:
Similarly, for: The letter H has two lines of symmetry.
Let us try one more example:
Which of the following alphabet cutouts can be made by just drawing half (1/2 ) or quarter (1/4 ) of the letter? You can do it by drawing lines of symmetry on the letters.
Which of the letters have a horizontal line of symmetry? _________________ Which of the letters has a vertical line of symmetry? ____________________ Which letters have both vertical and horizontal lines of symmetry?________
Ans: Letters that can be made by drawing half (1/2) or quarter (1/4) of the letter: E, X, T, O (because they have at least one line of symmetry to fold along)
Letters with a horizontal line of symmetry: E, X, O
Letters with a vertical line of symmetry: X, T, O, V
Letters with both vertical and horizontal lines of symmetry: X, O
So far, we have seen shapes that can be divided into equal mirror-image halves using lines of symmetry. But what if instead of folding them, we turn them? This brings us to our next concept, known as the Rotational Symmetry.
Rotational Symmetry
Meaning: A shape has rotational symmetry if it looks the same after being turned (rotated) around its centre by a certain angle (less than a full turn).
Order of Rotational Symmetry: The number of times a shape matches itself during one complete turn (360°).
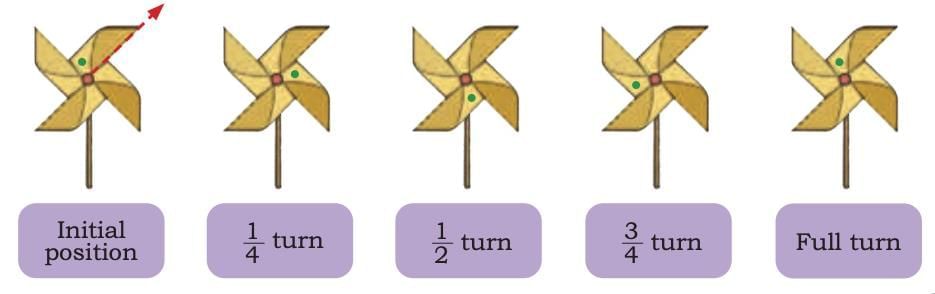
Let Us Make a Windmill Firki
To see rotational symmetry in action, let’s make a windmill firki! When the firki spins around its centre, its blades look the same in many positions during one full turn.
Lali makes firkis for her friends. Follow the steps given below to make your firki:
1. Take a square paper. 2. Fold the paper in half diagonally to make two triangles. 3. Open and fold it the other way to make two more triangles. 4. Open it again. You will see an ‘X’ shape on the paper. 5. Use scissors to cut along the four lines of the ‘X’. Stop cutting about halfway to the centre. 6. Take one corner of each triangle and fold it gently towards the centre of the paper. Do not press it flat. 7. Fold every other corner towards the centre. 8. Push a pin through the folded corners and the centre of the paper. 9. Push the pin through a stick or straw
Observe the dot in the firki. Does the firki look the same after 1/4, 1/2, 3/4, and a full turn?
Ans: Yes, the firki looks the same after 1/4, 1/2, 3/4, and a full turn because it has rotational symmetry of order 4.
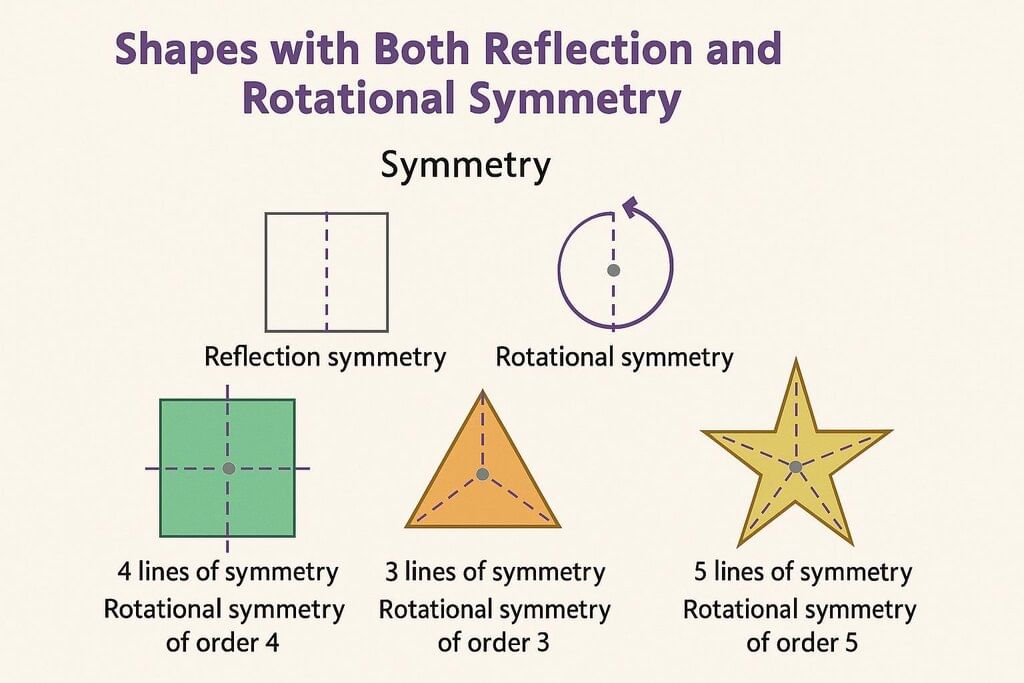
Shapes with Both Reflection and Rotational Symmetry
Now that we know about reflection symmetry (folding to get mirror images) and rotational symmetry (turning to get the same shape), let us look at shapes that have both.
Some shapes, like a square or certain patterns in rangoli, can be folded along lines of symmetry and still look the same when turned. For example, a square has 4 lines of symmetry and also rotational symmetry of order 4.
Let us explore more examples having both reflection and rotational symmetry:
1. Find symmetry in the digits:
Which digit(s) have reflection symmetry? ___________________________ Which digit(s) have rotational symmetry? ___________________________ Which digit(s) have both rotational and reflection symmetries? ________
Now, let us look at the following numbers: ||, |00| Do these have (a) rotational symmetry, (b) reflection symmetry or (c) both symmetries? Give examples of 2-, 3-, and 4-digit numbers which have rotational symmetry, reflection symmetry, or both.
Ans:
Which digit(s) have reflection symmetry? 0, 1, 8 Which digit(s) have rotational symmetry? 0, 1, 8 Which digit(s) have both rotational and reflection symmetries? 0, 1, 8
For || and |00|: Both have both symmetries. Examples:
(a) Does the design have rotational symmetry? Yes/No. (b) Try to change the design by adding some shape(s) so that the new design looks the same after a 12 turn. Draw the new design in your notebook. (c) Now try to modify or add more shapes so that the new design looks the same after 14 turns. Draw the new design in your notebook. (d) Do the new designs have reflection symmetry? If yes, draw the lines of symmetry
Ans:
(a) No. The design does not look the same after turning it ½ turn (180°) or ¼ turn (90°) because the right side has an extra circle that breaks the balance.
(b) Add another identical circle on the left side, opposite to the existing one. Now the design will look the same after a ½ turn.
(c) To get ¼ turn symmetry, you will need to place identical shapes in all four directions (top, bottom, left, and right) so that after turning 90°, the design remains unchanged. This means adding circles and triangles in the missing positions.
(d) 1. The modified design with ½ turn symmetry will have one vertical line of symmetry. 2. The modified design with ¼ turn symmetry will have two lines of symmetry — vertical and horizontal (and possibly diagonal if shapes are perfectly aligned).
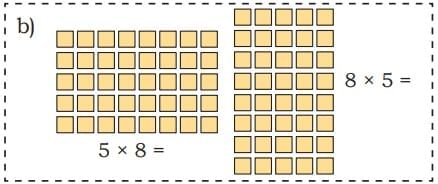
Have you ever lined up your pencils in neat rows or arranged your books in equal stacks? That’s an example of an array –a way to organise objects so we can count them quickly.
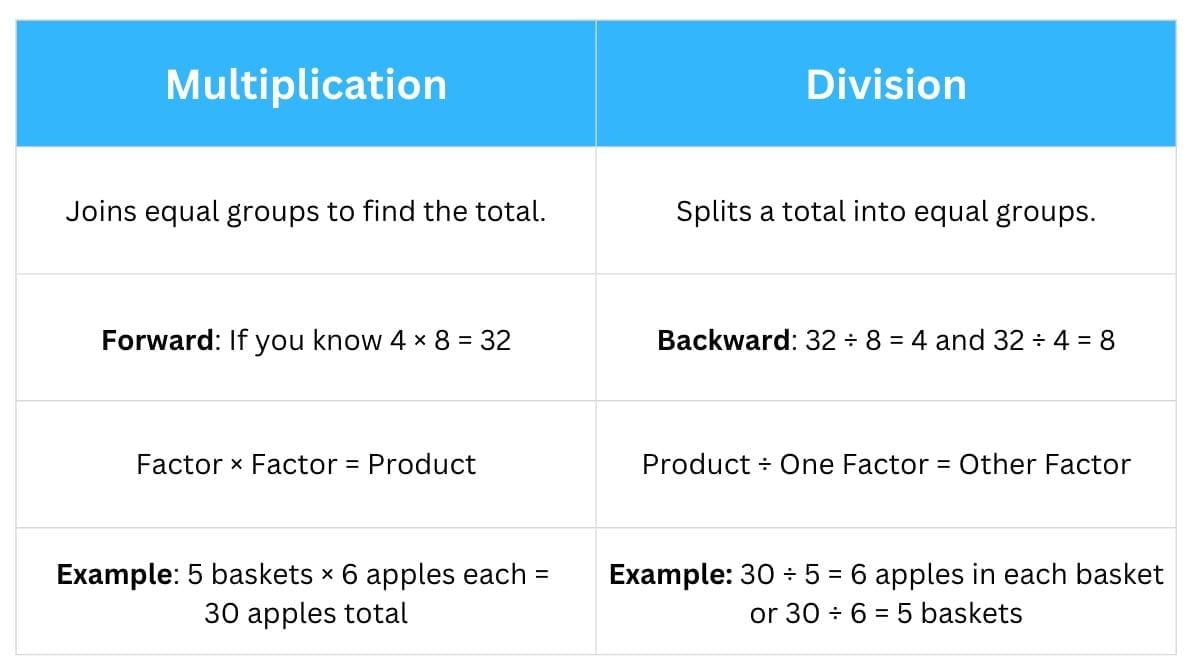
Arrays help us understand how multiplication and division are connected.
Multiplication tells us the total when we know the number in each group, while division helps us find out how many are in each group or how many groups there are. ?
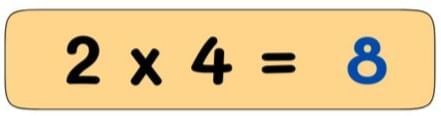
What is Multiplication?
Multiplication is a quick way to add the same number many times.
It helps us find the total when we have equal groups.
We use the sign “×” (times) for multiplication. The numbers we multiply are called factors, and the answer is the product.
We use multiplication in daily life—like counting apples in baskets, chairs in rows, or boxes in a stack.
For example, if there are 4 baskets and each basket has 2 apples, we can multiply 2 × 4 = 8 to find the total apples, instead of adding 2 + 2 + 2 + 2.
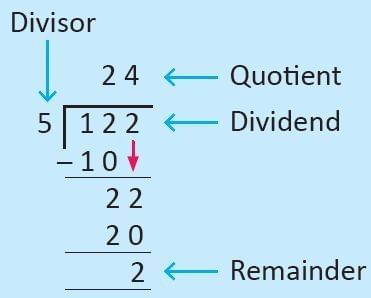
What is Division?
Division is a way to split a number into equal parts or groups.
It’s like sharing something so everyone gets the same amount.
We use the sign “÷” (divide) or “/” for division. The number we divide is called the dividend, the number we divide by is the divisor, and the answer is the quotient.
We use division in daily life – like sharing chocolates, splitting money, or making equal teams.
For example, if there are 122 apples and 5 friends, we can divide 122 ÷ 5 = 24 to find that each friend gets 24 apples and 2 are left.
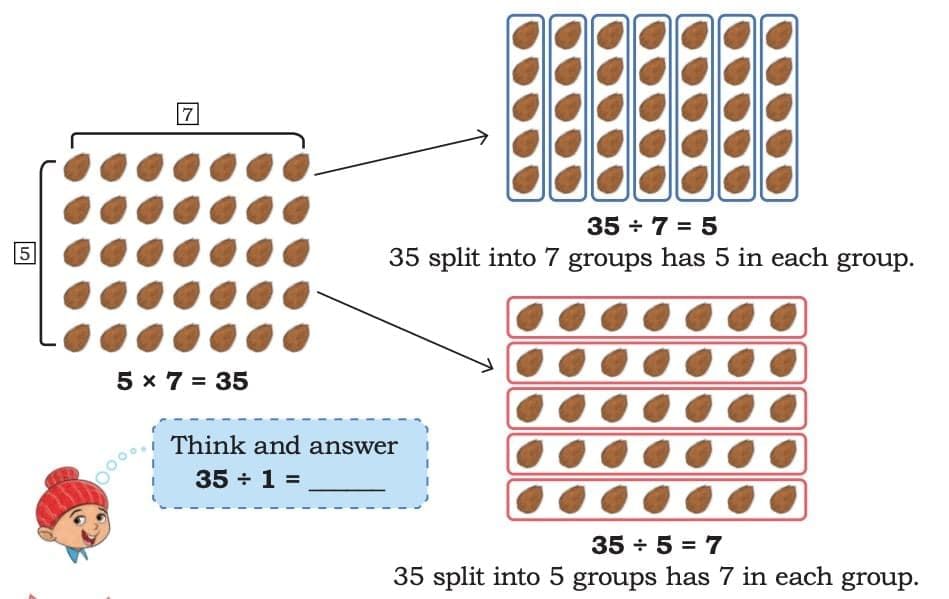
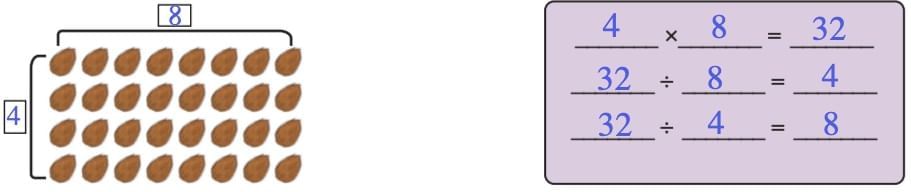
Q: Observe the following array of coconuts. Write two division facts using the given multiplication fact.
Sol: From the given multiplication fact 5 × 7 = 35, the two division facts are:
35 ÷ 7 = 5 → 35 split into 7 groups has 5 in each group.
35 ÷ 5 = 7 → 35 split into 5 groups has 7 in each group.
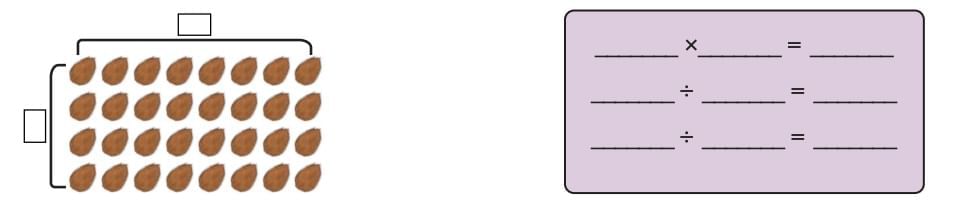
Example: Write the appropriate multiplication fact for the array shown below. Write two division facts that follow from the multiplication fact.
Sol:
Connection between Multiplication and Division
Multiplication and division are related.
In Multiplication, we have two numbers (factors) that make a product.
In Division, we take the product and divide it by one factor to find the other.
Patterns in Division
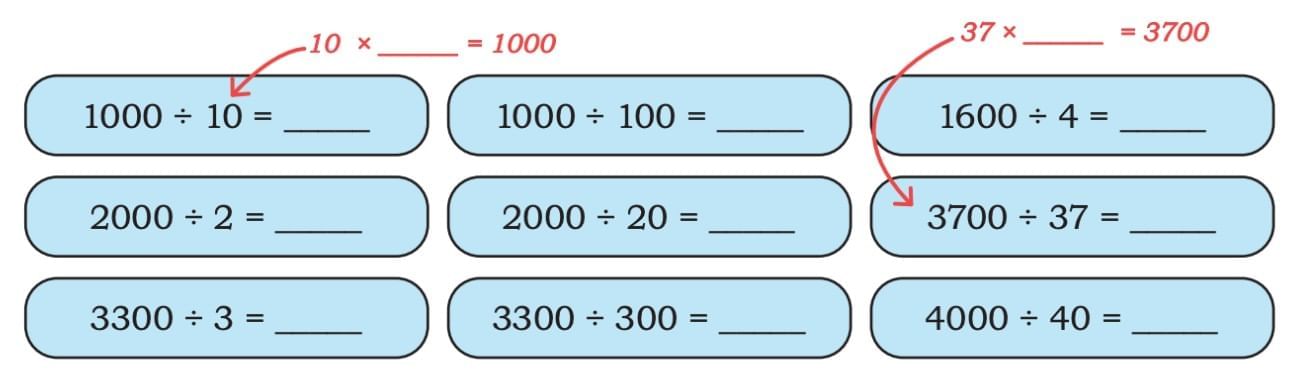
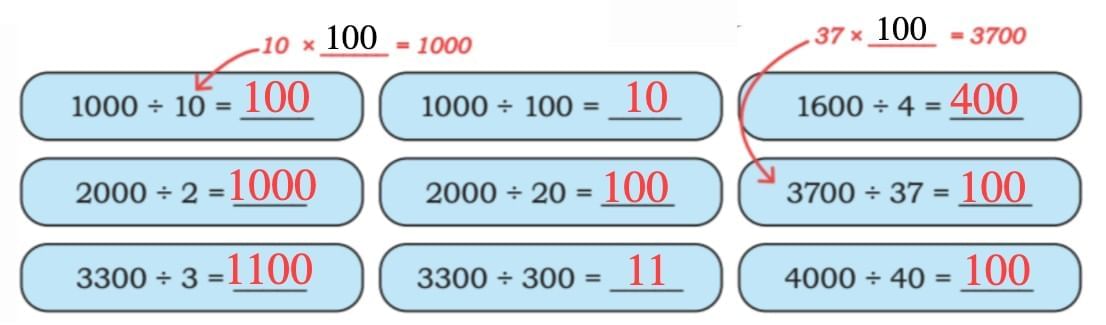
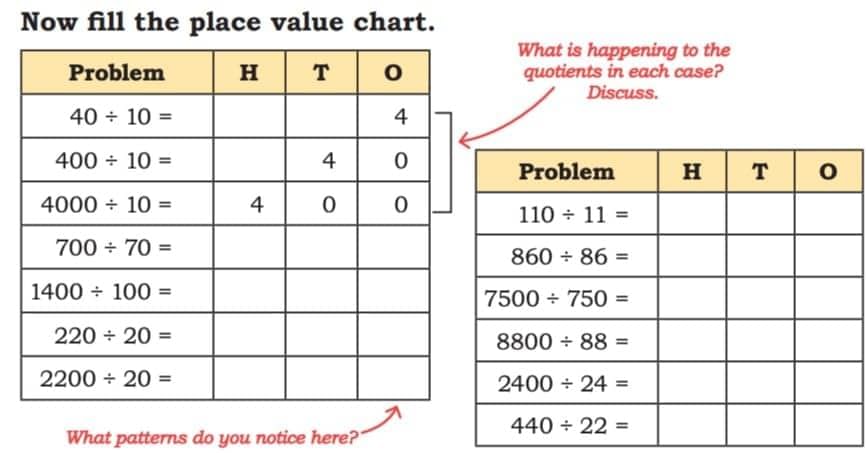
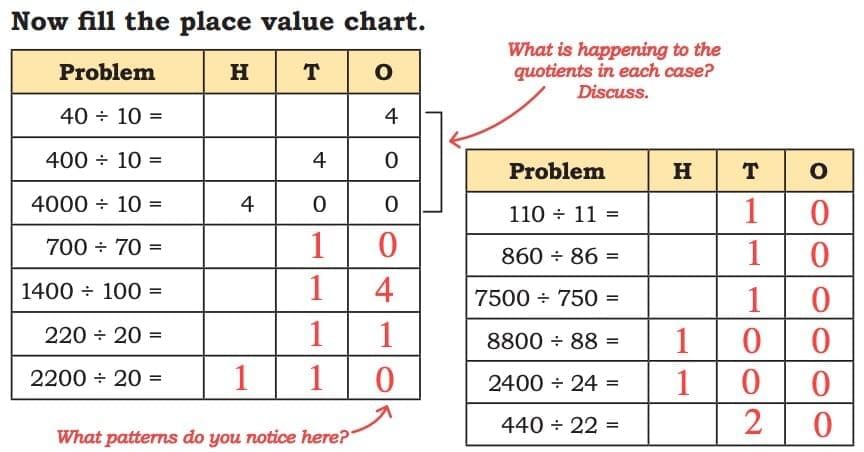
When we divide by 10, 100, 1000, or multiples of these, a clear pattern appears in the answers.
10 → answer is 10 times smaller.
100 → answer is 100 times smaller.
1000 → answer is 1000 times smaller.
In whole numbers, if the number ends with the same number of zeros as the divisor, those zeros can be removed.
Finding the Patterns in Division:
Sol:
Place Value
Dividing by 10 moves the digits 1 place to the right in the place-value chart.
Dividing by 100 moves the digits 2 places to the right.
Dividing by 1000 moves the digits 3 places to the right.
In decimal numbers, the decimal point moves left the same number of places as the zeros in the divisor.
Finding Place Values:
Sol:
What is happening to the quotients in each case? Discuss.
Dividing by 10, 100, or 1000 makes the number 10, 100, or 1000 times smaller.
This is why the digits move to the right in the place-value chart.
If both numbers change by the same factor, the answer stays the same.
What patterns do you notice here?
Digits move right when dividing by 10, 100, or 1000.
More zeros in the divisor → more places moved.
Some answers are round numbers like 10, 100, or 1000.
Application Problems
We use division to share things equally, so everyone gets the same.
Division helps to make equal groups when we arrange items.
It is used to find the value for one item, one hour, or one day.
We use division in daily life for money, time, distance, work, and other things.
Knowing division helps us solve word problems easily.
Distance Problem:
Q: Sabina cycles 160 km in 20 days and the same distance each day. How many kilometres does she cycle each day?
Sol: Sabina cycles 160 km in 20 days.
To find how many kilometres she cycles each day:
160÷20=8 km
Thus, she cycles 8 km each day.
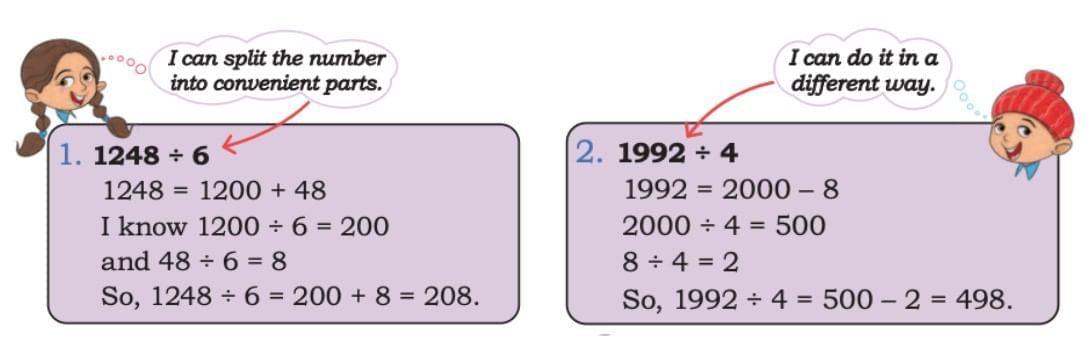
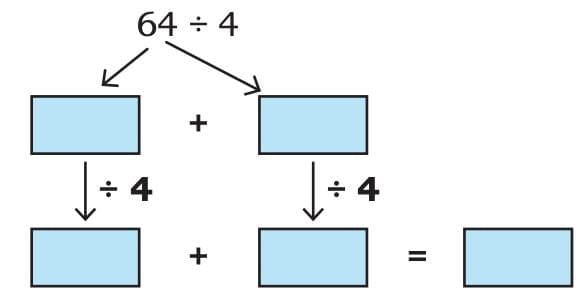
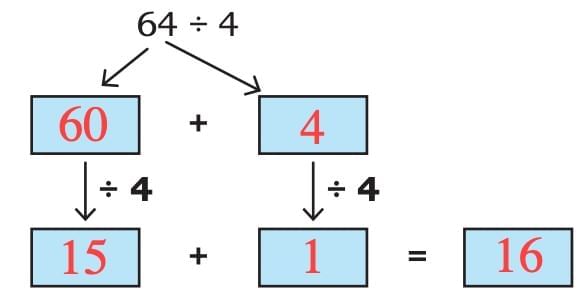
Mental Strategies for DivisionWe can divide faster in our mind by using some simple tricks:
Break big numbers into smaller, easy parts, then add the results.
Use numbers that are close and easy to divide, then adjust the answer.
Halve the number twice if dividing by 4, and three times if dividing by 8.
Use multiplication tables to see how many groups fit in the number.
Estimate a close answer first to check if your result makes sense.
Try some strategies:
1.
Sol:
2.
Sol:
Partial-Quotients Division & Estimation
Sometimes we can solve big division problems in easy steps. This is called partial-quotients division.
Take away big groups of the divisor again and again.
Each time, write how many groups you took away.
Add all the groups to get the answer.
Bigger groups mean fewer steps.
First, make a guess (estimate) to help choose group sizes and check your answer.
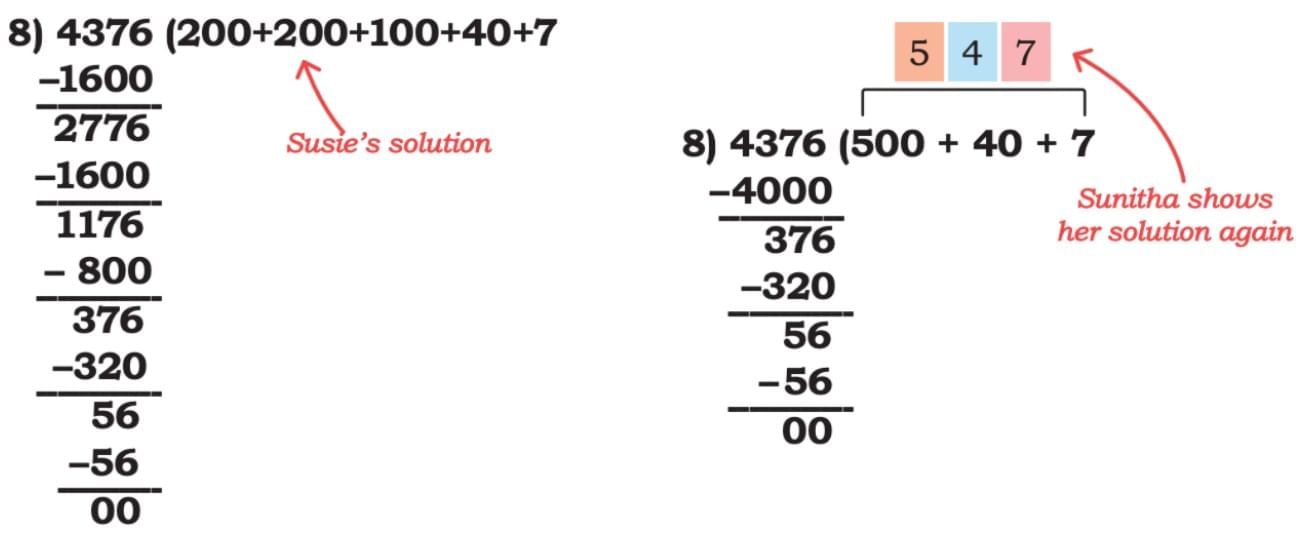
Susie’s Farm in Kerala
Susie and Sunitha have a large coconut farm, and they harvested 1,117 coconuts in April. They sold 582 coconuts equally to 6 regular customers. How many coconuts did each customer get?
They sold 582 ÷ 6 coconuts to each customer. Susie and Sunitha both gave two different methods:Each customer gets 97 coconuts.
Do you think Sunitha’s method is better? Discuss which one you would prefer and why.
Sol: I think Sunitha’s method is better because it is faster. She takes away a big number first, so there are fewer steps. Susie’s way works, but it takes more time because she takes away small numbers many times.
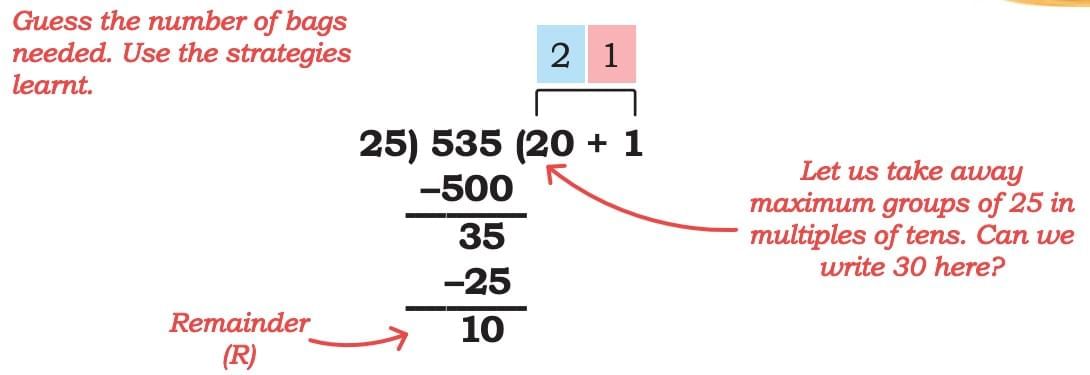
Each bag can hold 25 coconuts. How many bags would be needed to pack 97 coconuts?
Sol: 3 bags will hold 75 coconuts. They will need another bag to fill the remaining coconuts. So, each person will get 4 bags.
They pack the remaining coconuts for drying and extracting oil. They can pack 25 coconuts in each bag. How many bags will they need to pack the remaining coconuts?
Sol: The number of coconuts left after selling 582 coconuts is 1117 – 582 = 535. The number of bags needed is 535 ÷ 25.
They need 21 full bags and 1 more bag to pack the 10 remaining coconuts, that is, 22 bags.
Remainders & the Division Relationship
Sometimes, the divisor (D) does not completely divide the dividend (N) and leaves a remainder (R)
Words to know:
Dividend = the big number we’re dividing.
Divisor = how many in each group.
Quotient = the number of full groups.
Remainder = what’s left over.
The rule is: N = (D × Q) + R
The remainder is always smaller than the divisor.
A remainder of 0 means no leftovers.
A non-zero remainder means there are leftovers.
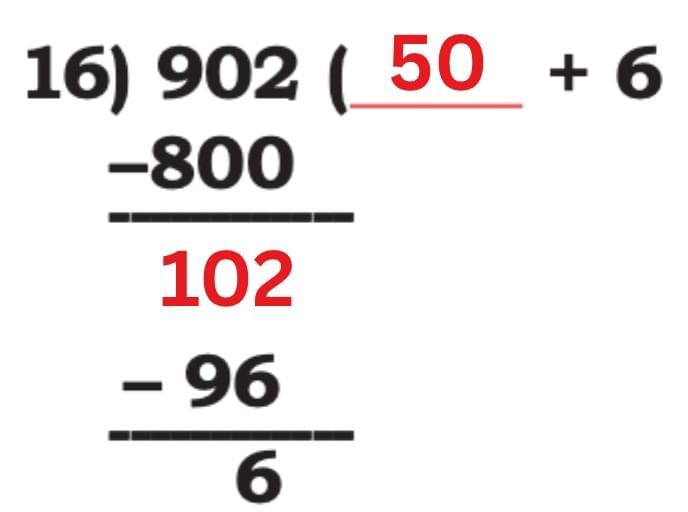
Identify the remainder, if any. Check if N = D × Q + R:
1. 902 ÷ 16
Sol:
Now, after solving the above, we have:
N= 902
D= 16
Q= 56
R= 6
Checking if N = D × Q + R :
902 = 16 x 56 + 6
902 = 896 + 6
902 = 902
Hence, proved that both sides are equal.
Kalpavruksha Coconut Oil
In a particular year, Susie and Sunitha used 4376 coconuts for extracting coconut oil. They can extract 1 litre of oil from 8 coconuts. What quantity of oil were they able to extract?
Sol: They would get 4376 ÷ 8 litres of coconut oil.They extracted 547 L of oil in the year.
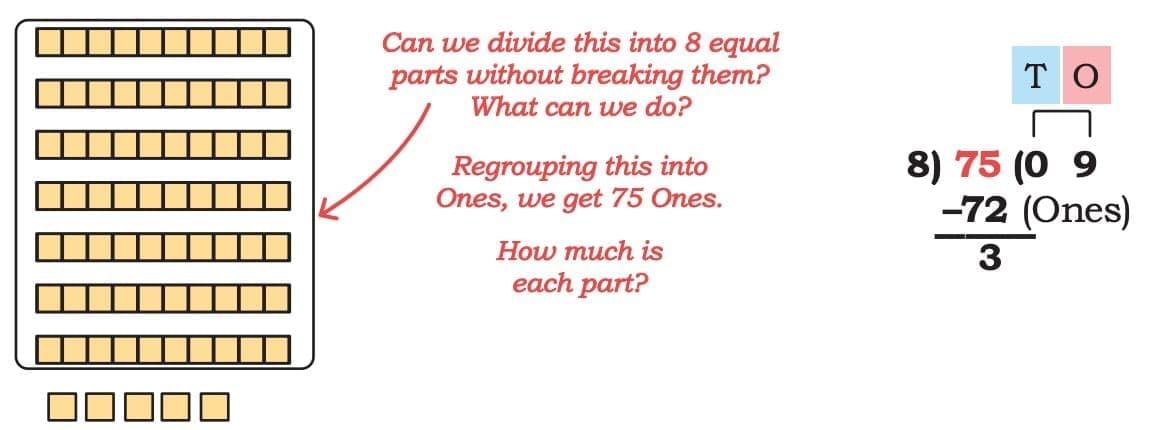
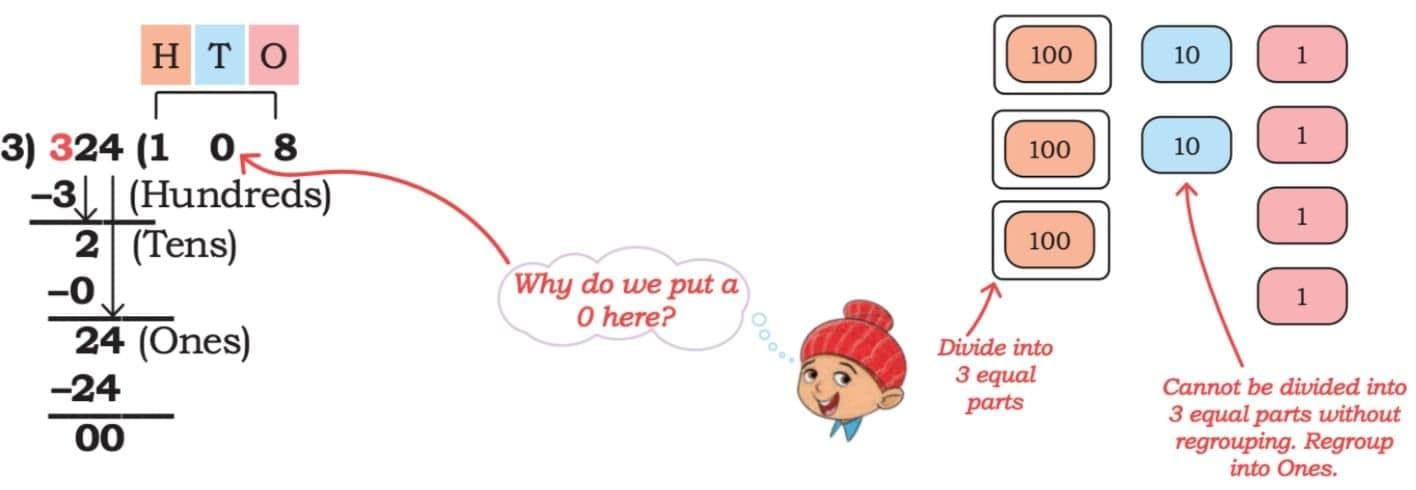
Division Using Place Value
Start with the biggest place value (the leftmost digit) when dividing a number.
Check if the divisor fits into the number or part of it.
Regroup if the part you’re dividing is smaller than the divisor.
Place zeros in the quotient if needed when the number doesn’t divide evenly.
Continue dividing by moving to smaller place values (tens, hundreds, ones).
After dividing, check the answer by multiplying the quotient with the divisor.
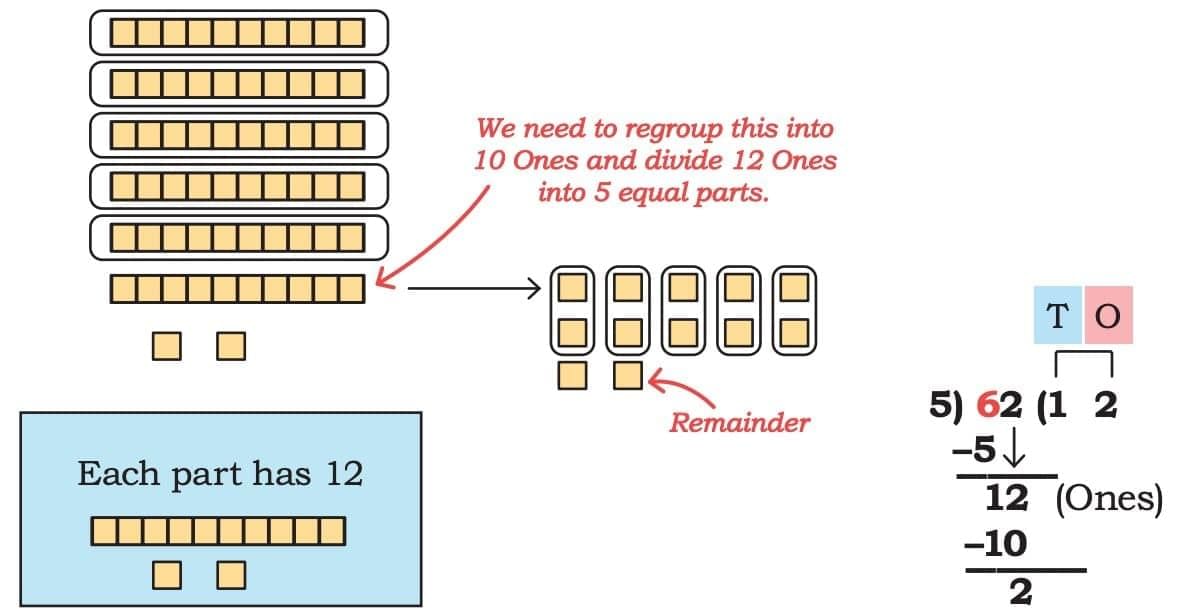
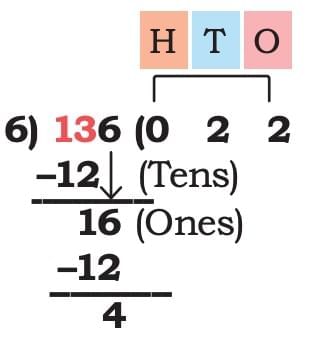
Candle Distribution Problem:
Sunitha’s mother has 62 candies to be distributed equally among 5 children. How many candies would each child get? She shows the following way of doing division using place value.
Sol: 136 = 1 Hundred + 3 Tens + 6 Ones. 1 Hundred ÷ 6 → not possible without regrouping into Tens Regroup 1 Hundred into 10 Tens. Total 13 Tens. Continue dividing.
Extended Word Problems
Some problems use both multiplication and division.
First, you might need to multiply to find a total.
Then, divide to share that total equally or find how many groups there are.
Do the steps in the correct order to get the right answer.
Solved Example:
Naina bought 5 kg of ice cream as a birthday treat for her 23 friends. 400 g of ice cream was left after everyone had an equal share. How much ice cream did each of her friends eat?
Sol: Naina bought 5 kg of ice cream. That means she had 5000 grams of ice cream. (1 kg = 1000 grams)
After the party, 400 grams were left. So, the ice cream that was eaten =5000−400=4600 grams.
She had 23 friends. Everyone got the same amount.
To find each friend’s share:4600÷23=200 grams.
Thus, each friend ate 200 grams of ice cream.
Data Handling via Division
Division helps you find missing numbers in tables or charts.
It can also help to check totals and see if they add up correctly.
Sometimes, you need to divide to find the value for one item or unit.
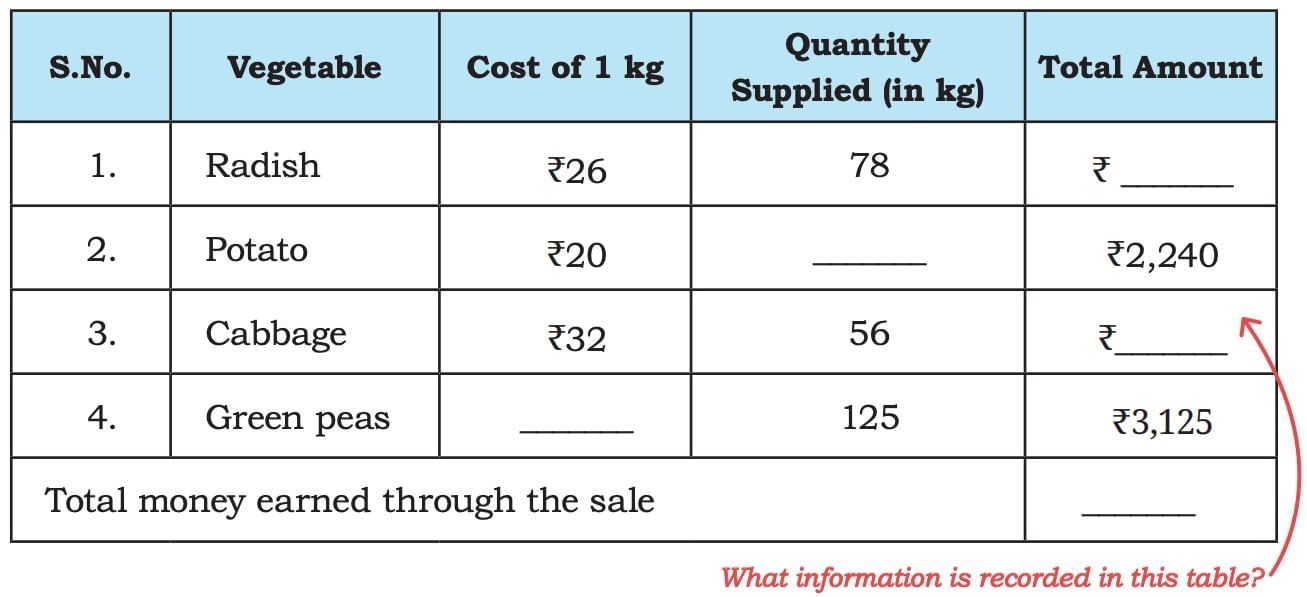
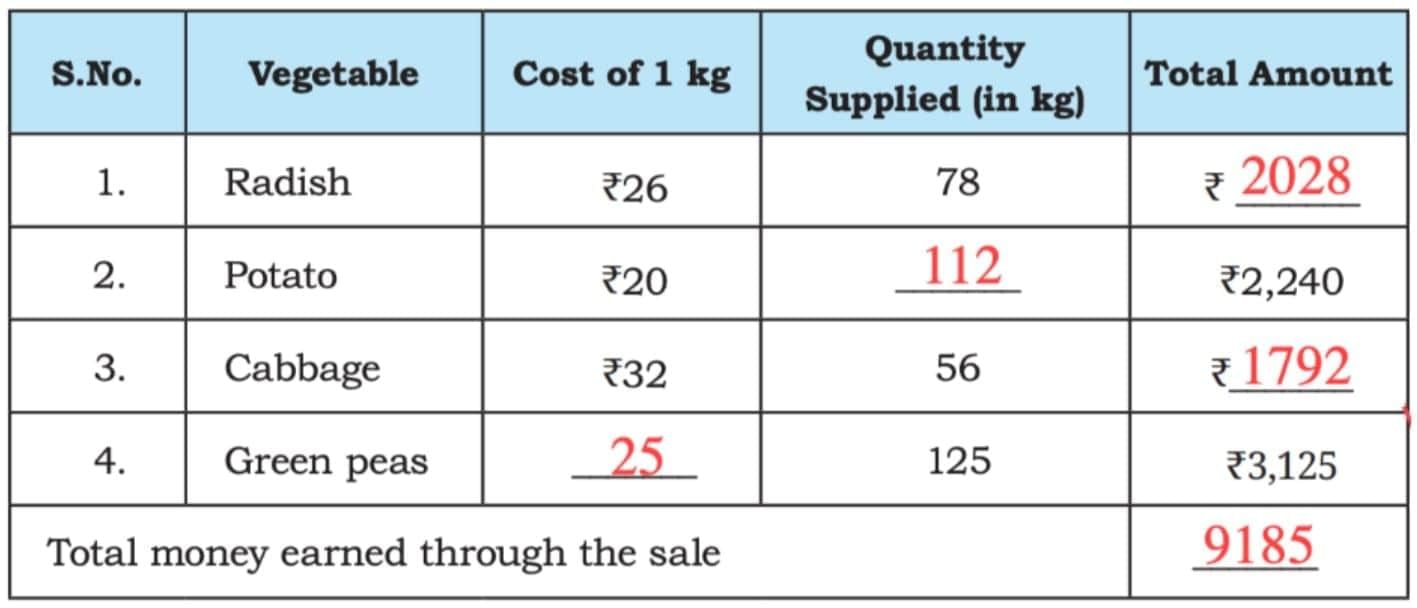
Vegetable Market:
Munshi Lal has a big farm in Bihar. Every Saturday, he sells the vegetables from his farm at Sundar Sabzi Mandi. Munshi ji maintains a detailed record of the quantity of vegetables he sends to the Mandi and the cost of each vegetable.
The following table shows his record book on one Saturday. His naughty grandson has erased some numbers from his record book. Help Munshi Lal complete the table.
Sol:
Radish: Cost of 1 kg = ₹26 Quantity = 78 kg26×78=2028 Total amount = ₹2028
Potato: Total amount = ₹2240 Cost of 1 kg = ₹202240÷20=112 Quantity = 112 kg
Cabbage: Cost of 1 kg = ₹32 Quantity = 56 kg32×56=1792 Total amount = ₹1792
Green peas: Total amount = ₹3125 Quantity = 125 kg3125÷125=25 Cost of 1 kg = ₹25
Total money earned:2028+2240+1792+3125=9185 Total = ₹9185
Mathematical Statements
When you see a math statement, decide if it’s always, sometimes, or never true.
Think carefully about why the statement is right or wrong, and explain your reasoning.
Solved Example:
Complete the following statements such that they are true. (a) 7 × 6 = ____ + 17 (b) 87 + 6 = ____ × 31 (c) 63 + ____ = 74 – 4 (d) ____ ÷ 9 = 16 ÷ 2
Ever bought fruits at a shop and saw the shopkeeper use a weighing scale? That’s measuring weight.
Ever filled a water bottle or a milk jug? That’s measuring capacity.
We use units like kilograms (kg), grams (g), litres (l), and millilitres (ml) to measure.
Sometimes we need to change units, add, subtract, multiply, or divide to solve problems.
These skills help in shopping, cooking, sports, farming, and many other daily activities.
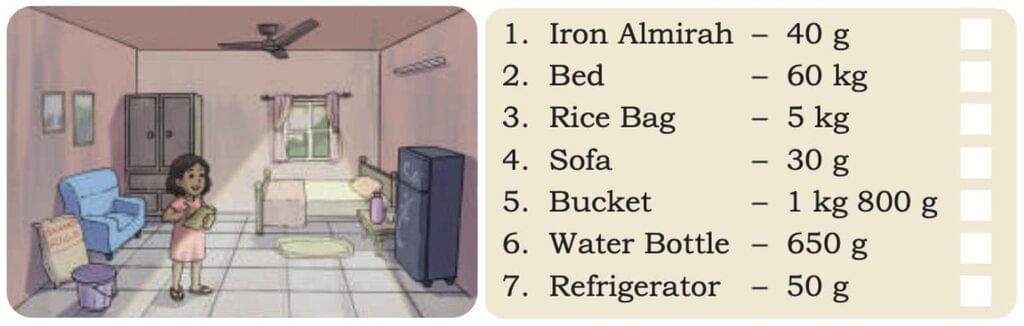
Check! Check!
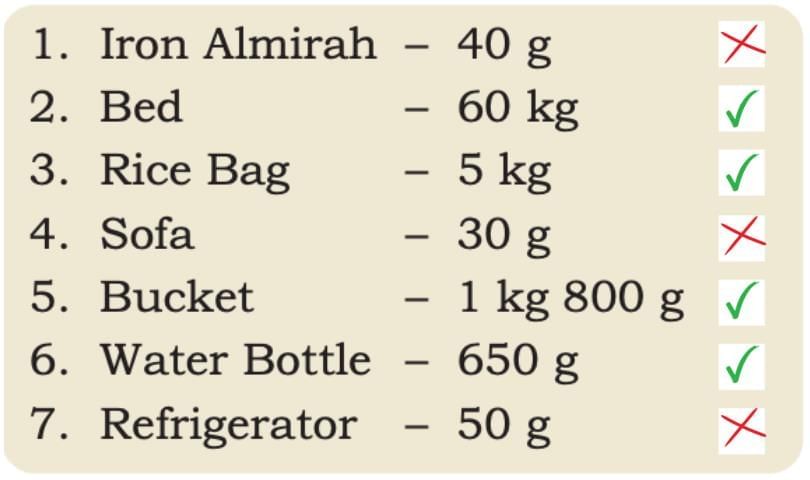
Anu has recorded the weights of the items in her house. Check if she has recorded them correctly by putting a tick against them if they look correct.
Sol:
Explanation:
1. This is too light because iron almirahs are very heavy and can weigh many kilograms.
2. This sounds correct because beds are heavy but not too heavy to move with help. 3. This is correct because we often buy rice in 5 kg bags. 4. This is too light because sofas are big and heavy, not as light as a few grams. 5. This is correct because buckets can weigh this much, especially if they are big or filled with something. 6. This is correct because a full water bottle can weigh around this much. 7. This is too light because refrigerators are very heavy and can weigh many kilograms.
Understanding Weighing Scale
A weighing scale tells us how heavy something is. We can see these in shops, kitchens, bathrooms, and even in school labs.
Scales can look different, but all of them do the same job – they measure weight.
The number ‘0’ on the scale means nothing is on it, so there is no weight.
Before you measure anything, look at the scale to see if it is at 0.
If the scale is not at 0 before you start, the weight will not be correct.
Some scales have a small knob or button that can move the pointer back to 0. This is called “zeroing” the scale.
When the scale is at 0, it measures only the weight of the thing you put on it.
Reading Weight
Look at the biggest numbers first. They tell you the weight in kilograms or grams.
See where the pointer is pointing. Check if it’s between two big numbers.
Count the small lines between the big numbers – each small line is usually 100 g or 50 g, depending on the scale.
Start from the smaller big number and add the small lines until you reach the pointer.
Write the weight in kilograms and grams, or only grams if it’s a small weight.
Always check from the zero mark to be sure the scale is correct before reading.
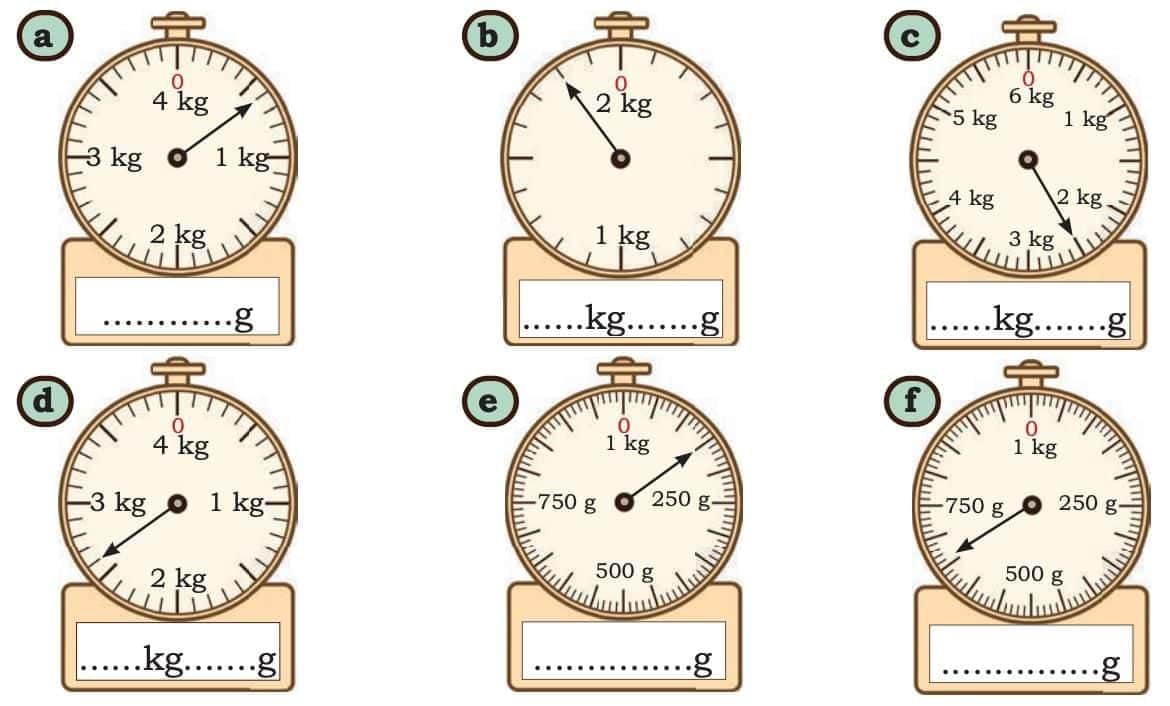
Read the ScalesRead the scales. Write the correct weight in the space given below.
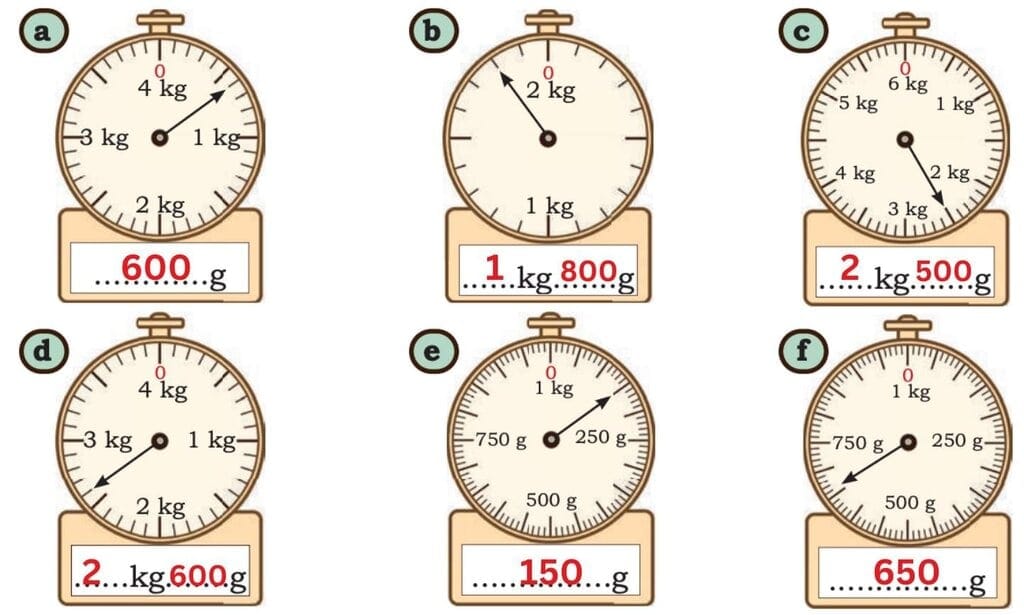
Sol:
(a)
Needle between 0 and 1 kg.
Each small line = 100 g.
Needle at 600 g.
(b)
Between 1 kg and 2 kg.
Needle at 1 kg 800 g.
(c)
Between 2 kg and 3 kg.
Exactly halfway → 2 kg 500 g.
(d)
Between 2 kg and 3 kg.
Needle at 2 kg 600 g.
(e)
Between 0 g and 250 g.
Needle at 150 g.
(f)
Between 500 g and 750 g.
Needle at 650 g.
Units of Weight and their Relationship
Weight can be measured in kilograms (kg) and grams (g).
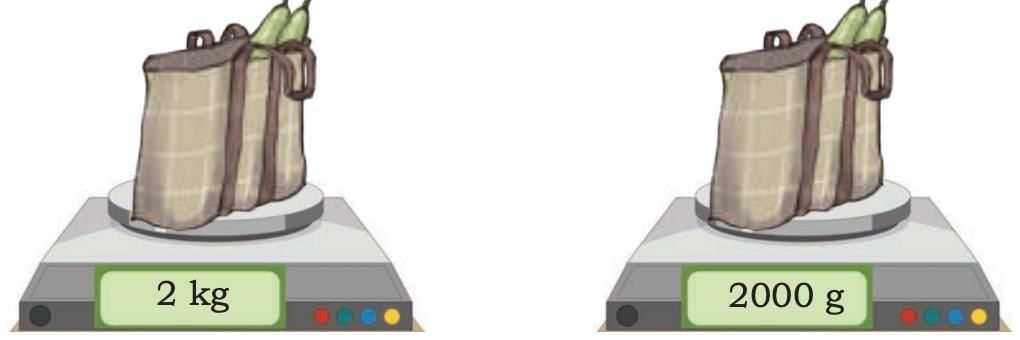
1 kilogram = 1,000 grams. This means a kilogram is a bigger unit and grams are smaller units.
If we have a weight in kilograms and want to know it in grams, we multiply by 1,000. Example: 3 kg = 3 × 1,000 = 3,000 g.
If we have a weight in grams and want to know it in kilograms, we divide by 1,000. Example: 2,500 g = 2,500 ÷ 1,000 = 2.5 kg.
Kilograms are used for heavier things like a bag of rice or a person’s weight.
Grams are used for lighter things like a chocolate bar or a pencil.
Match the weights
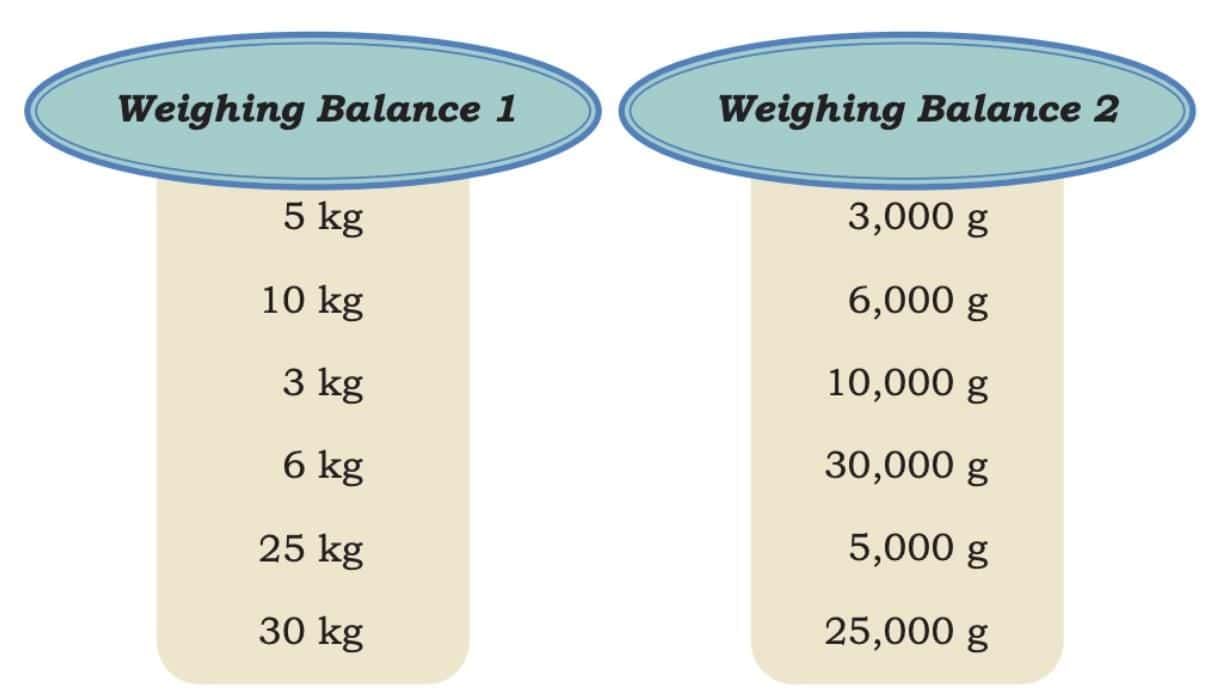
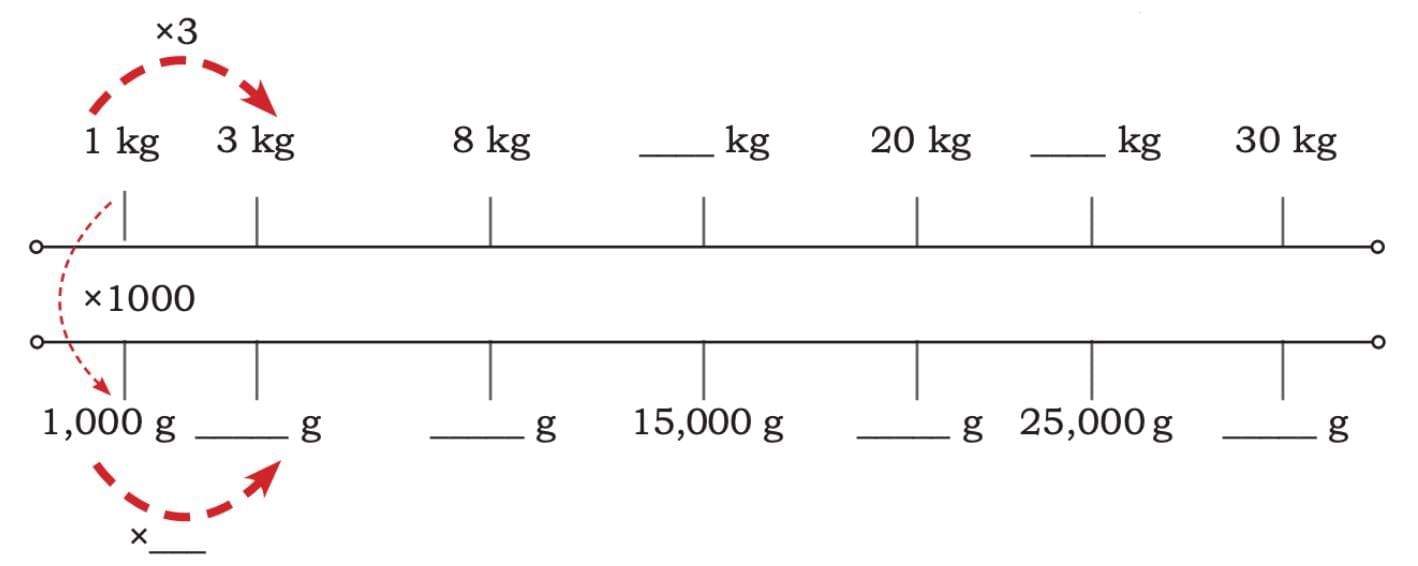
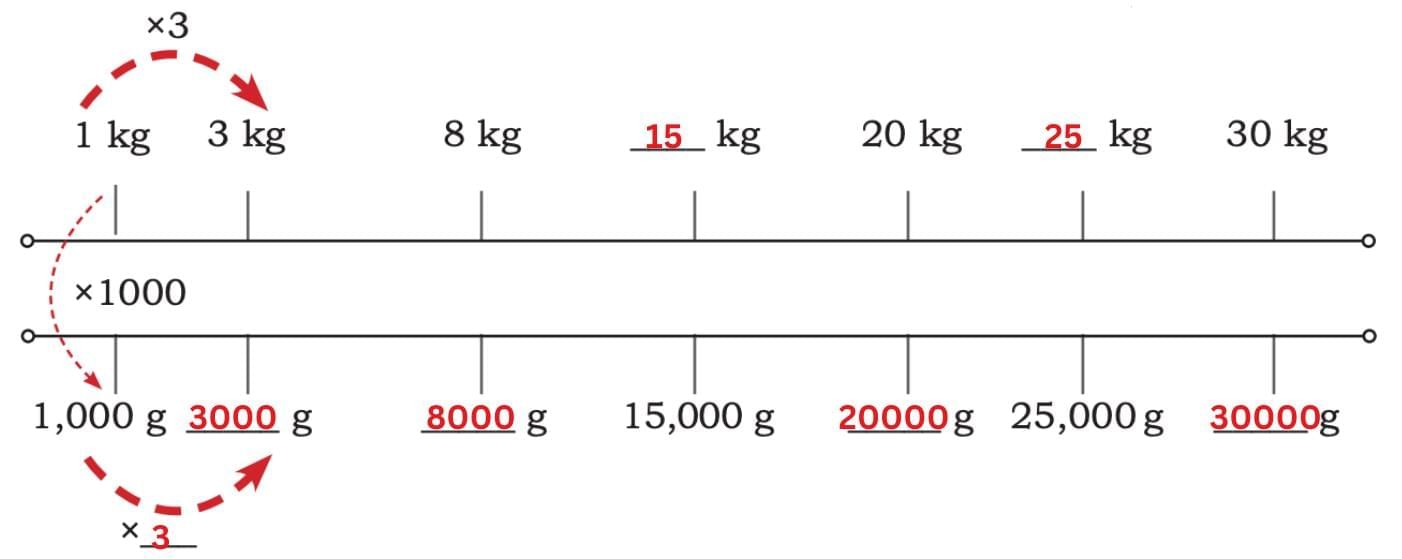
Match the bags that have the same weight. You can use the double number line given below.
Sol:
Step 1: Weighing Balance 1
It has weights in kilograms:
5 kg, 10 kg, 3 kg, 6 kg, 25 kg, 30 kg
Step 2: Convert them into grams
5 kg = 5 × 1000 = 5000 g
10 kg = 10 × 1000 = 10,000 g
3 kg = 3 × 1000 = 3000 g
6 kg = 6 × 1000 = 6000 g
25 kg = 25 × 1000 = 25,000 g
30 kg = 30 × 1000 = 30,000 g
Step 3: Match with Weighing Balance 2
5 kg ↔ 5000 g
10 kg ↔ 10,000 g
3 kg ↔ 3000 g
6 kg ↔ 6000 g
25 kg ↔ 25,000 g
30 kg ↔ 30,000 g
Step 4: Understanding the Double Number Line
Top line shows kilograms
Bottom line shows grams
To go from kilograms to grams, multiply by 1000
To go from grams to kilograms, divide by 1000
Examples from the number line:
1 kg = 1000 g
3 kg = 3000 g
8 kg = 8000 g
20 kg = 20,000 g
30 kg = 30,000 g
Weigh the Cake
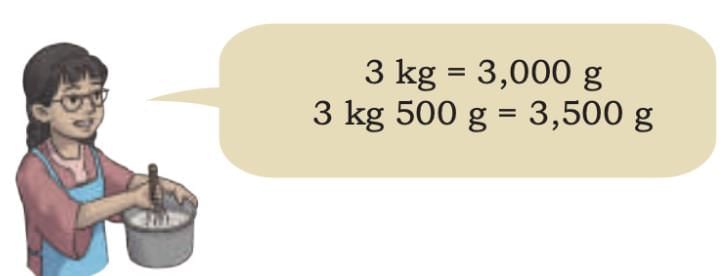
Shrenu is baking cakes for her shop. She needs 3 kg 500 g of flour. Her kitchen scale measures only in grams. What should her kitchen scale show for 3 kg 500 g of flour?
Sol:
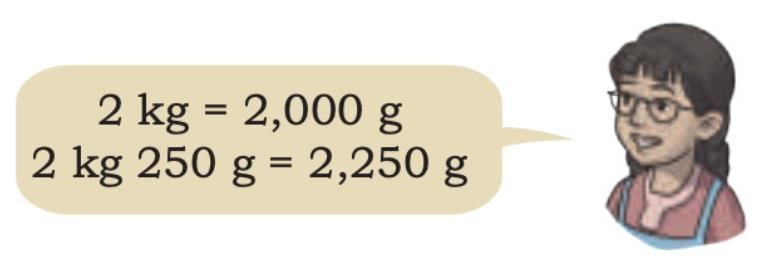
What would be 2 kg 250 g of flour in grams?
Sol:
Comparison between Different Weights
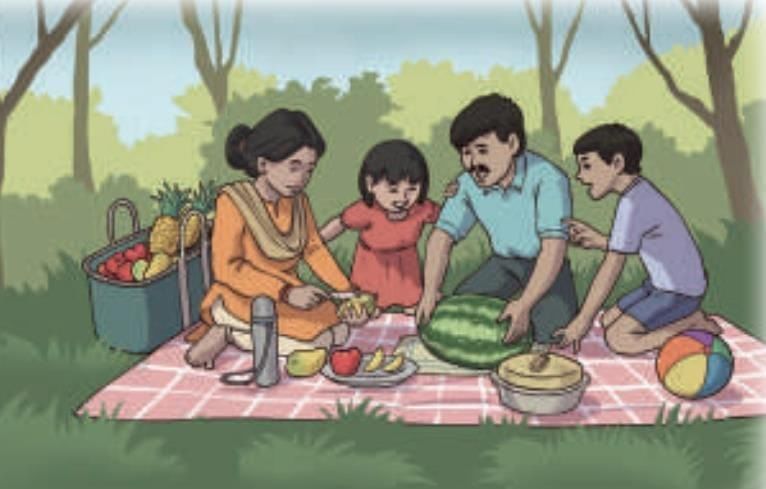
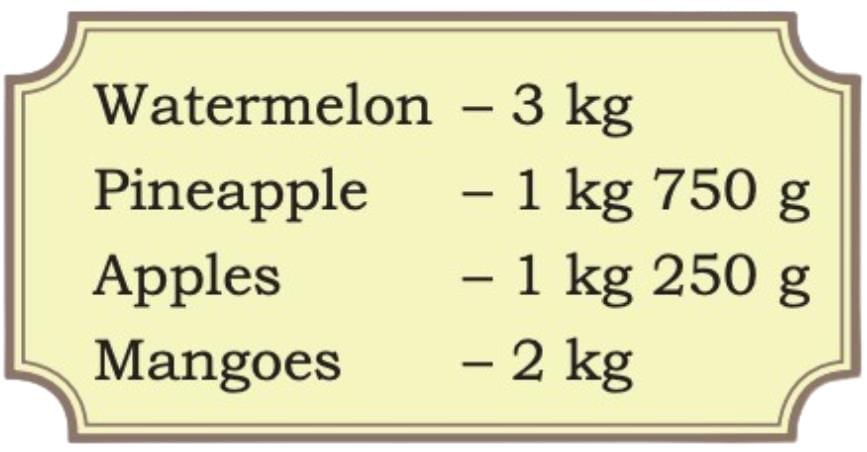
1. Harpreet’s family planned a picnic over the weekend. Her mother and father packed different food items to take along. The following is the list of fruits they carried.
Among the fruits they carried, which one has the (a) highest weight? __________ (b) least weight? __________ (c) Arrange the items in descending order of their weight.__________ __________ __________ __________
Sol: (a) Highest weight? Watermelon – 3 kg (b) least weight? Apples – 1 kg 250 g (c) Arrange the items in descending order of their weight. Watermelon, Mangoes, Pineapple, Apples
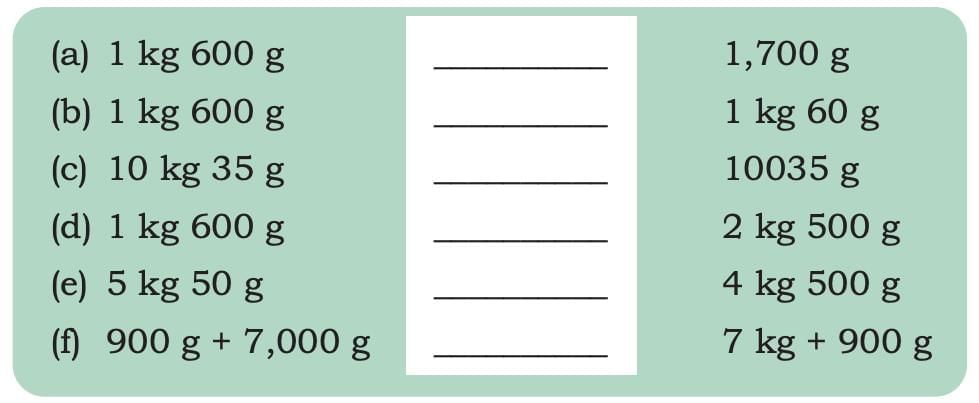
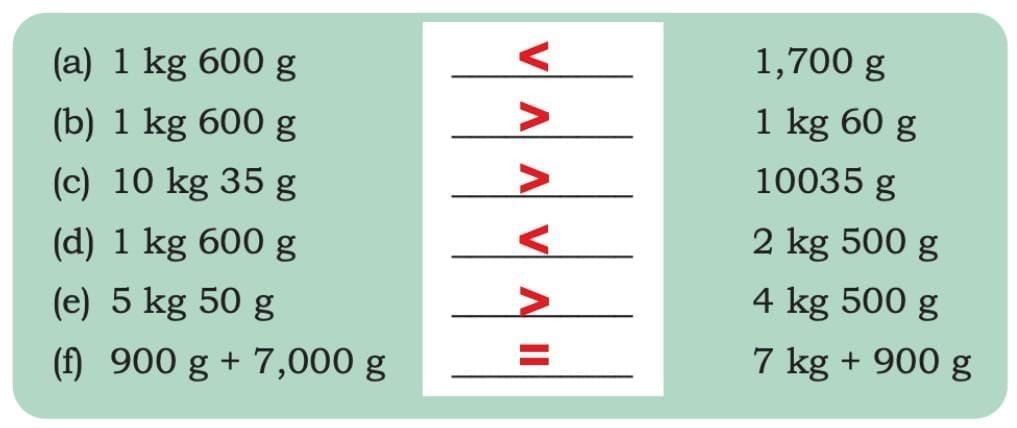
2. Compare the weights using <, =, > signs.
Sol:
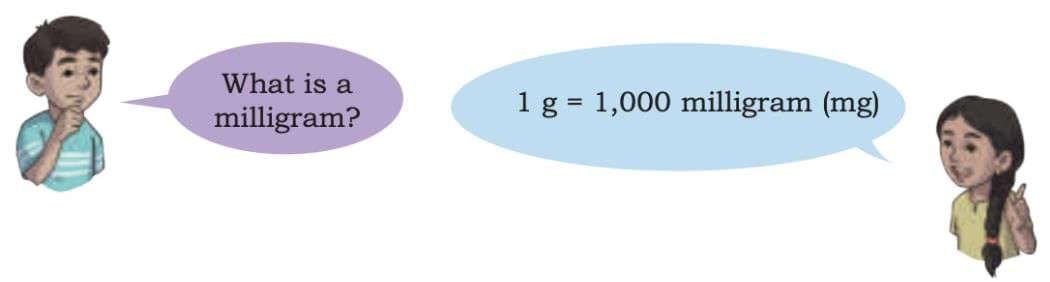
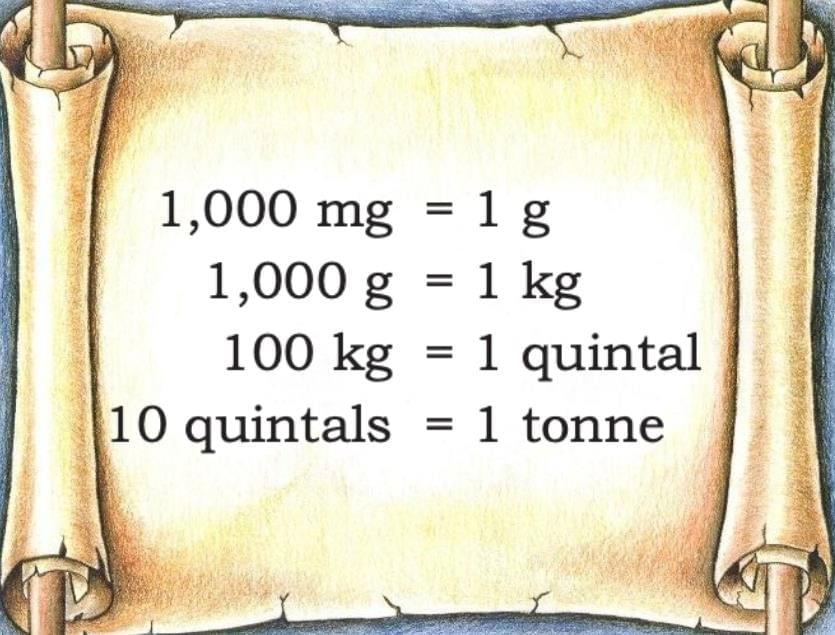
Milligram
Milligrams (mg) are tiny units for very light things like medicine or gold.
1 gram = 1,000 mg.
To change g into mg → multiply by 1,000.
To change mg into g → divide by 1,000.
It helps in precise measurements.
Solved Example:
If a sugar sachet weighs 5g, how much will it be in milligrams?
Sol: We know that 1 g = 1000 mg
Thus, 5 g = 5 x 1000 = 5000 mg
Tonnes
Tonnes (t) are big units for very heavy things like trucks, elephants, or huge containers of goods.
1 tonne = 1,000 kilograms.
To change tonnes into kilograms → multiply by 1,000.
To change kilograms into tonnes → divide by 1,000.
It helps in measuring very heavy weights.
King’s Weight
In a kingdom, the king donates wheat grains equal to 10 times his weight on his birthday.
(a) If he donates 800 kg of wheat grain this birthday, what is his current weight? _______ kg. (b) If he had donated 780 kg of wheat grain on his last birthday, what was his weight last year? _______ kg. (c) How much weight did he gain in a year until this birthday?_______ kg
Sol: (a) 80 kg (b) 78 kg (c) (80 – 78) kg = 2 kg
From Tiny to Big
Always remember these weight conversions – they are the key to changing between milligrams, grams, kilograms, quintals, and tonnes!
Addition and Subtraction of Weights
We measure weight in kilograms (kg) and grams (g).
1 kilogram = 1,000 grams.
When adding or subtracting weights, first look at the kilograms and grams separately.
Step 1: Add or subtract the kilograms.
Step 2: Add or subtract the grams.
If the grams are 1,000 or more, change 1,000 g into 1 kg and add it to the kilograms.
Sometimes it’s easier to change the whole weight into grams first, do the calculation, and then change the answer back to kilograms and grams.
This method is very useful in real life — for example, when adding the weight of vegetables in a market or measuring ingredients in cooking.
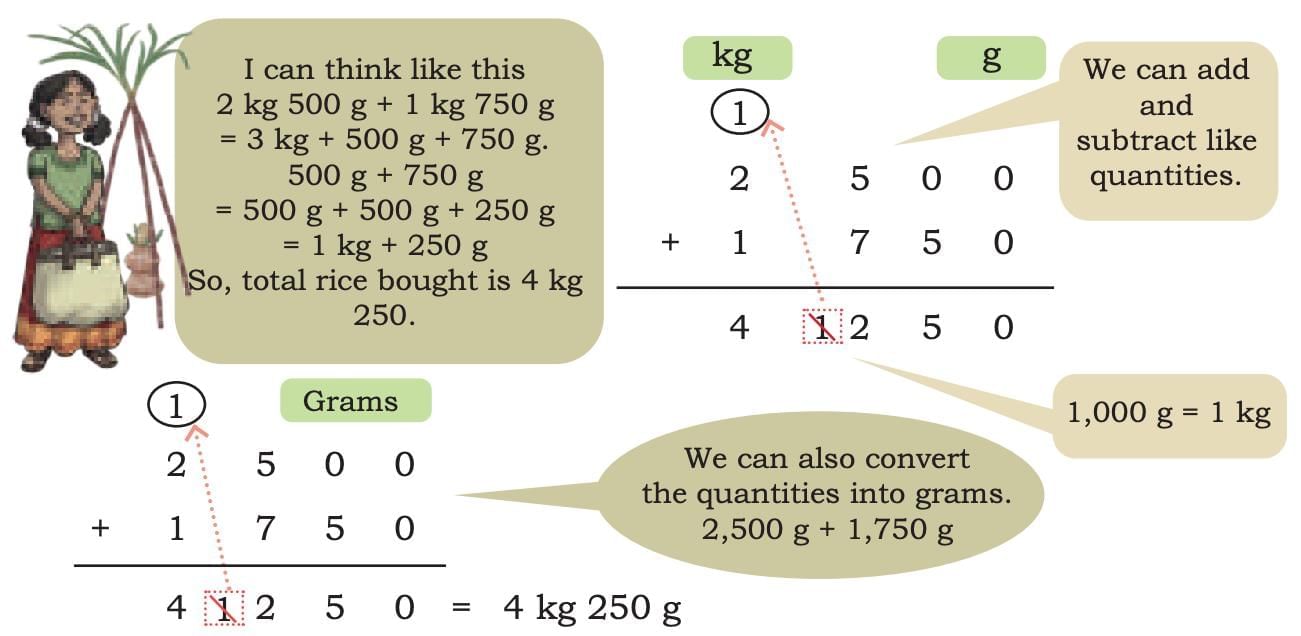
Example: 2 kg 500 g + 1 kg 750 g → Add kilograms: 2 + 1 = 3 kg → Add grams: 500 + 750 = 1,250 g → Change 1,000 g into 1 kg and add to kilograms → Total = 4 kg 250 g
The Grocery Store
Rathna went to the local grocery store and bought several items.
She bought 2 kg 500 g rice for daily use and 1 kg 750 g additional rice for the upcoming Pongal festival. How much total rice did she buy?
Sol: We have three different waysto add these weights:
Mental Method (breaking into parts):
Add kilograms and grams separately.
2 kg + 1 kg = 3 kg
500 g + 750 g = 1250 g = 1 kg 250 g
So, 3 kg + 1 kg 250 g = 4 kg 250 g
Column Method:
Write kg and g in columns and add them.
Carry over 1000 g as 1 kg.
Answer is 4 kg 250 g.
Convert to grams:
2 kg 500 g = 2500 g
1 kg 750 g = 1750 g
Add: 2500 g + 1750 g = 4250 g
Convert back: 4250 g = 4 kg 250 g
Multiplication and Division of Weights
Weighing is not just about adding and subtracting — sometimes we need to multiply or divide weights.
Multiplication with weights
Used when we have many items of the same weight.
We multiply the weight of one item by the number of items to get the total weight.
Example: If one packet of flour weighs 2 kg and we buy 5 packets, 2 kg × 5 = 10 kg total.
Division with weights
Used when we know the total weight and need to find the weight of one item.
We divide the total weight by the number of items.
Example: If 12 kg of rice is packed equally into 4 bags, 12 kg ÷ 4 = 3 kg per bag.
Why it’s useful:
Helps when buying in bulk or sharing food equally.
Useful for finding the cost of items (price per kg × weight) or finding weight from cost (total price ÷ price per kg).
Always remember:
You can multiply or divide kilograms and grams directly.
Or convert everything to grams first, do the calculation, then change it back to kg and g.
Solved Example
1. A farmer weighs a sack of potatoes and finds it to be 10 kg 500 g.If the farmer has 4 such potato sacks, what is the total weight of all the sacks?
Sol: 4 × 10 kg 500 g = 4 ×10 kg and 4 × 500 g = 40 kg + 2000 g = 40 kg + 2 kg = 42 kg.
2. A box of nuts weighing 4 kg 800 g is equally distributed into 4 smaller boxes. What is the weight of each small box in grams?
Sol: 4 kg ÷ 4 = 1 kg 800 g ÷ 4 = 200 g So, 4 kg 800 g ÷ 4 = 1 kg 200 g
Measuring Capacity
Capacity refers to the amount of liquid a container can hold.
We measure it using litres (l) and millilitres (ml). 1 litre = 1,000 millilitres. Bigger containers (like buckets, bottles) are measured in litres. Smaller amounts (like a spoon of medicine, a small packet) are measured in millilitres.
Example:
At home, when we prepare tea, we use water and milk.
If we want to make 2 cups of tea, we don’t need 1 litre of water because 1 litre is too much.
500 ml of water is usually enough for 2 cups.
This shows we choose the right unit (ml or l) depending on the quantity.
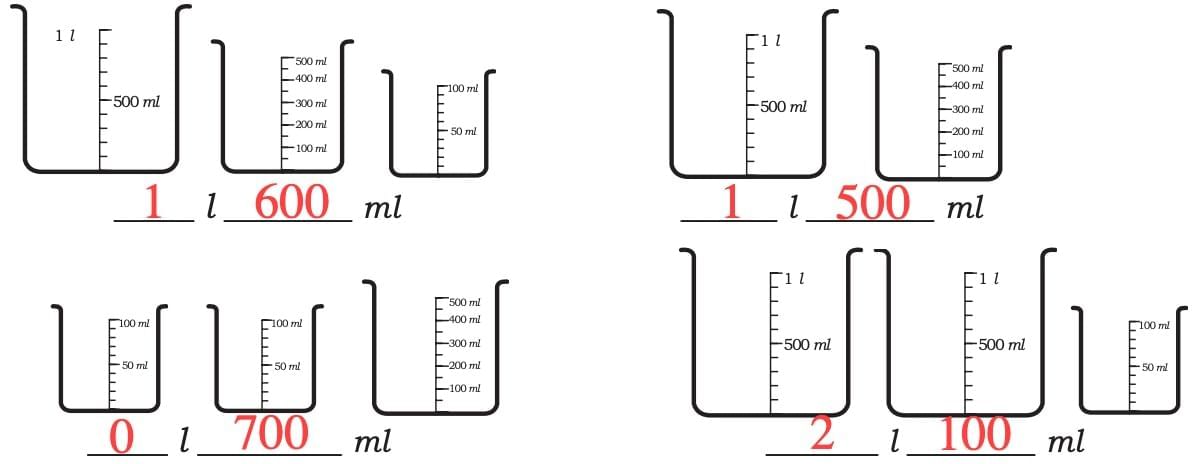
Big to Small, Small to Big
Write the total capacity of the following containers in each blank.
Sol: Observe the beakers:
Big beaker = 1 litre (1 l = 1000 ml)
Medium beaker = 500 ml
Small beaker = 100 ml
Add the capacities in each set.
Top-left set: 1 l + 500 ml + 100 ml = 1 l 600 ml
Top-right set: 1 l + 500 ml = 1 l 500 ml
Bottom-left set: 100 ml + 100 ml + 500 ml = 700 ml (or 0 l 700 ml)
Bottom-right set: 1 l + 1 l + 100 ml = 2 l 100 ml
Different Units but Same Measure
Litres and millilitres are connected – whenever litres feel too big, we can change them into millilitres. Example: 2 litres = 2,000 ml.
Containers are marked in ml or l – like a milk vessel or water bottle. Even if the vessel is marked in ml, you can still measure litres.
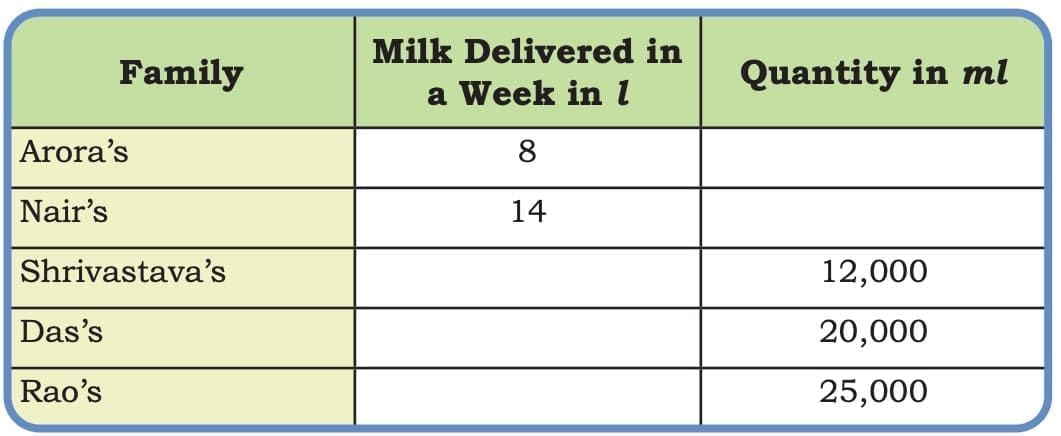
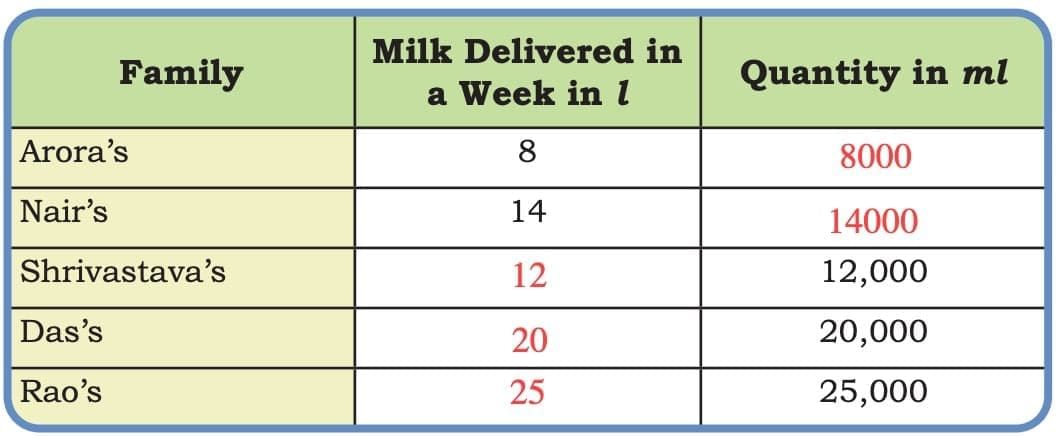
Example:
Shrivastava’s family takes 12,000 ml, which means 12 litres.
Rao’s family takes 25,000 ml, which means 25 litres.
Why we learn this – it helps us when: Buying milk, petrol, or juice. Measuring medicines in ml. Cooking recipes where exact liquid amounts matter.
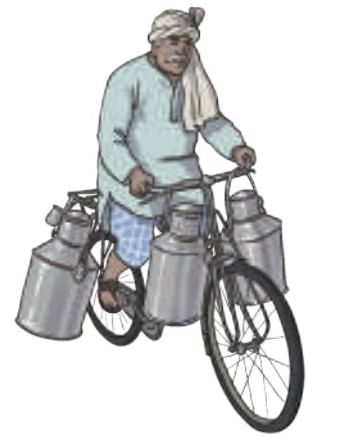
Measuring Milk
Khayal chacha delivers fresh cow milk to homes. Bhalerao’s family orders 2l of milk every day. This family has a vessel marked in ml only. What mark will you see in the vessel corresponding to 2l?
Khayal chacha delivers the following amounts of milk each week to different families.
Dev’s family needs 1 l milk every day. On Sunday, they need 500 ml more.Quantity of milk they need on Sunday = 1 l + 500 ml = 1,000 ml + 500 ml = 1,500 ml
Sol:
1. Bhalerao’s vessel mark for 2 litres Rule: 1 l = 1000 ml 2 l = 2 × 1000 = 2000 ml So the mark you will see is 2000 ml.
2. Fill the litres–millilitres blanks (Use 1 l = 1000 ml)
1 l → 1000 ml 2 l → 2000 ml 6 l → 6000 ml 8 l → 8000 ml 12 l → 12,000 ml 14 l → 14,000 ml 20 l → 20,000 ml 25 l → 25,000 ml
So the filled rows are:
3. Weekly delivery table (convert each using 1 l = 1000 ml)
4. Dev’s family Needs 1 l every day, and on Sunday, 500 ml more. 1 l + 500 ml = 1000 ml + 500 ml = 1500 ml
Comparing Capacity
It means finding out which container can hold more liquid and which one can hold less.
How do we compare? 1. If the liquids are given in the same unit (both in litres or both in millilitres), just look at the numbers. Example: 3 l vs 5 l → 5 l is more. 2. Example: 1 l vs 750 ml → change 1 l into 1,000 ml → now 1,000 ml is more than 750 ml.
Why do we convert? 1. Because it’s like comparing apples and oranges. 2. To compare properly, we need both in the same form (like both in ml or both in l).
Real-life examples: 1. A water bottle (1 l) vs a juice packet (250 ml) → bottle holds more. 2. A bucket (15 l) vs a mug (1 l) → bucket holds more. 3. Milkman gives 2 l to one family and 1,500 ml to another → convert 2 l = 2,000 ml → 2,000 ml is more.
Easy tip to remember: 1. Bigger number in the same unit = bigger capacity. 2. Always bring litres and millilitres to the same unit before deciding.
Let Us Compare
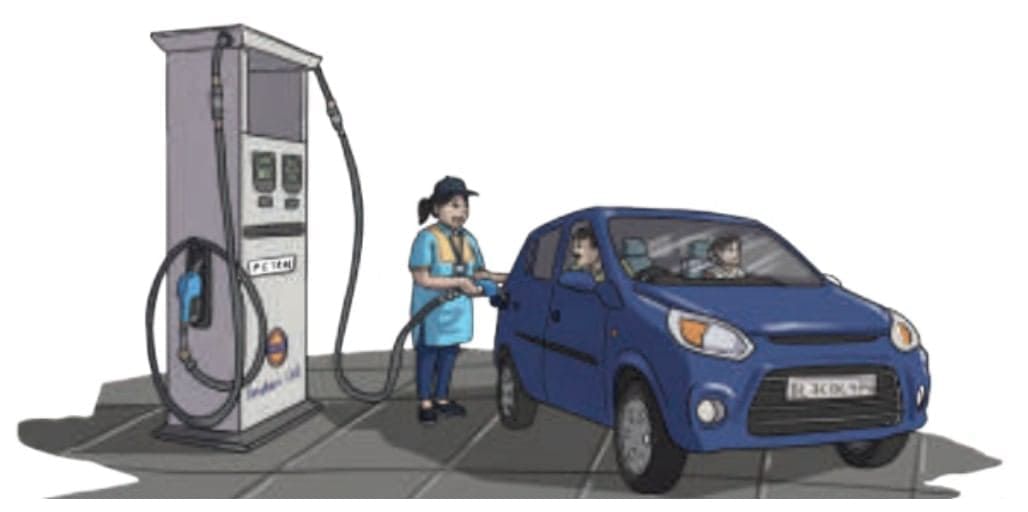
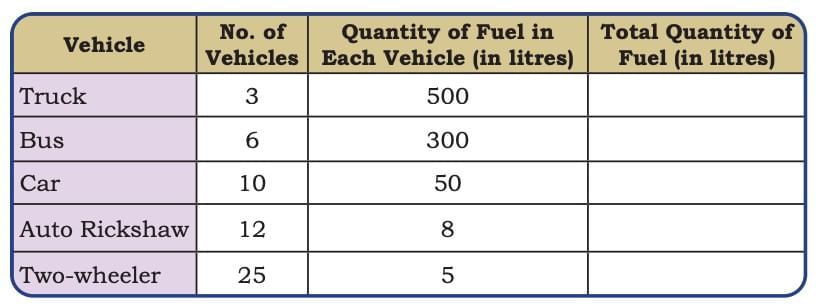
Kiran owns a petrol pump. She records the details of the sales of petrol in a day.
(a) How much more fuel is bought for buses than for trucks? (b) What is the total quantity of fuel filled from the petrol pump on that day?
Sol: First, find the total fuel for each vehicle type (No. of vehicles × fuel in each):
(a) How much more for buses than trucks? Buses: 1,800 litres Trucks: 1,500 litres Difference: 1,800 − 1,500 = 300 litres more for buses. (b) Total fuel filled that day Add all the totals: 1,500 + 1,800 + 500 + 96 + 125 = 4,021 litres.
Addition of Capacity
Capacity means the amount of liquid a container can hold.
To add, write litres (l) and millilitres (ml) separately.
Add ml and l column-wise.
If millilitres go over 1,000, regroup them into litres (because 1,000 ml = 1 l).
Example:
2 l 500 ml + 3 l 750 ml
= (2 + 3) l and (500 + 750) ml
= 5 l and 1,250 ml
1,250 ml = 1 l 250 ml
Final = 6 l 250 ml
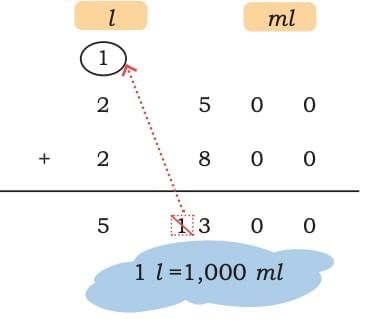
Subtraction of Capacity
Write litres (l) and millilitres (ml) separately.
Subtract ml and l column-wise.
If ml in the top number is smaller, borrow 1 litre = 1,000 ml.
Example:
5 l 200 ml – 3 l 750 ml
= (5 – 3) l and (200 – 750) ml
Since 200 is smaller, borrow 1 l = 1,000 ml
200 + 1,000 = 1,200 ml
Now subtract: (4 – 3) l and (1,200 – 750) ml
Final = 1 l 450 ml
Let us solve
Sam and Tina fill petrol in their bikes. Tina bought 2 l 500 ml of petrol. Sam bought 2 l 800 ml more petrol than Tina. How much petrol didSam buy?
Sol: Sam found the quantity of petrol by adding like quantities.
2 l 500 ml + 2 l 800 ml = 2 l + 2 l and 500 ml + 800 ml = 4 l and 1,300 ml = 4 l and 1 l and 300 ml = 5 l 300 ml
Tina converted the quantities into ml, that is, 2,500 ml and 2,800 ml.
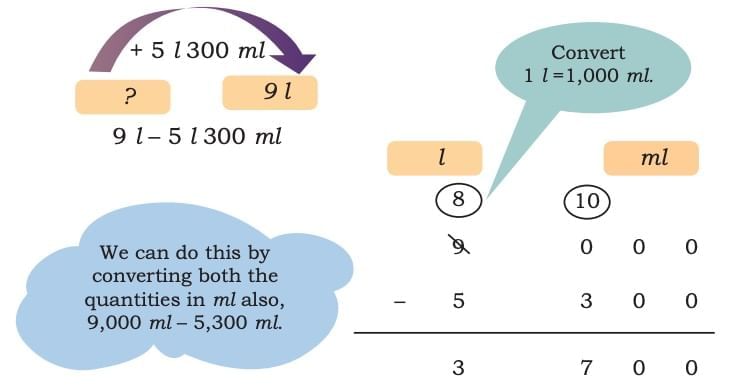
Total quantity of petrol bought by Sam = 2,500 ml + 2,800 ml = 5,300 ml =5 l 300 ml.
After refuelling, Sam found his fuel gauge reading 9 l.
How much fuel did his bike have before refuelling? The quantity of fuel Sam’s bike had before refuelling is–Sam’s bike had 3l 700ml of fuel before refuelling.
Patterns are everywhere – from woven mats to floor tiles!
Shapes fit together to make beautiful designs without gaps or overlaps.
In this chapter, you’ll learn to make patterns by weaving and tiling.
You’ll explore how triangles, squares, and other shapes create repeating patterns.
Get ready to create shapes and solve fun geometry puzzles!
Patterns
A pattern is a repeated arrangement of shapes, colours, numbers, or objects in a particular order.
Patterns can be: Shapes: Like repeating circles or squares. Numbers: Like 2, 4, 6, 8 (numbers increase by 2 each time). Colours: Like red, blue, red, blue (alternating colours).
How Patterns Work: Patterns repeat in a specific order. Once you know the rule (like “1 over, 1 under”), you can continue the pattern. Example: In a pattern of colours, “red, blue, red, blue,” you can predict that the next colour will be red.
Creating Patterns: You can create your patterns by picking a shape, number, or colour and repeating it in a certain order. Example: “circle, square, circle, square…” is a simple pattern.
Patterns in Everyday Life: You can find patterns everywhere, like in designs on clothes, tiles, or nature, such as the stripes on a zebra or the petals of a flower.
Why Are Patterns Important? Recognising and creating patterns helps us organise information, solve problems, and understand the world around us.
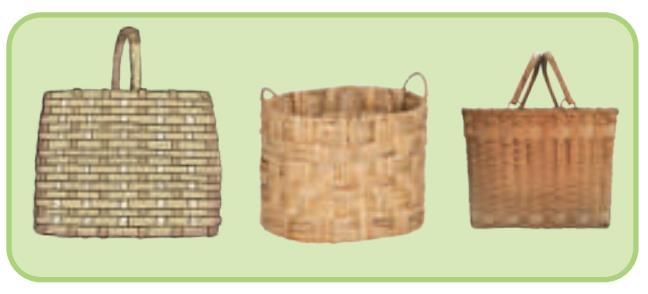
Weaving Mats
You may have seen woven baskets of different kinds. If you look closely, you will notice different weaving patterns on each basket.
We will try weaving some mats with paper strips.
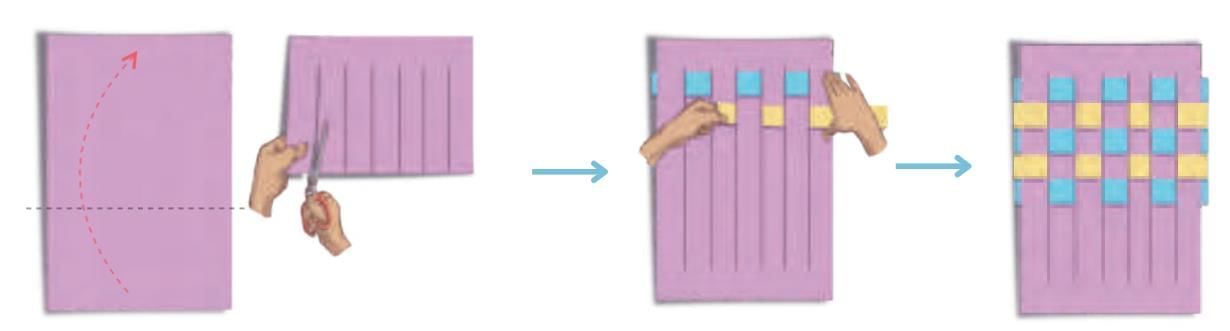
You will need —A coloured paper (30 cm long and 20 cm wide) and eight paper strips of two different colours (3 cm wide and longer than 20 cm). (a) Take a coloured paper 30 cm long and 20 cm wide. (b) Fold the coloured paper in half along the longer side. (c) Draw vertical lines at equal distances from the closed end and cut slits, leaving a gap of 3 cm at the top. (d) Carefully unfold the paper. There will be no cuts in the paper at the top and the bottom. (e) Now cut 8 paper strips of 3 cm width in 2 colours and of length slightly longer than 20 cm. (f) Take one colour strip and weave it across the slits, going 1 under and 1 over, and again 1 under and 1 over. Repeat it for the first row. (g) Take one more strip of another colour and weave it across the slits, going 1 over and 1 under, and again 1 over and 1 under. Repeat it for the second row. (h) Weave all the strips in the same alternating pattern. Neatly fold any extra strip ends behind the mat. Your mat is ready!
Different Types of Shapes
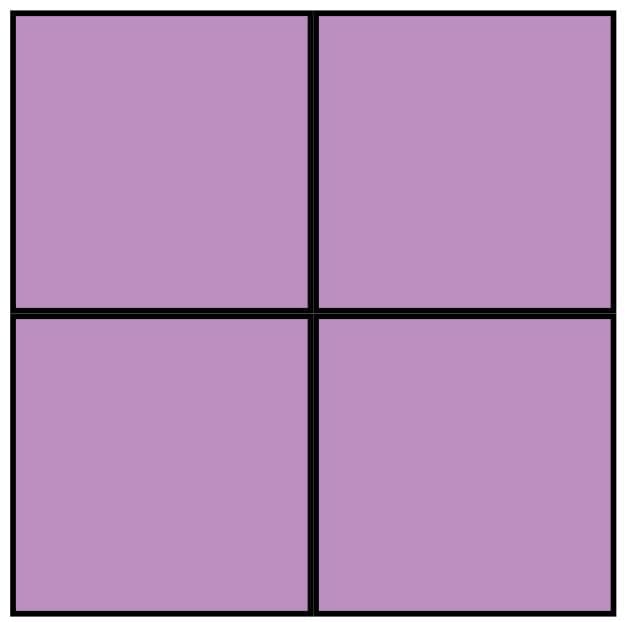
The following table summarises different types of shapes:
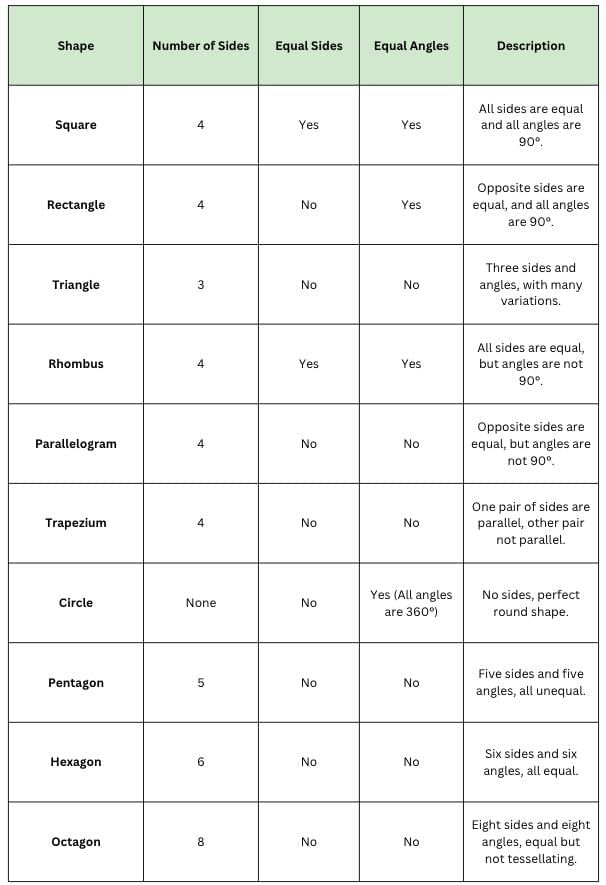
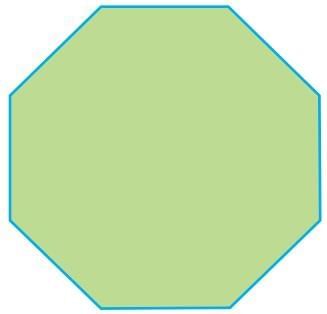
Tiling and Tessellation
Tiling: Using shapes (like tiles) to cover a surface without gaps or overlaps.
Regular Shapes: Shapes with equal sides, like squares, triangles, and pentagons.
Pentagons: A regular pentagon has 5 equal sides.
When we place 3 pentagons around a point, there’s a space left.
Pentagons cannot tessellate because they don’t fit together perfectly—they leave gaps.
Tessellation happens when shapes fit together without any gaps or overlaps, like squares or triangles.
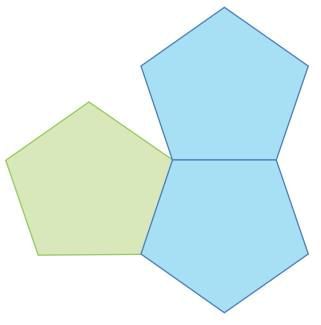
Find Out
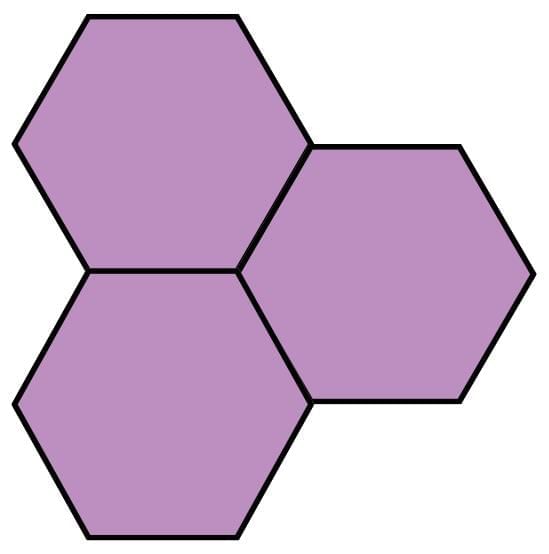
Can regular triangles fit together at a point without any gap? How many of them fit together? Do you see that regular triangles fit around a point as shown here?
Regular triangles, when fitted around a point, leave no gaps, and there is no overlap.
Triangles with all equal sides are also called equilateral triangles. Therefore, equilateral triangles tessellate.
Sol:
Yes! Equilateral triangles (triangles with all equal sides) fit together perfectly around a point without any gaps or overlaps.
Exactly 6 equilateral triangles fit together around a point. When placed correctly, they create a tessellating pattern with no empty spaces.
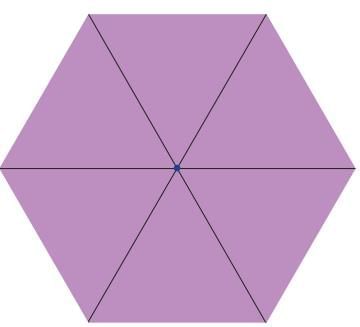
Can five squares fit together around a point without any gaps or overlaps? Why or why not?
Sol:
Yes, squares (4-sided shapes) also fit together perfectly around a point without gaps or overlaps. You will need 4 squares to fit together around a point.
No, 5 squares cannot fit together at a point because there isn’t enough space to align them without leaving gaps.
Can regular hexagons (6-sided shapes with equal sides) fit together around a point without any gaps or overlaps? Try and see (a sample hexagon is given at the end of the book). How many fit together at a point?
Sol: Yes, regular hexagons (6-sided shapes) fit together perfectly around a point, with 3 hexagons fitting together at each point without any gaps or overlaps.
Here is a tessellating pattern with more than one shape. What shapes have been used in this pattern? _____________, _____________.
Sol: Triangles, Regular Hexagon
A regular octagon means a shape with eight equal sides. Do regular octagons fit together without any gaps or overlaps? Try drawing the same and check
Sol: Regular octagons do not tessellate.
Because:
The angles inside an octagon are too big to fit together perfectly at the corners.
When you place octagons next to each other, they leave gaps because their angles don’t match up to fill the space completely.
A rhombus is a shape with all equal sides.
What shapes are coming together at the marked points? Are the same set of shapes coming together at these points?
Sol:
At the marked points, we can see rhombuses and triangles coming together.
Yes, the same set of shapes (rhombuses and triangles) is repeating at each marked point. This means the pattern is consistent and repeating.
Rhombuses have equal sides, and when divided into four triangles, the angles of the triangles match up perfectly with each other. This helps the shapes fit together neatly without any gaps.
The equal sides and angles of rhombuses and triangles allow them to fill a surface by repeating without leaving any empty spaces. This is why tessellation works — the shapes fit together perfectly and create a pattern.
Types of Triangles
Equilateral Triangle
All three sides are equal.
All three angles are the same and are always 60°.
Example: A perfect triangle with all sides the same length.
Isosceles Triangle
Two sides are equal, and the third side is different.
The two angles opposite the equal sides are also equal.
Example: A triangle with two sides of the same length and one different.
Scalene Triangle
All three sides are different lengths.
All three angles are also different.
Example: A triangle with no equal sides or angles.
Quadrilaterals
Quadrilaterals whose opposite sides are equal are called parallelograms. What types of angles do quadrilaterals A and B have? Which angles are equal in each of the above parallelograms?
In parallelogram A, opposite angles are equal.
In parallelogram B, all angles are equal and are right angles. Such a parallelogram is called a rectangle.
A rectangle is a special type of parallelogram.
Tangram
A Tangram is a puzzle made of 7 flat pieces (called tans) that can be rearranged to form different shapes and figures.
Observing Angles and Sides When you look at the Tangram pieces, you can see how the angles of each piece fit together to form new shapes. The triangles have different angles, while the square and parallelogram have right angles. The pieces may have equal sides or unequal sides, depending on their shape.
Using Tangram Pieces to Make Figures You can rearrange the 7 pieces to make different shapes. For example: a bird or a fish.
Tangrams help develop spatial thinking, which means understanding how shapes fit together and how they can be rearranged.
Why is Tangram Fun? Tangram puzzles are fun because you can create many different things using the same 7 pieces. It also helps you practice problem-solving and creativity as you figure out how to arrange the pieces into new shapes.
Observe and Answer
Look at the tangram set given. Cut out all the shapes. Name them.
(a) How are they the same or different from each other? (b) What do you notice about the angles of each of the shapes? (c) What do you notice about the sides of each of the shapes? Now, use some or all of the pieces of your tangram set to make the following shapes. There may be more than one way to do it.
Sol:
A standard Tangram has 7 pieces:
2 Large right-angled isosceles triangles
1 Medium right-angled isosceles triangle
2 Small right-angled isosceles triangles
1 Square
1 Parallelogram
(a) Same:
All the shapes are polygons.
Many are right-angled isosceles triangles (triangles with one right angle and two equal sides).
Altogether, they fit perfectly into a large square.
Different:
Some shapes are triangles, one is a square, and one is a parallelogram.
Their sizes vary (small, medium, and large triangles).
The parallelogram is the only piece without right angles.
(b)
Triangles: Each has a right angle (90°) and two 45° angles.
Square: All four angles are right angles (90°).
Parallelogram: Opposite angles are equal, not all right angles.
(c)
Triangles: Two equal sides (isosceles).
Square: All four sides equal.
Parallelogram: Opposite sides equal and parallel.
Using Tangram Pieces to Make Given Shapes
Parallelogram (top left):
Can be made using the parallelogram piece itself OR by combining triangles.
Square (top right):
Can be made using the square piece directly, or by joining two small triangles.
Triangle (bottom left):
Can be made using any of the triangle pieces (small, medium, or large).
Trapezium (bottom right):
Can be made by combining two or more triangle pieces.
Kites
A kite is a four-sided shape with two pairs of adjacent sides that are equal in length.
The adjacent sides are the sides that are next to each other.
The diagonals of a kite cross each other at right angles (90°), and one diagonal bisects the other.
The angles between the unequal sides of the kite are equal.
You can make a kite shape by folding a square piece of paper diagonally and bringing the opposite corners together.
Kites are also seen in real life, like the flying kites or diamond shapes.
The name “kite” comes from the kite shape seen in flying kites!
Make your own kite shape.
(a) Start with a square piece of paper. (b) Take one corner of the paper and fold it towards the opposite corner, creating a sharp crease along the diagonal. (c) Open and fold the corner A inwards, aligning the edge with the crease you just made. (d) Repeat on the other side, folding the other corner B inwards to align with the crease at the centre. You have a kite shape! What shapes do you see in the kite
Sol: The kite shape is a quadrilateral made of two triangles and a central quadrilateral (square/diamond) formed by the folds.
Circles
A circle is a shape with no straight sides, and every point on the circle is equidistant from the centre.
The distance from the centre of the circle to any point on the circle is called the radius.
The longest distance across the circle, passing through the centre, is called the diameter. The diameter is twice the length of the radius.
The circumference is the distance around the edge of the circle.
Circles are round and have no corners or edges.
Every circle has 360° angles, meaning the entire angle around the circle adds up to 360 degrees.
Pi (π) is a special number used to calculate the circumference and area of a circle.
Play with Circles
(a) Draw a circle with a compass and mark its centre. (b) Draw its diameter. Mark the endpoints of the diameter. (c) Draw another diameter of the circle and mark the endpoints. (d) Now join the four points.What shape is formed? Check the sides of the quadrilateral and the angles obtained. Try with a different pair of diameters. What do you notice about the shape that is formed? Is it possible to create a 4-sided shape other than a rectangle through this process?
Sol: What Shape is Formed?
When you join the four points, you get a quadrilateral ACBD.
This quadrilateral is a rectangle (in some cases, a square if the diameters are perpendicular and equal divisions).
Checking the Sides:
Opposite sides are equal (AB = CD and AC = BD).
The figure is symmetric about both diameters.
Checking the Angles:
Each interior angle is 90°.
So the quadrilateral is a rectangle (and sometimes a square if the diameters are perpendicular).
Trying with Different Pairs of Diameters:
No matter which diameters you draw, the figure formed is always a rectangle (or a square).
This is because diameters always pass through the centre, and opposite points on a circle are always symmetric.
Can a 4-sided Shape Other Than a Rectangle Be Formed? No.
Any quadrilateral formed by joining the endpoints of two diameters of a circle will always be a rectangle (or a square as a special case).
It cannot be any other quadrilateral like a trapezium, parallelogram (non-rectangle), or rhombus.
Cube
A cube is a 3D shape with 6 square faces (flat surfaces).
All the faces of a cube are equal in size and shape, and all angles are 90°.
A cube has 12 edges (the sides where two faces meet) and 8 vertices (corners where edges meet).
The length, width, and height of a cube are all the same, making it a regular shape.
A cube is like a box—you can think of dice as an example of a cube.
Surface Area of a cube is the area of all 6 faces added together.
Volume of a cube is found by multiplying the length, width, and height (since all are equal, it’s simply side³).
Cube Connections
Here are some big, solid cube frames. How many small cubes have been removed from each cube?
Sol: (a) First set
The cube is 4 × 4 × 4.
Total small cubes = 64.
From each face, 1 cube is removed from the centre.
There are 6 faces, so 6 cubes are removed.
(b) Second set
The cube is 6 × 6 × 6.
Total small cubes = 216.
From each face, 4 cubes are removed (a 2 × 2 square in the centre).
6 faces × 4 cubes = 24 cubes removed.
(c) Third set
The cube is 8 × 8 × 8.
Total small cubes = 512.
From each face, 16 cubes are removed (a 4 × 4 square in the centre).
6 faces × 16 cubes = 96 cubes removed.
Icosahedron and Dodecahedron
An icosahedron is a 3D shape with 20 triangular faces. All its faces are equilateral triangles, meaning all sides are equal.
A dodecahedron is a 3D shape with 12 pentagonal faces. Each of its faces is a regular pentagon, meaning all sides and angles are equal.
Both icosahedron and dodecahedron are types of Platonic solids, which means their faces are made up of identical regular polygons.
An icosahedron has 30 edges and 12 vertices.
A dodecahedron has 30 edges and 20 vertices.
These shapes can be made by folding a 2D net into a 3D solid, and they have a special symmetry in geometry.
Let us find out
Use the nets provided at the end of the book to make icosahedron and dodecahedron models.
1. What shapes do you see in an icosahedron and a dodecahedron? Icosahedron: …….. Dodecahedron: ……..
2. Do all the faces look the same? Icosahedron: …….. Dodecahedron: ……..
3. How many faces meet at a vertex (point)? Icosahedron: …….. Dodecahedron: ……..
4. Do the same number of faces meet at each vertex? Icosahedron: …….. Dodecahedron: ……..
5. How many edges do you see? Icosahedron: …….. Dodecahedron: ……..
Sol:
1. Icosahedron: Triangles Dodecahedron: Pentagons
2. Icosahedron: Yes Dodecahedron: Yes
3. Icosahedron: 5 Dodecahedron: 3
4. Icosahedron: Yes Dodecahedron: Yes
5. Icosahedron: 30 Dodecahedron: 30
How did you count them such that you do not miss out any edge or count an edge twice? Sol: I counted by looking at one face at a time and then checking how many new edges appeared as I moved around the shape. I also remembered that every edge belongs to exactly two faces, so I did not count the same edge twice.
Can you think of any other solid shapes that have faces that look the same? Sol: Yes. A cube has 6 square faces that are all the same. A tetrahedron has 4 triangular faces that are all the same. An octahedron has 8 triangular faces that are all the same.
Do the same number of faces meet at each common vertex? Sol: Yes. In both the icosahedron and the dodecahedron, the same number of faces meet at every vertex. That is why they are called regular solids.
You can also build some 3-D shapes using straws or ice-cream sticks and clay or play-dough. Which shapes did you make? Sol: I made a cube, a triangular prism, and a pyramid using straws and clay.
This chapter will help you learn and understand multiplication in many different ways. There are stories, examples, and many ways to multiply numbers which will make your calculations easier and faster. You will see how multiplication helps in our daily life, especially on a dairy farm!
Multiplication is a method of adding the same number over and over again. It helps us find out how much we have in total when we have many groups of the same size.
What is Multiplication?
Suppose you have 3 bags, and each bag has 4 apples. If you want to know how many apples you have in total, you can add:
4 + 4 + 4 = 12
But instead of adding many times, we can use multiplication:
3 bags × 4 apples in each bag = 12 apples
So, multiplication makes our work much quicker and easier!
The Parts of Multiplication
The number of groups: 3 bags
The number in each group: 4 apples
The answer (total): 12 apples
We write it as:
3 × 4 = 12
‘×’ means ‘times’ or ‘groups of’
Order of Numbers in Multiplication
Daljeet Kaur arranges butter packets different ways:
What pattern do you notice?
3 × 2 = 6
2 × 3 = 6
Pattern: Changing the order of numbers does not change the answer.
Think 20 × 5 = 100, then subtract 2 × 5 =10, so 100-10=90.
Therefore, All ways are correct! Multiplication can be done in many ways to make calculation easier.
Doubling and Halving
Butter packets are arranged in the following ways. Let us find some strategies to calculate the total number of packets.
Key Trick:
Halving one number and doubling the other does not change the product.
This method is extremely useful when multiplying with numbers like 4, 8, 5, 25, or 50.
Nearest Multiple
When a number is close to a multiple that is easy to multiply with, use that:
Example:
Here, 20 is close to 19, and multiplying with 20 is alot easier, so we multiply 4 x 20 instead of 4 x 19, because multiplying with 19 is very hard. Now, see the figure, when we multiply 4 with 20, we actually added 1 more column of 4 squares. So, we get extra 4 squares, we need to subtract these squares after multiplying 4 x 20 to get the result of 4 x 19.
This method is useful if one of the numbers is close to a multiple of 10, like 19, 99, etc.
Waste and Composting
A family makes 35kg waste in one month. How much waste will the family produce in a year?
Quantity of kitchen waste in 1 month is 35 kg.
Quantity of kitchen waste in 12 months is 12 × 35 kg
Lets calculate this number
Different Ways to Multiply:
1. Nida’s solution
Lets understand what Nida did:
Nida split the numbers in 2 parts: 35 = 30 + 5, 12 = 10 + 2 and then she multiplied these numbers.
This method splits the numbers into parts, multiplies each pair, and then adds everything together. It’s based on the distributive property:
Lets see how it works
(10+2)×(30+5)=(10×30)+(10×5)+(2×30)+(2×5)
= (10×30)+(10×5)+(2×30)+(2×5)
=300+50+60+10=420
2. Kanti’s solution
Lets understand what Kanti did:
10. Multiplication Using Place Value
When we multiply large numbers, we break them into parts using their place value.
Example:
574 × 125
574 × 100
574 × 20
574 × 5 Add up the answers.
This is called the expanded form method, or Mili’s father’s method.
11. Practice Problems
You get to practice multiplying using different methods:
Using breaking into parts (expanded form method)
Using doubling and halving
Using nearest multiple
Changing the order of numbers
Example Problems:
Multiply: 78 × 4, 83 × 9, 86 × 3, 94 × 5, etc.
Solve word problems based on multiplication
12. Dairy Cooperative ExamplesHow Many Cows?
If 1 villager has 4 cows, and there are 268 villagers: Total cows = 268 × 4 = 1,072
How Much Milk?
453 Gir cows, each cows gives 13 litres: Total milk = 453 × 13 = 5,889 litres
How Much Ghee Sold?
1kg ghee = ₹574
125kg produced = 574 × 125 = ₹71,750
13. Patterns in Multiplication
Multiplying by 10s and 100s adds 0s or two 0s to the product.
Multiplying in any order gives the same product (commutative).
Multiplying in parts, you can break any big number to smaller parts, multiply, and add.
14. The King’s Reward Story
3 ministers get different numbers of coins with different rules.
You must multiply and see which gives the most coins.
(Double, triple, or five times every day for 7 days)
Moral:
Multiplication grows very fast when we multiply every day!
15. Multiplication Patterns and Tricks
Look at how numbers and products change in patterns.
E.g., 11 × 11 = 121, 111 × 111 = 12,321
You can predict the next numbers using observed patterns.
16. Practice Section
Match multiplication problems to their answers
Find different ways to solve a multiplication
Some numbers are easier to multiply if broken down cleverly
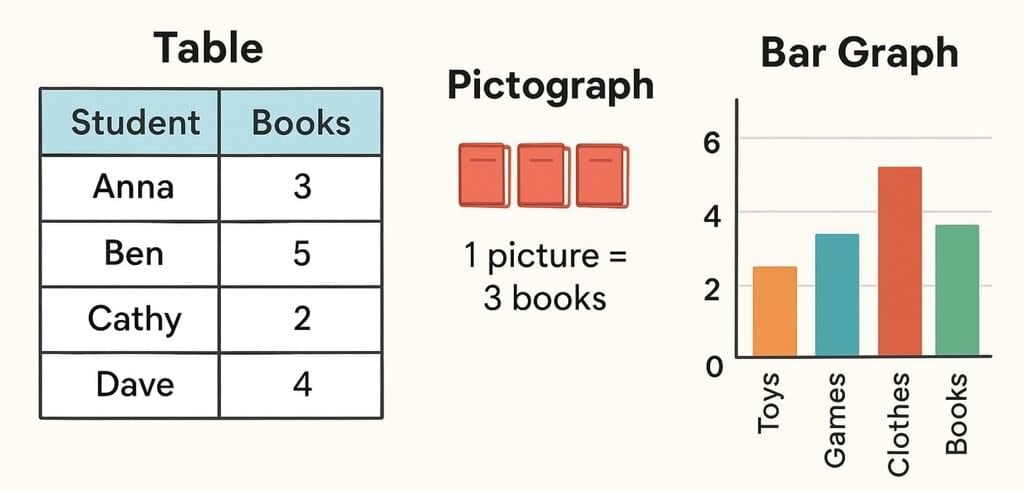

 The collected data was organised in a table, which shows how much time each child spends watching TV.
 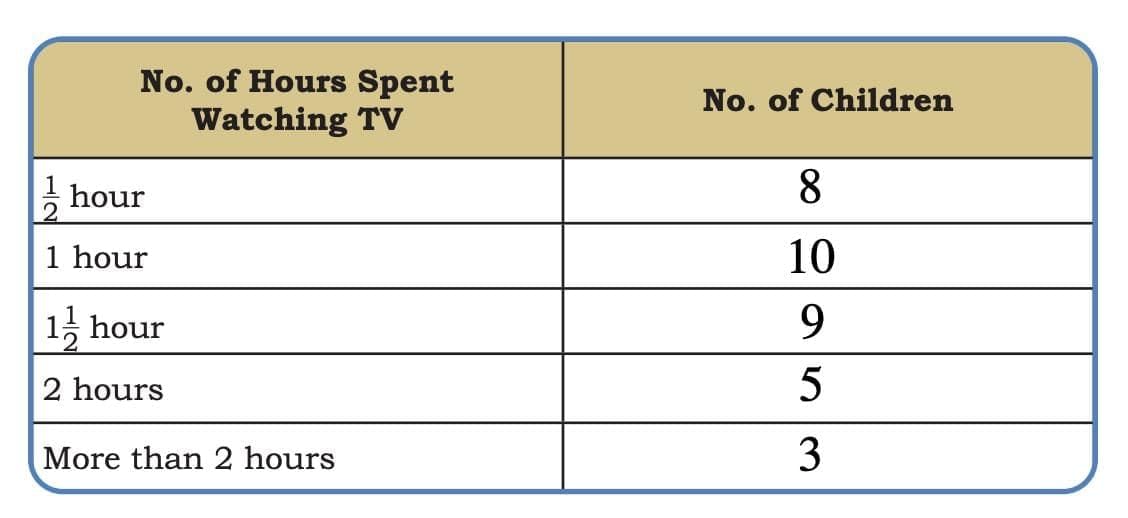 Based on this information, we will answer a few questions related to their TV viewing habits.
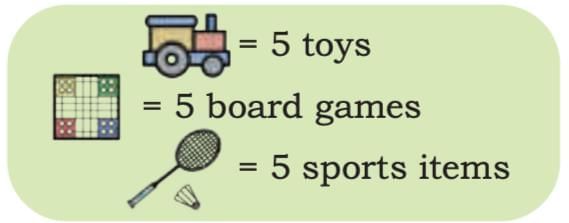
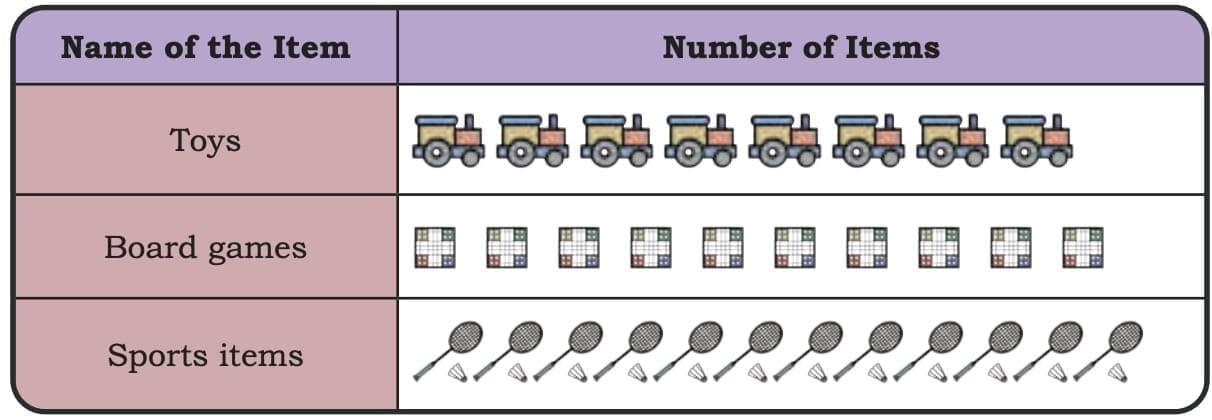
 Observe the pictograph and answer the following questions.
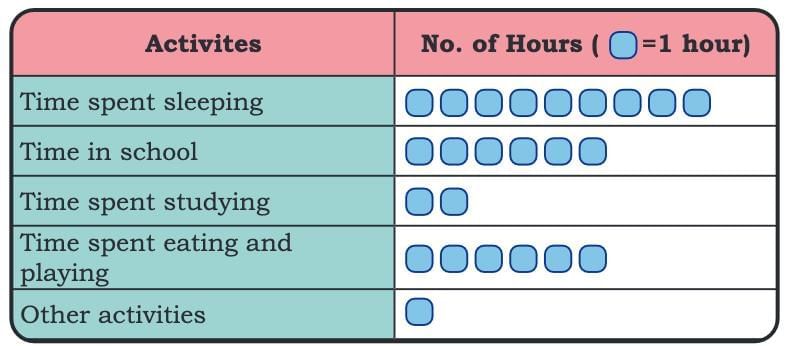 Sheela recorded her routine in the following manner:
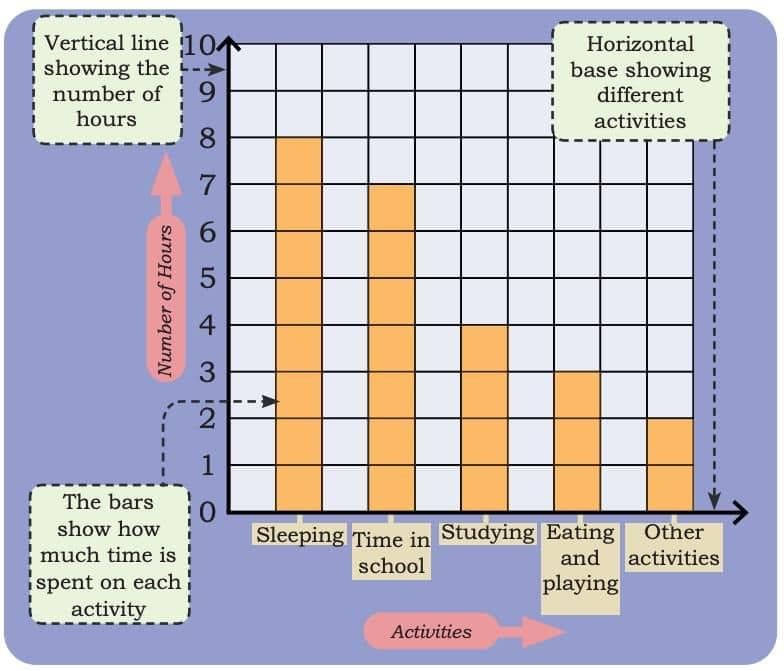 How is Sheela’s recording different from Raman’s recording?
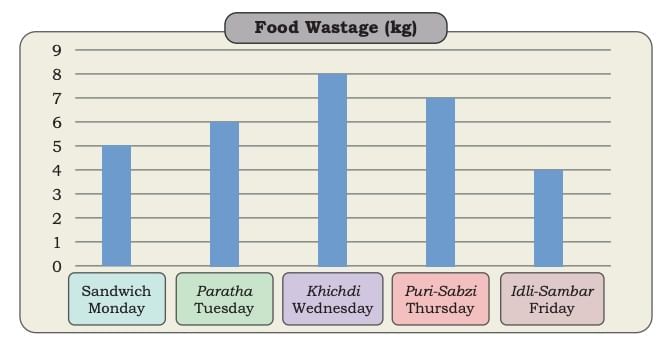 Rani was shocked to see the data. What do you think about food wastage? How can we reduce the wastage of food? What can we do with the leftover food?